The troubleshooting methods for the Flashforge Adventurer 5M series are based on the symptoms of the failure. Listed below are the commonest troubleshooting sub-topics.
Troubleshooting: Equipment Usage Issues
1. Filament Guide Tube Clogged.
Issue: During filament change, the filament cannot pass through the filament guide tube.
Cause 1: Uneven (inclined) surface of the filament end, making it get stuck at the filament detection position
Solution: Rotate the filament or trim the filament end, and then re-feed the filament.
Cause 2: Filament breaks off in the filament guide tube.
Solution: Remove the broken filament remains in the filament guide tube.
2. Filament Extrusion Issue.
Issue: 1. Under-extrusion; 2. No filament extrusion.
Cause:
- Filament tangles;
- Mismatched parameter settings;
- Nozzle clogged;
- Extruder clogged
Solution:
Step 1: Check if filament is tangled on the spool.
Step 2: Ensure the setting temperature of the nozzle matches the setting temperature of the current filament, and then perform filament loading. If no extrusion, remove the filament guide tube on the top of the extruder, hold the filament by hand, and push it downward to clear the blockage.
Step 3: If the above steps don’t work, use the provided unclogging pin tool to clear the nozzle.
Step 4: If the above steps don’t work, replace the nozzle.
Step 5: If the above steps still don’t solve the problem, check for extruder blockage.
3. No Extrusion on the First layer.
Cause: Distance too close.
Solution: Re-level.
4. Model Not Sticking to the Build Plate.
Cause:
- Build plate damaged or severe wear, resulting in an uneven surface;
- Oil stains on the build plate;
- Improper distance after leveling;
- Incorrect parameter settings
Solution:
Solution 1:
Step 1: Clean the build plate surface by removing the oil stains and filament residues.
Step 2: Clean the nozzle by removing the residues.
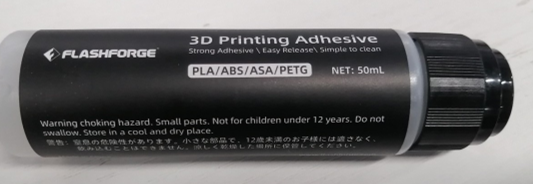
Step 3: Apply a thin layer of glue evenly across the entire build surface; The glue is provided with the machine, as shown below.
Step 4: Re-level and perform a test print. If the issue persists, please proceed to Solution 2.
Solution 2
Step 1: Update the firmware, enable leveling before printing, and conduct a test print.
Step 2: If Step 1 doesn’t work, slightly increase the bed temperature by 5-10℃ based on the corresponding filament. For example, for PLA filament, set the bed temperature to 55-60℃; for ABS filament, set the bed temperature to 110℃.
Step 3: If the above steps don’t work, manually raise the bed by 0.05-0.1mm during the first layer printing to reduce the distance between the nozzle and bed, thus improving adhesion.
Step 4: If the above steps still don’t solve the problem, please copy logs to a USB flash drive and contact customer support.
5. Nozzle Scraping Against the Built Plate.
Issues: After automatic leveling, the extruder is too close to the bed when printing the first layer, causing the nozzle to scrape against the build plate.
Cause: Filament residues at the nozzle tip or uncleared print bed.
Solution:
Step 1: Clean the nozzle and bed by removing the residues.
Step 2: Restart the printer and perform automatic leveling again.
Step 3: If the above steps don’t work, consider checking for firmware updates. Upgrade the firmware if a new version is available and retry.
Step 4: If the above steps still don’t solve the problem, please copy logs to a USB flash drive and contact customer support.
6. No Filament Extruded During Filament Loading.
Issue: During filament loading, there is no filament extrusion or filament cannot be fed downward.
Cause: 1. Improper extruder installation; 2. Mismatched parameter settings; 3. Nozzle clogged; 4. Extruder clogged.
Solution:
Step 2: Ensure the setting temperature of the nozzle matches the setting temperature of the current filament, and then perform filament loading. If no extrusion, remove the filament guide tube on the top of the extruder, hold the filament by hand, and push it downward to clear the blockage.
Step 3: If the above steps don’t work, use the provided unclogging pin tool to clear the nozzle.
Step 4: If the above steps don’t work, replace the nozzle.
Step 5: If the above steps still don’t solve the problem, check for extruder blockage.
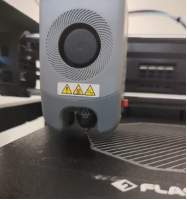
7. Extruder Clogged.
Issue: 1. No filament extrusion during printing;2. No filament extrusion during filament change (a creaking sound is produced when manually loading filament).
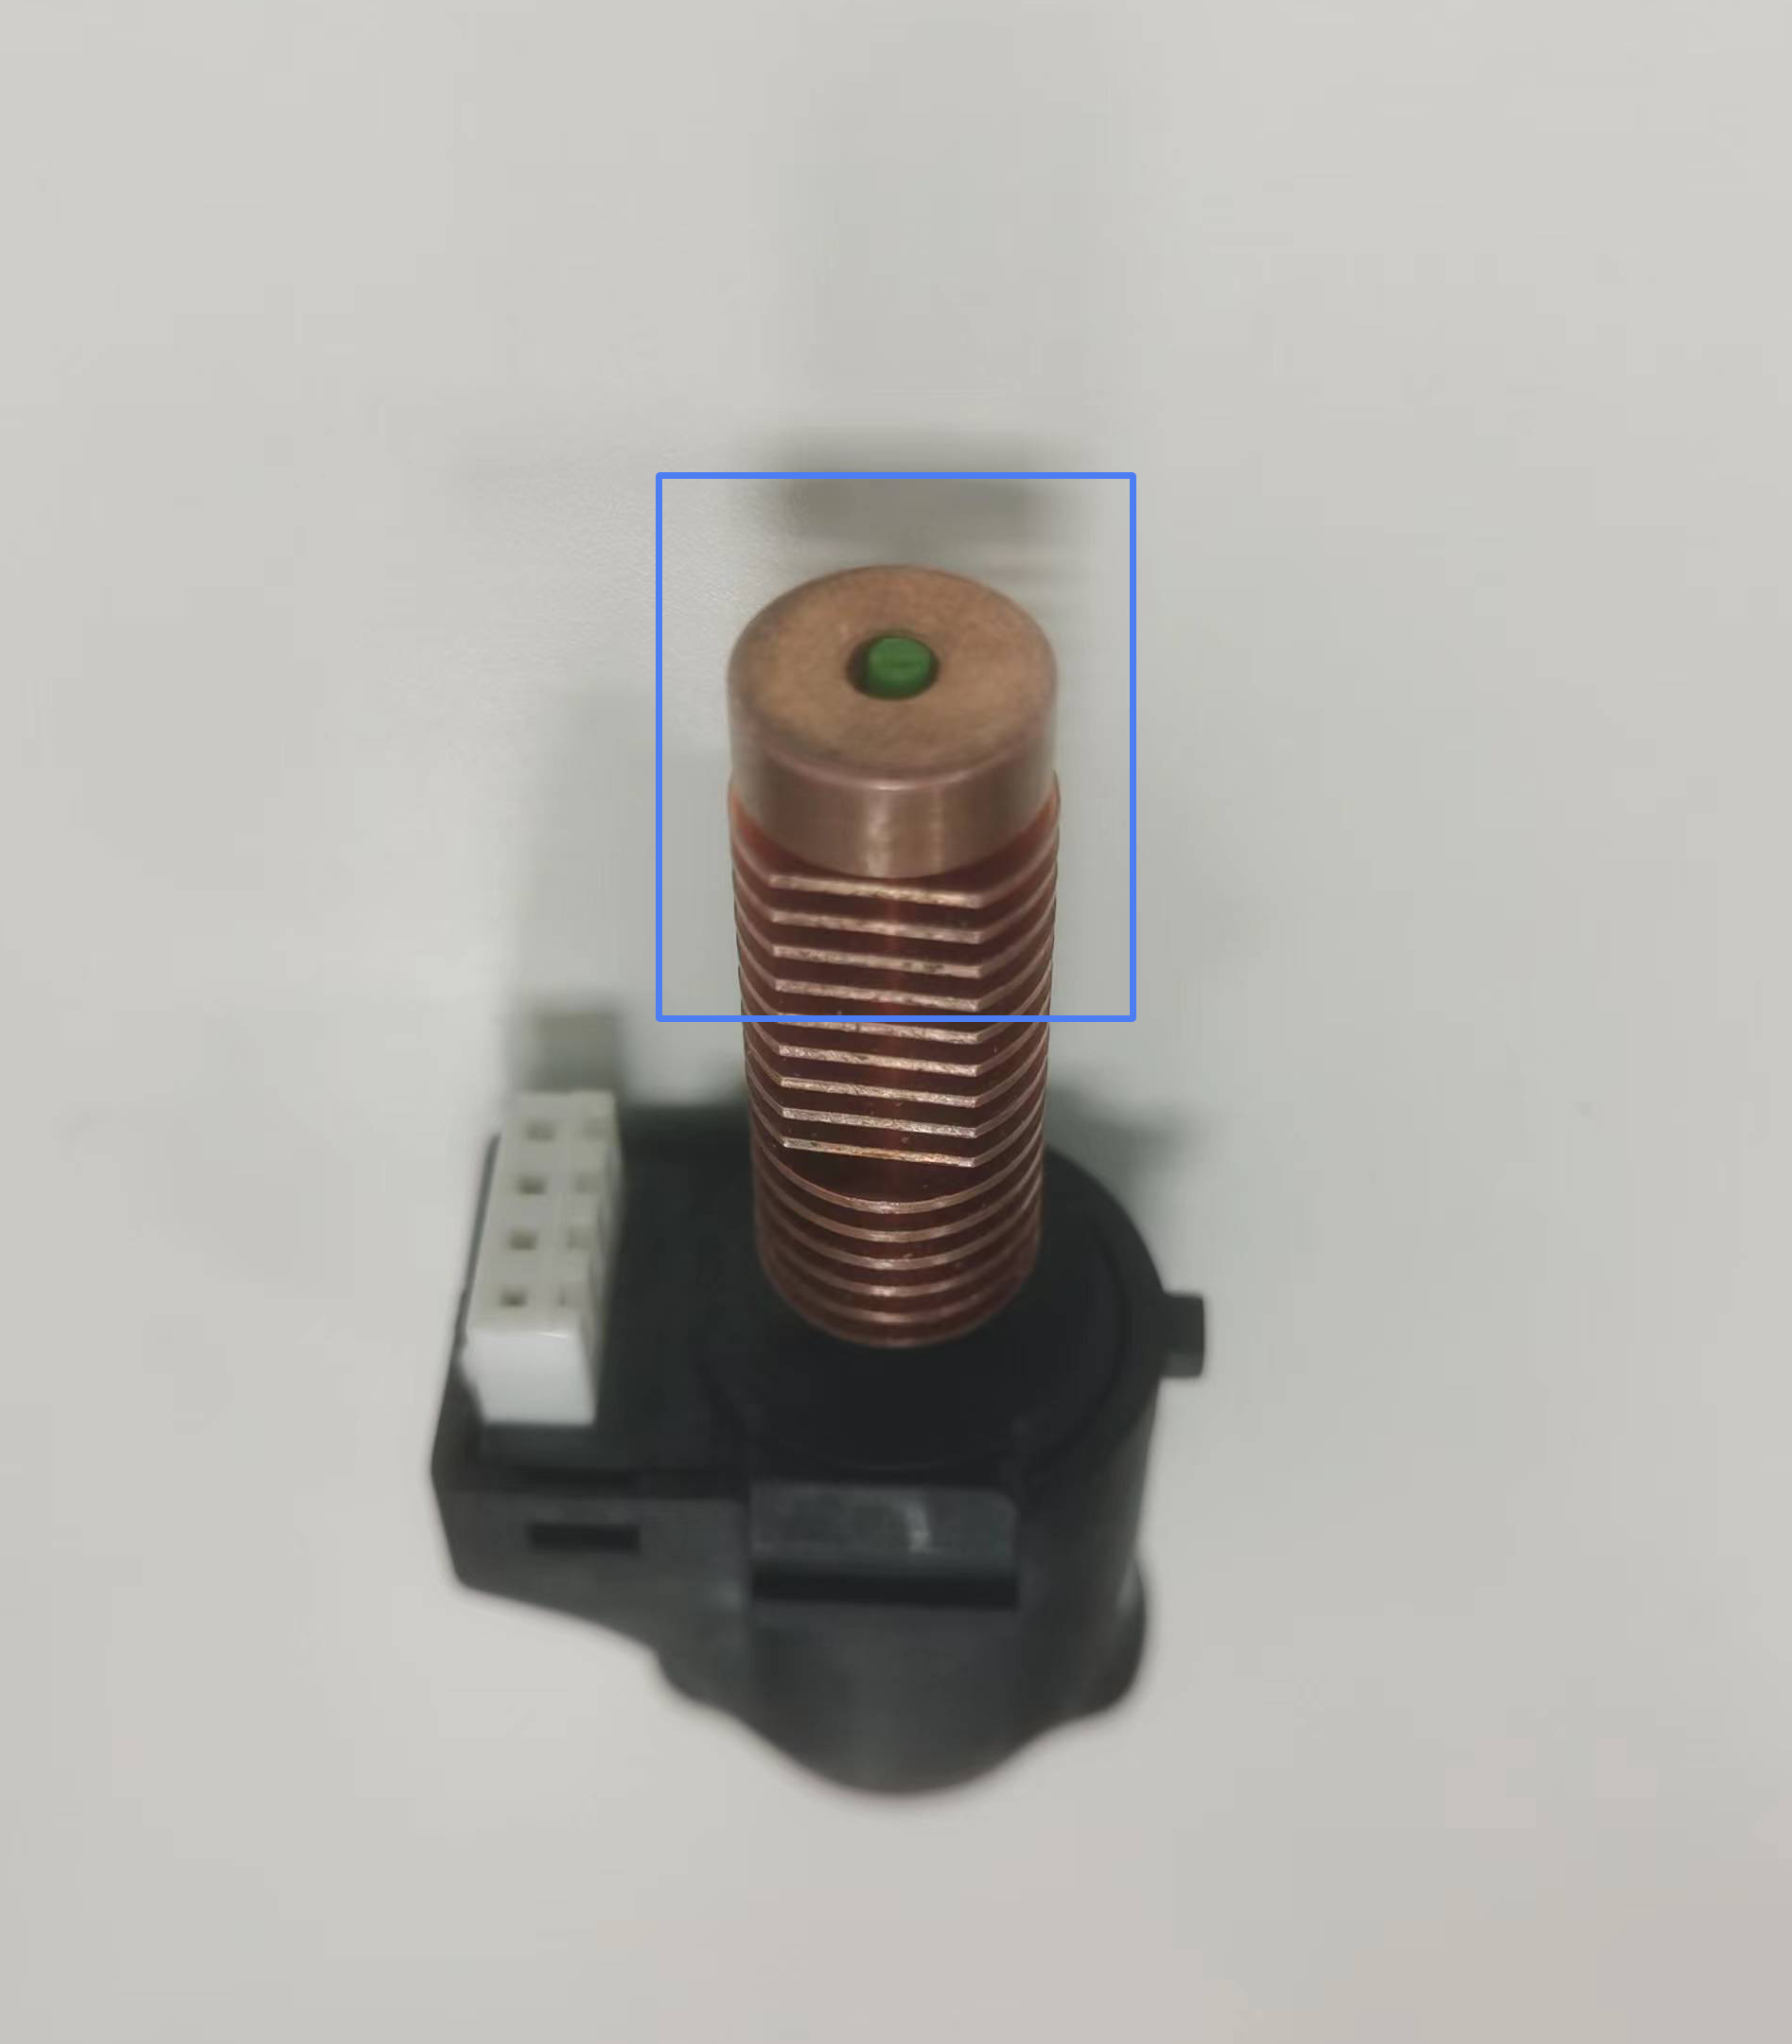
Cause: Extruder got clogged or the filament feeding gear of the extruder was slipping. Below is the position of the extruder.
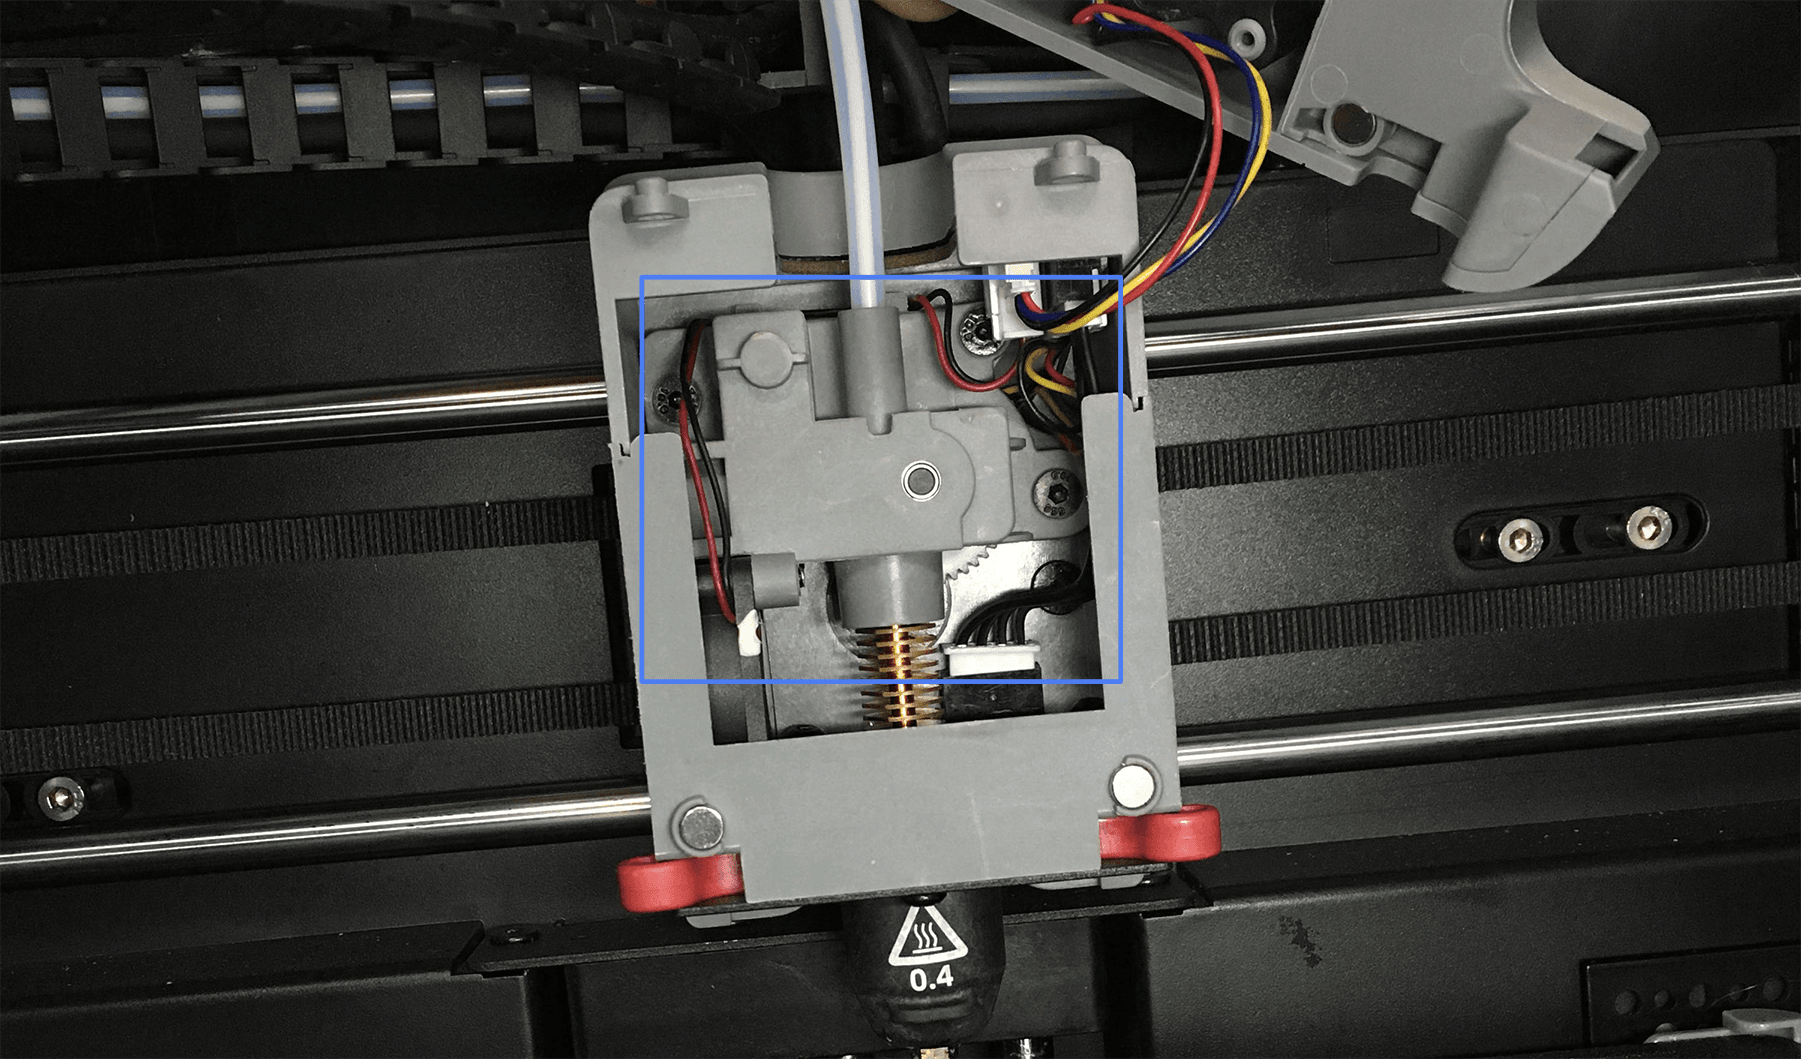
Solution: Check for extruder blockage and clear the feeding gear of the extruder. For how to disassemble and fix the extruder, you can refer to this video on Youtube:
Troubleshooting: Print Quality Problems
1. Under-extrusion During Printing
Cause 1: Impurities in the filament or mismatch between the model printing temperature and filament temperature
Solution:
- Replace the filament with a new one.
- Set the correct printing temperature based on the recommended temperature indicated on the filament box.
Cause 2: Carbonized filament buildup on the nozzle
Issue: During manual filament feeding, the extruded filament diameter is less than 0.45mm. The normal diameter shall be around 0.5±0.03mm.
Solution: Replace the nozzle.
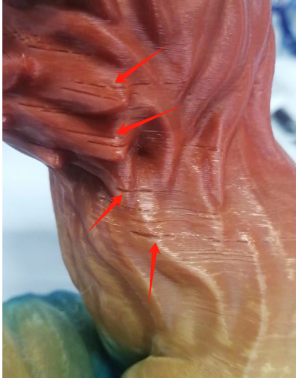
2. Layer Lines on 3D Prints
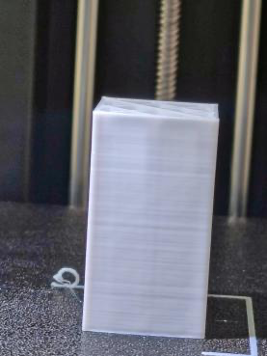
Cause 1: Z-axis movement is not smooth.
Issue: Abnormal noise or jamming during Z-axis up-and-down movement.
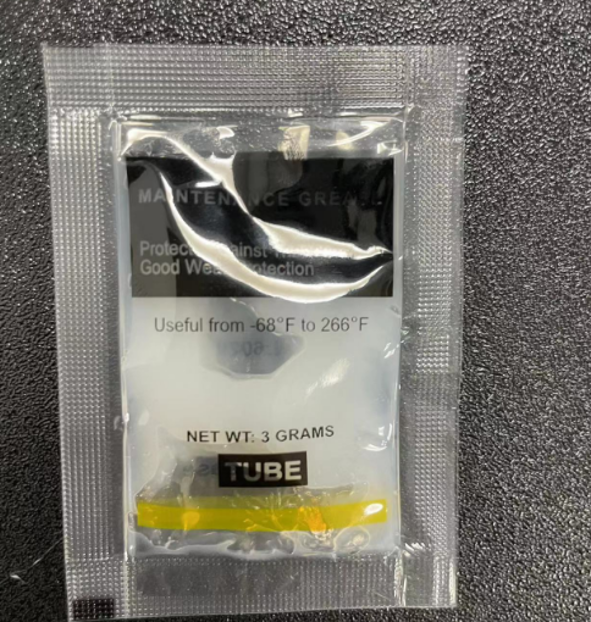
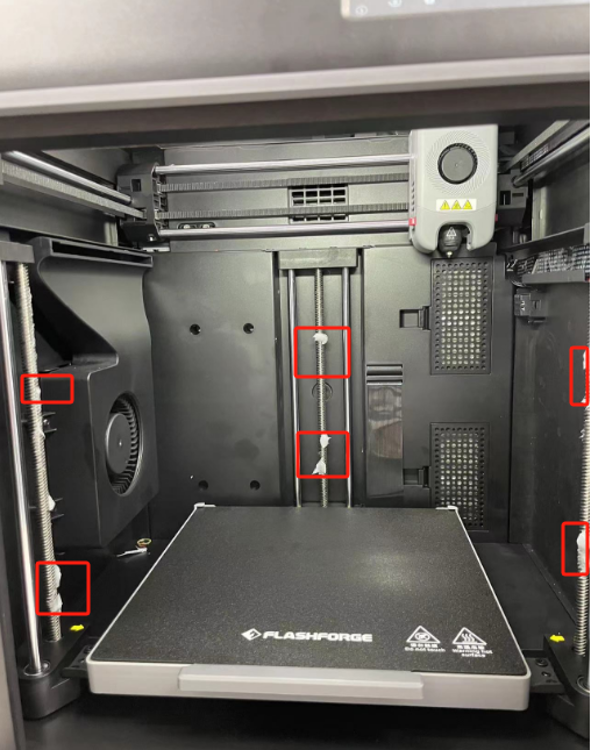
Solution: Apply grease to the Z-axis lead screw.
Step 1: Open the grease and home XYZ.
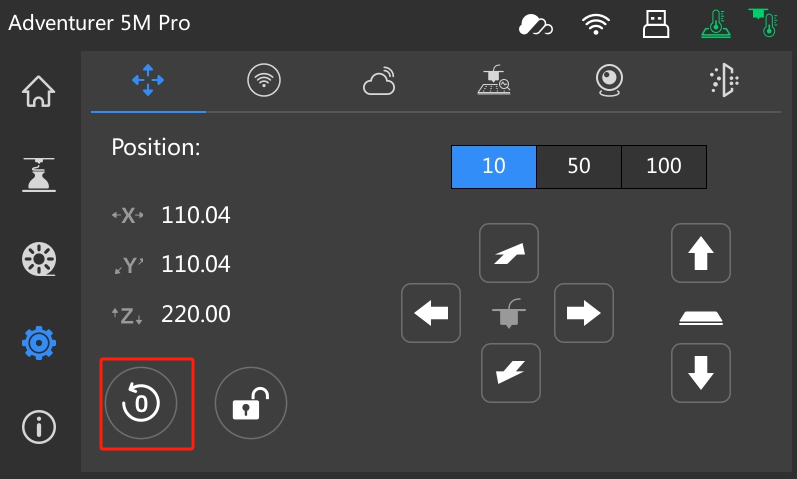
- Step 2: Apply grease to the Z-axis lead screw, ensuring even coverage.
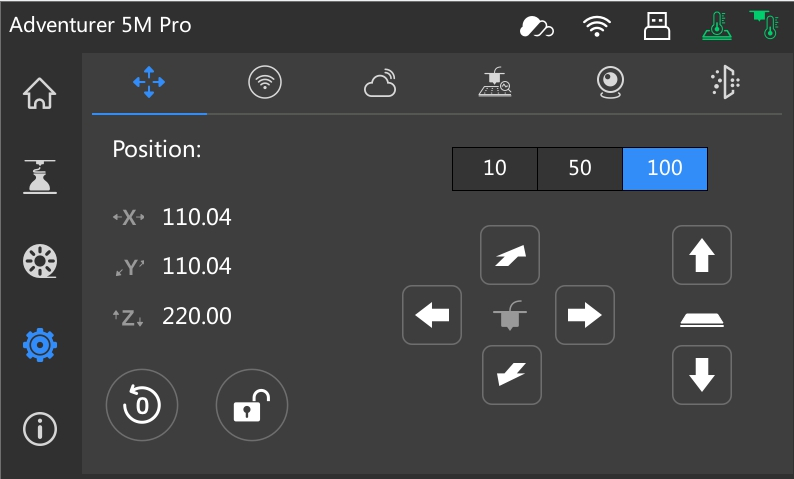
- Step 3: Click to raise the bed (select 100 by clicking twice).
- Step 4: Apply grease under the bed.
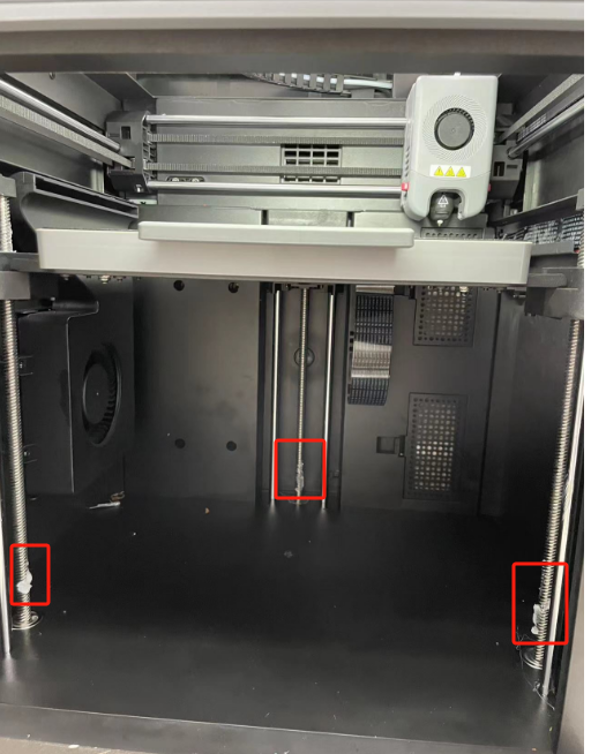
- Step 5: Click the homing button to evenly distribute the grease on the entire lead screw. Move up and down several times.

3. Ghosting & Ringing
Cause1: Insufficient belt tension
Solution 1:
- Step 1: Retighten the belt.
- Step 2: Perform calibration and vibration compensation again.
Solution 2:
- Reduce the acceleration using OrcaSlicer via Speed → Acceleration → Normal printing.

4. Droopy Overhangs
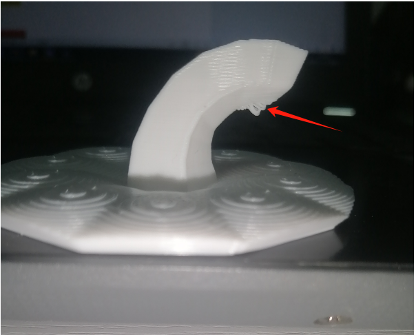
Cause 1: Overhangs at large angles
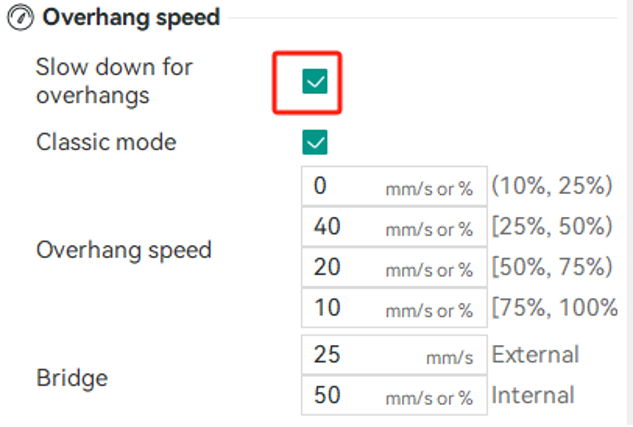
Solution 1: Enable “Slow down for overhangs” in OrcaSlicer.
Solution 2: Add supports for overhangs at an angle greater than 30°.
Solution 3: Increase the cooling fan layer time and reduce the minimum print speed in OrcaSlicer.
Cause 2: Malfunctioning cooling fan and auxiliary fan
Solution: Please refer to the video for instructions on [replacing the cooling fan and turbo fan](/en/adventurer-series/maintenance/ad5mseries-replace-the-turbo-fan-and-cooling-fan =650x).
5. Stringing
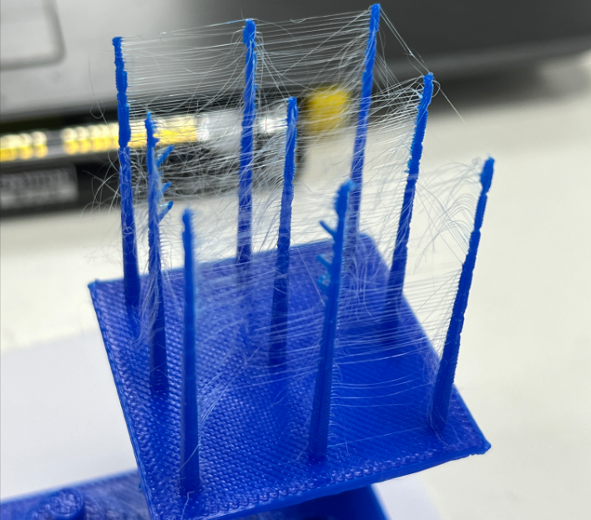
Cause 1: Filament that has absorbed moisture can become brittle and prone to breaking (especially for PLA, PETG, and ABS).
Solution: Dry or replace it with a newly unpacked filament.
Cause 2: Insufficient retraction
Solution: Use OrcaSlicer to increase the retraction amount and retraction speed appropriately, and enable “Retract on layer change” and “Wipe while retracting”.
Cause 3: Incorrect temperature setting
Solution: Adjust the extruder temperature.

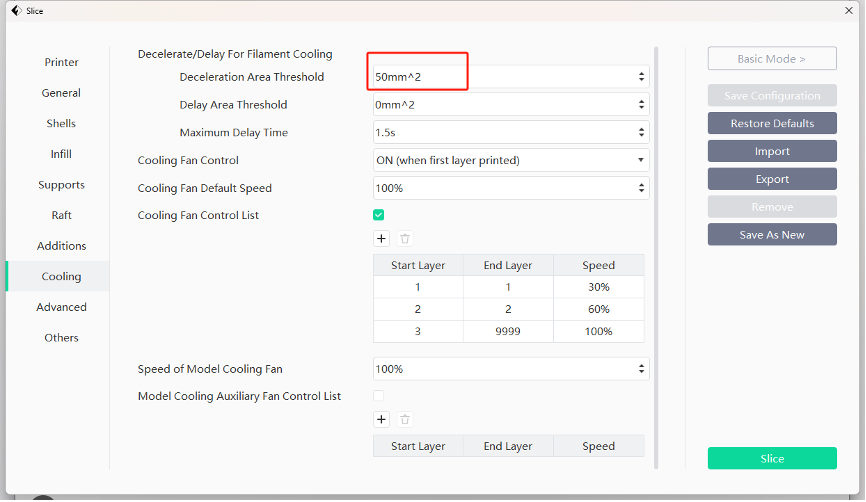
6. Roughness is Observed in Small Areas When Sliced Using FlashPrint5
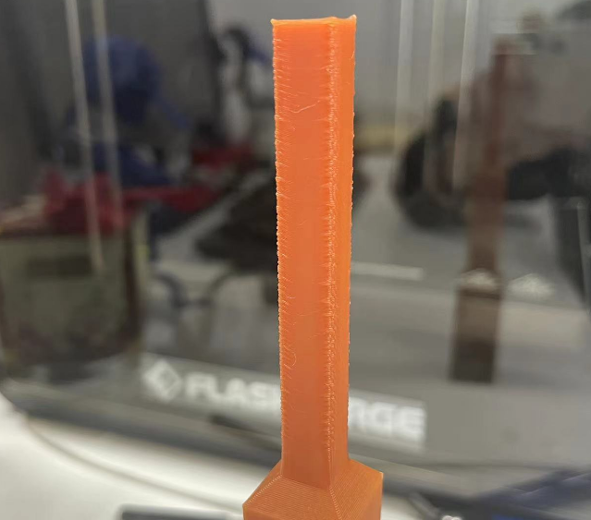
Cause: Model printing speed too fast, insufficient cooling
Solution 1: Reduce the print speed in the slicer.
Solution 2: Adjust the “Deceleration Area Threshold” in the slicer to make the printer automatically slow down for smaller areas of the model.
Troubleshooting: Equipment Hardware Issues
1. Bed Hitting the Extruder During Auto-leveling.
Cause: Filament residues at the nozzle tip or uncleared print bed.
Solution:
Step 1: Clean the nozzle and bed by removing the residues.
Step 2: Restart the printer and perform auto-leveling again.
Step 3: If the above steps don’t work, consider checking for firmware updates. Upgrade the firmware if a new version is available and retry.
Step 4: If the above steps still don’t solve the problem, please copy logs to a USB flash drive and contact customer support.
2. After Auto-leveling the Extruder Is Too Far Away from the Bed when Printing the First Layer.
Cause: Filament residues at the nozzle tip or uncleared print bed.
Solution:
Step 1: Clean the nozzle and bed by removing the residues.
Step 2: Restart the printer and perform automatic leveling again.
Step 3: If the above steps don’t work, consider checking for firmware updates. Upgrade the firmware if a new version is available and retry.
Step 4: If the above steps still don’t solve the problem, please copy logs to a USB flash drive and contact customer support.
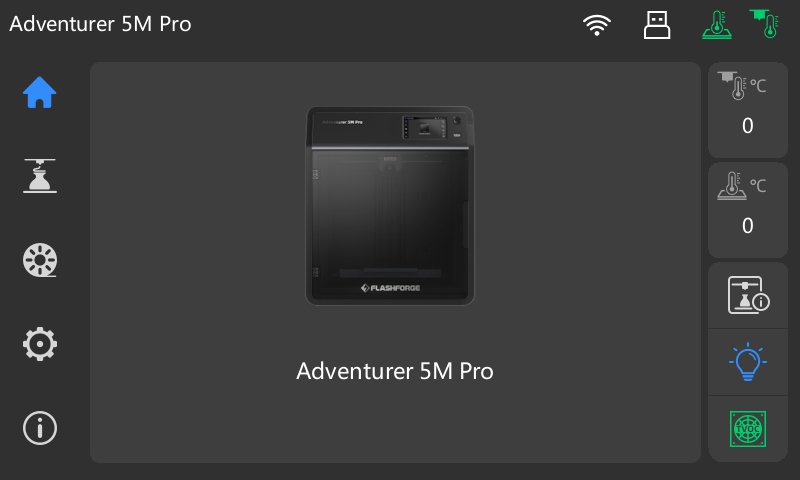
3. When Preheating the Extruder It Doesn’t Heat up or the Temperature Displays a Negative Value.
Cause: Firmware communication failure; Nozzle damaged or extruder cable in poor contact.
Solution:
Step 1: After powering on, check if the nozzle temperature display on the screen is normal. If it shows a negative or 0 value, restart the printer.
Step 2: If Step 1 doesn’t work, turn off the printer again, remove and reinstall the nozzle, and then restart the printer.
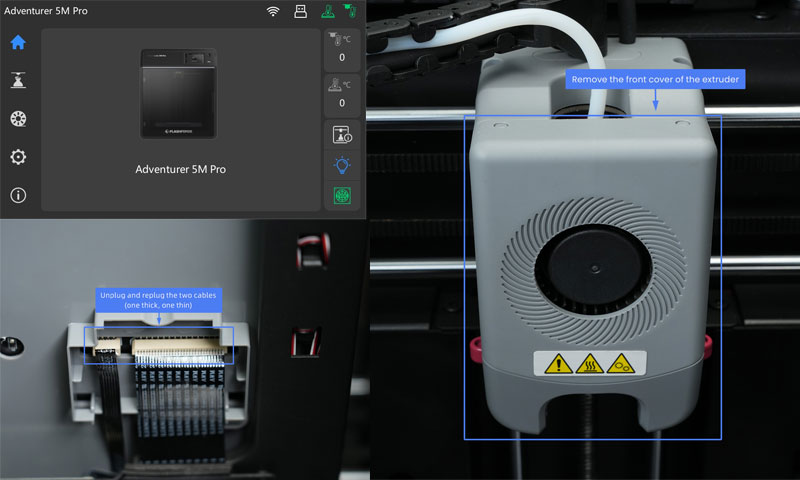
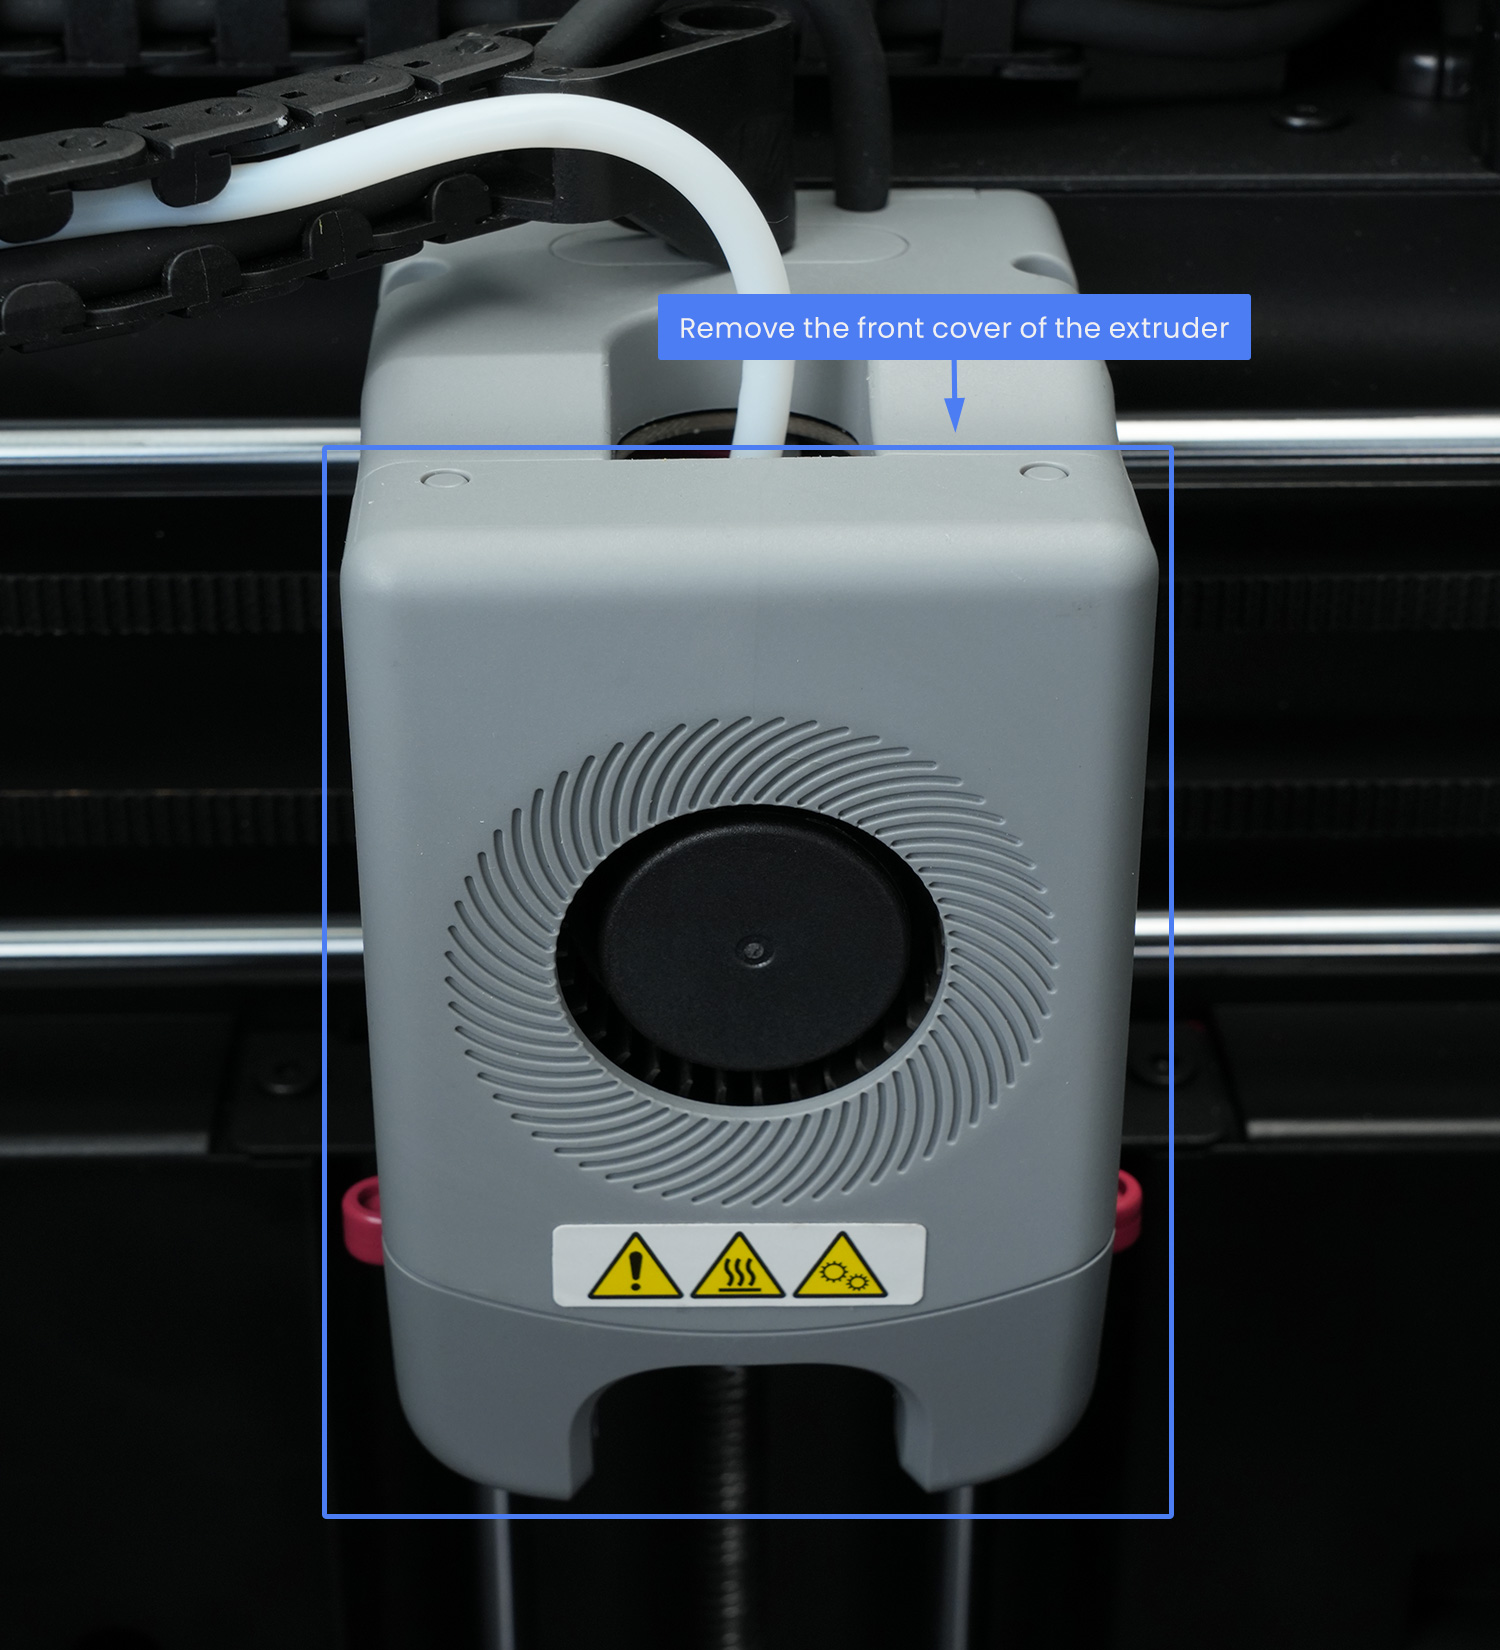
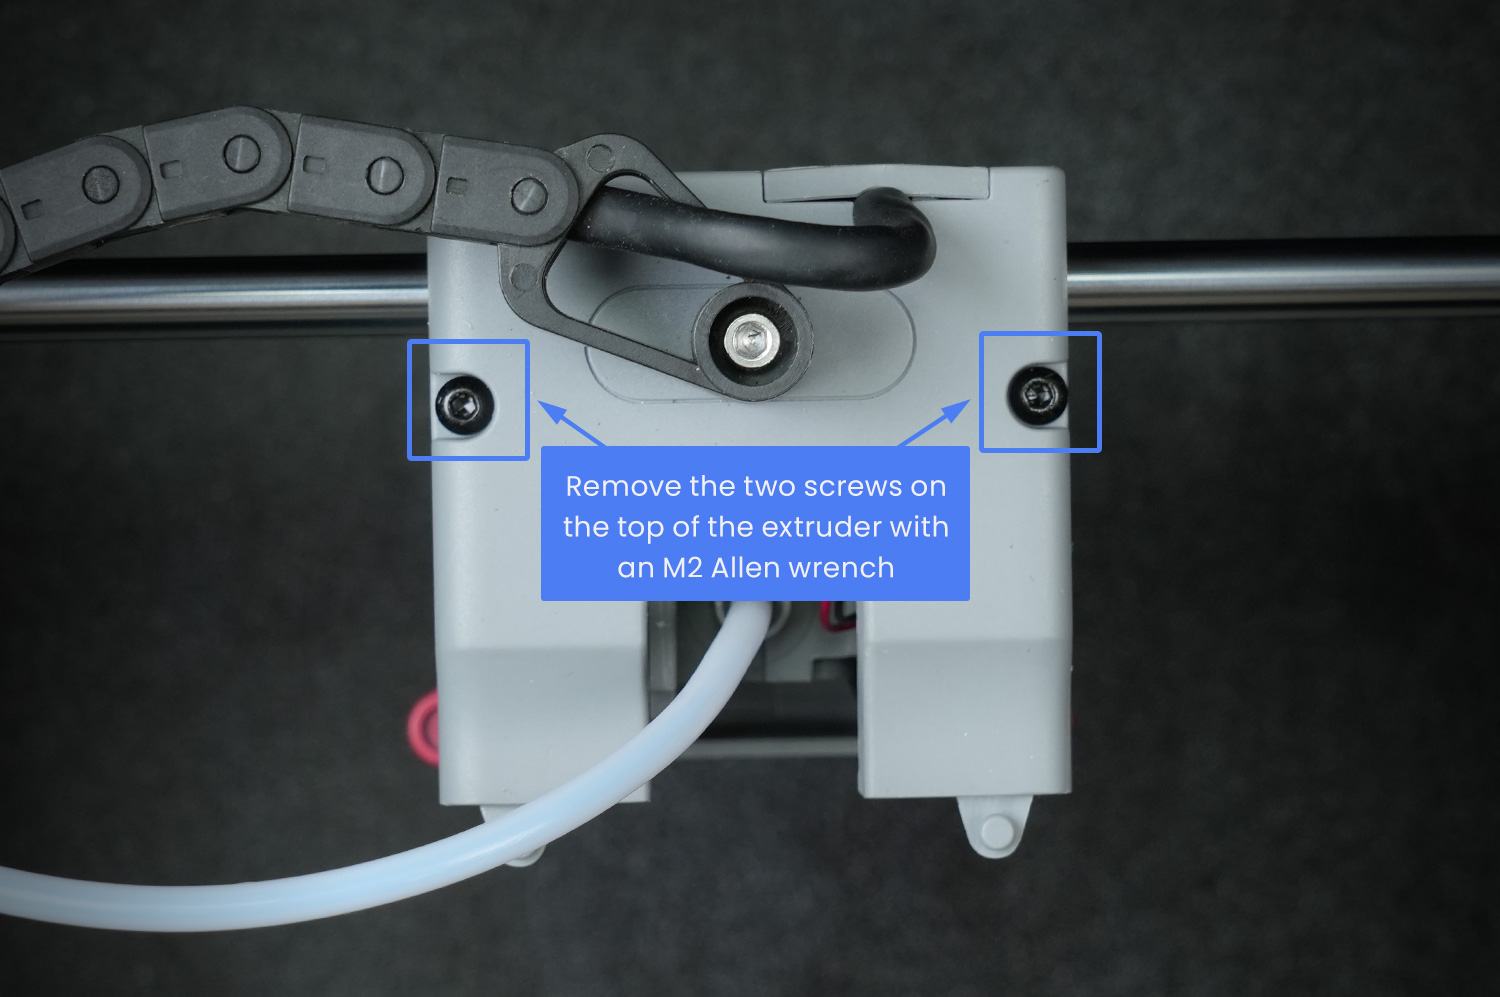
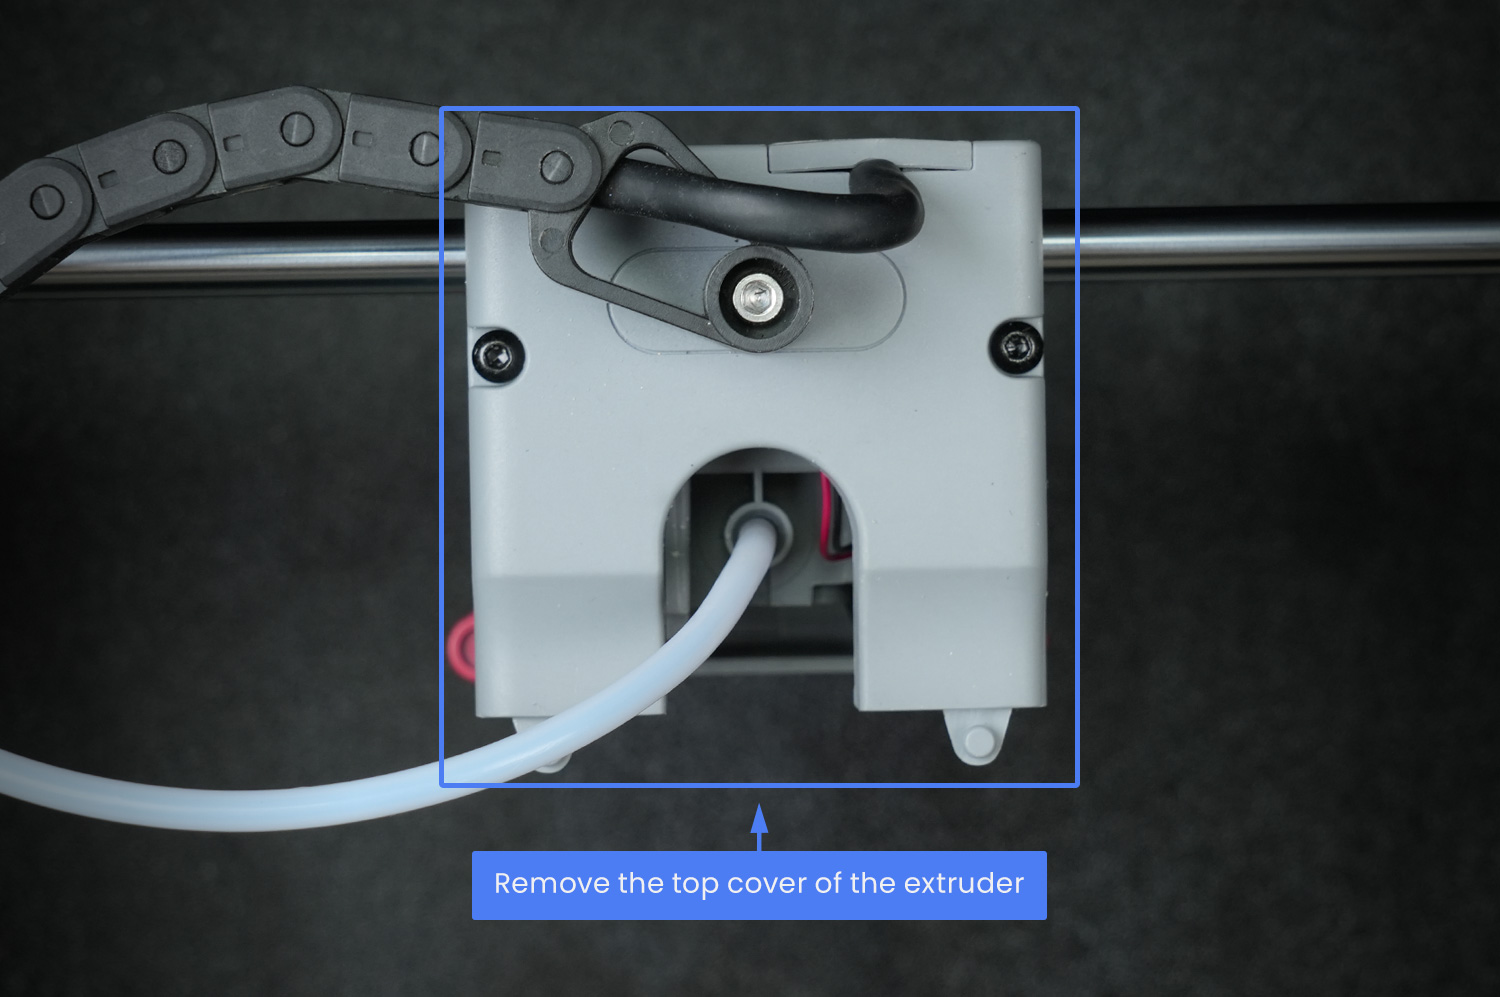
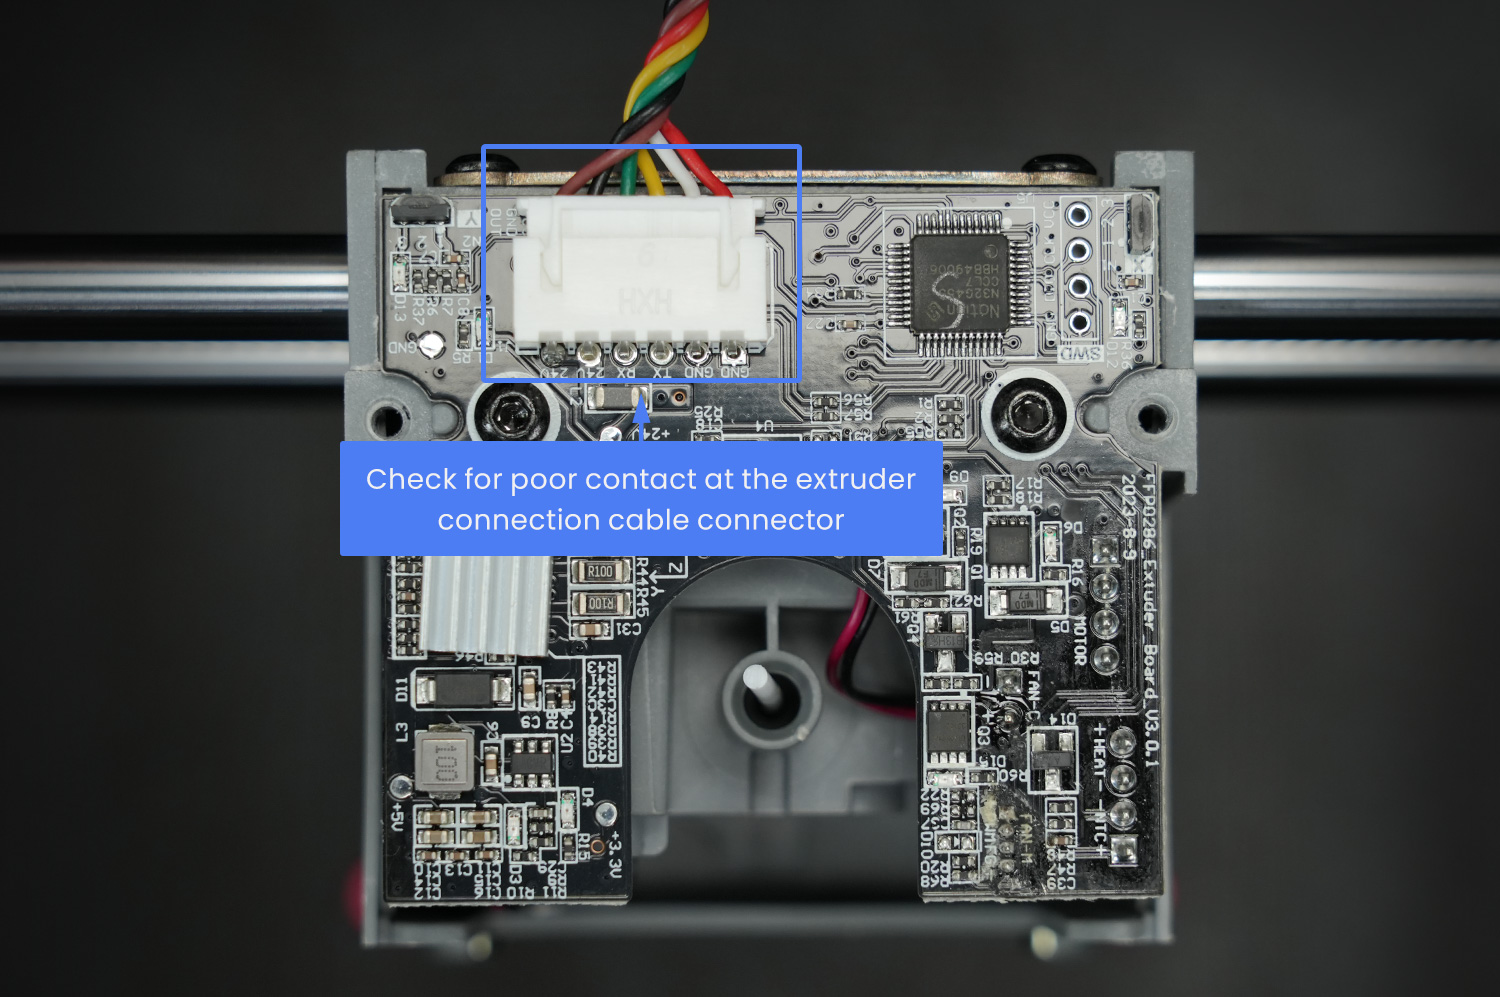
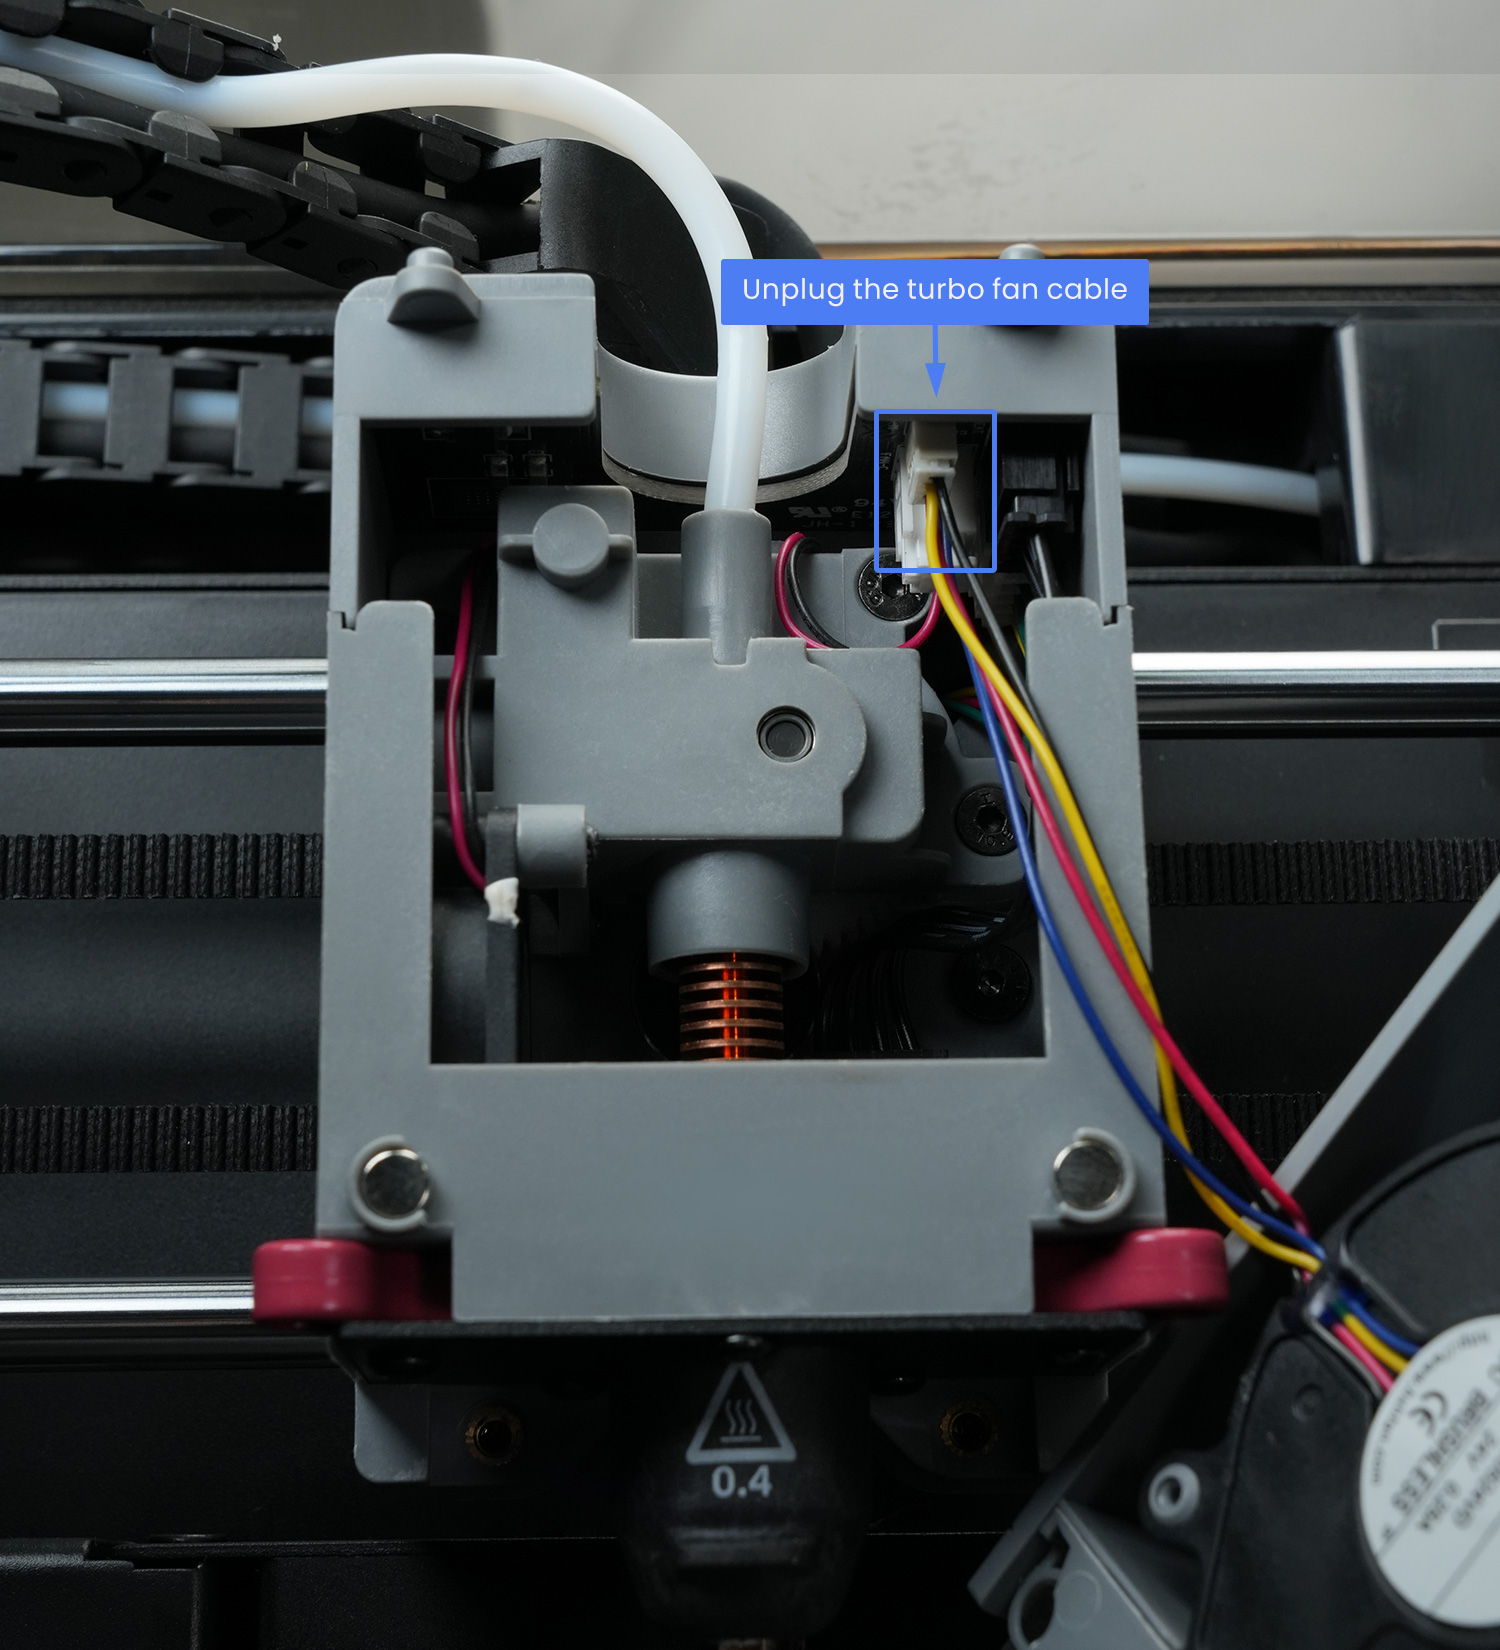
Step 3: If Step 2 doesn’t work, turn off the printer, open the top and rear covers of the extruder, and check for poor contact or damage to the extruder connection cable. If there’s poor contact, unplug and replug the extruder connection cable, and restart the printer.
Specific steps for checking the extruder connection cable are as follows:

Step 4: If the above steps don’t work, replace the nozzle.
Step 5: If the above steps still don’t solve the problem, please copy logs to a USB flash drive and contact customer support.
4. Insensitive Touchscreen: No Response When Clicking Menu Options.
Cause: Firmware communication failure.
Solution:
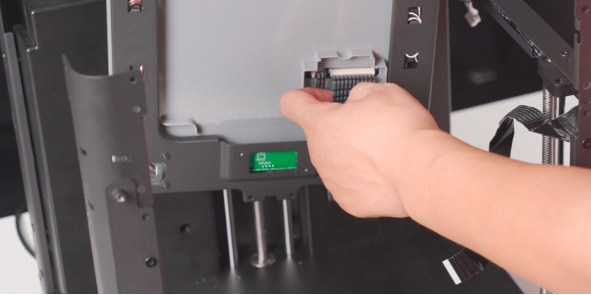
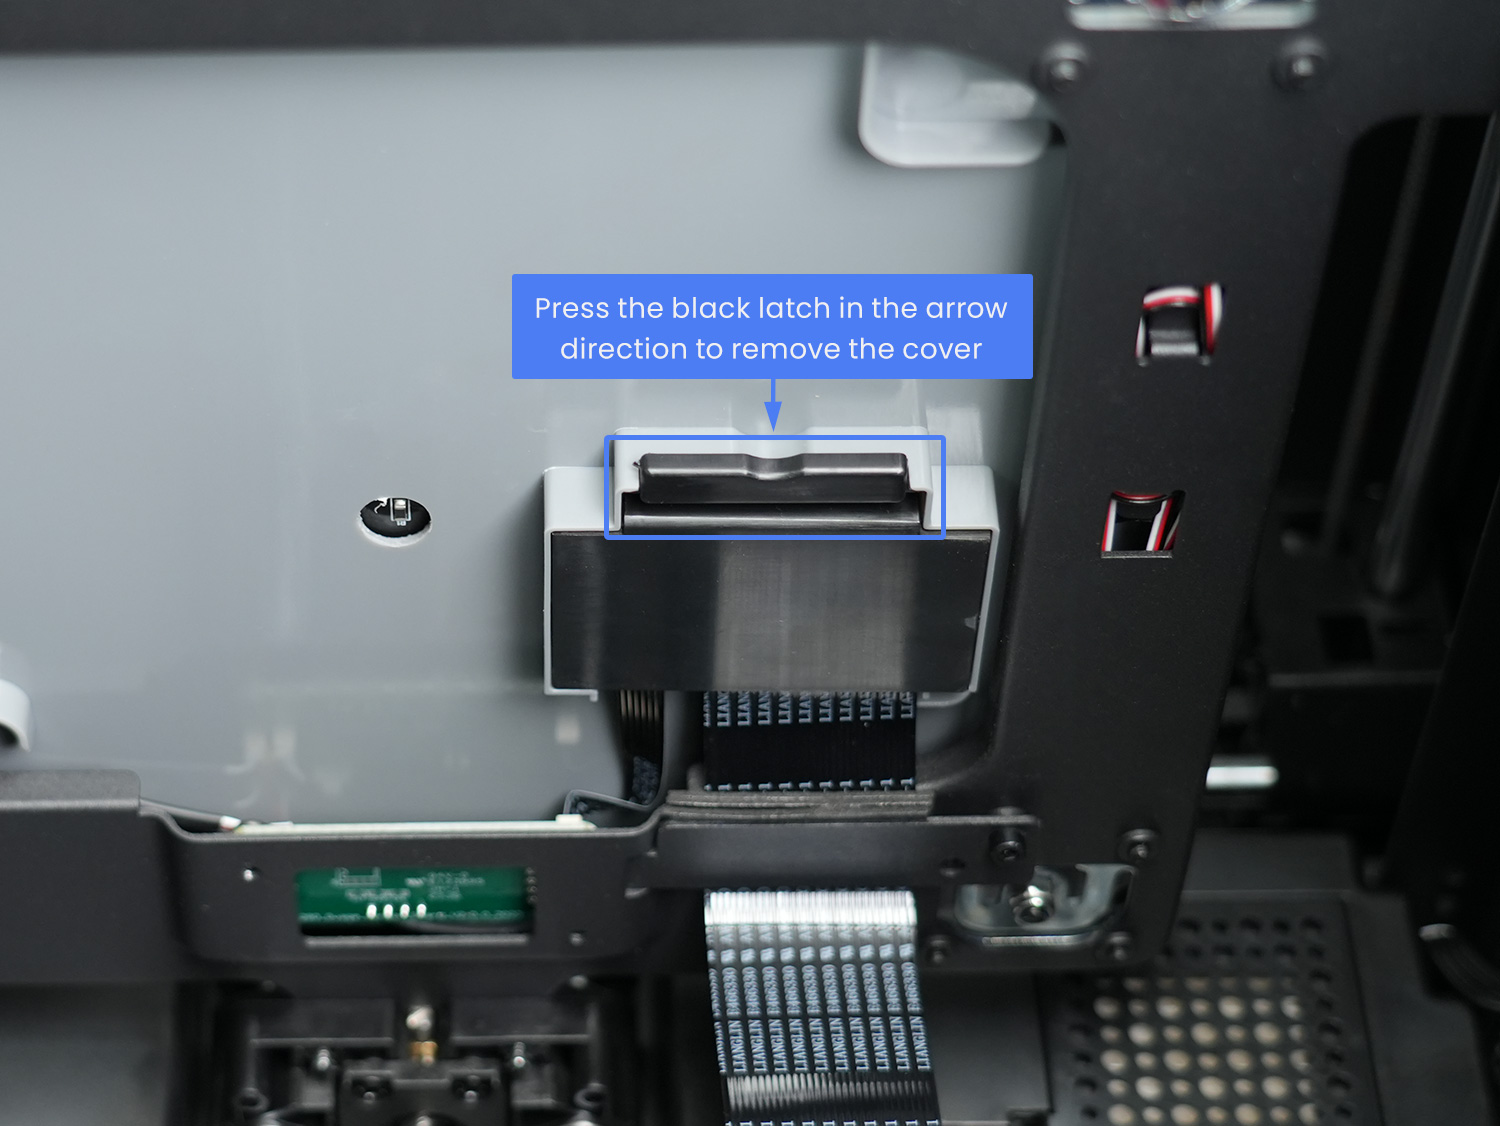
Step 1: Manually raise the bed to the maximum Z-axis height, unplug and replug the cable and other connection cables, and then confirm if the print bed functions normally. Below are steps for replugging.
Step 1: Remove the cable cover.
5. Bed Not Heating During Preheating.
Cause: Poor cable connection or faulty bed heating assembly.
Solution 1: Restart the printer and check if it heats up normally.
Solution 2: Unplug and replug the cables.
Step 1: Manually raise the bed to the maximum Z-axis height, unplug and replug the cable and other connection cables, and then confirm if the print bed functions normally. Below are steps for replugging.
Step 1: Remove the cable cover.

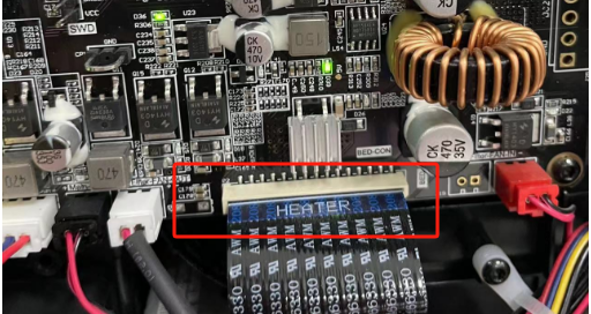
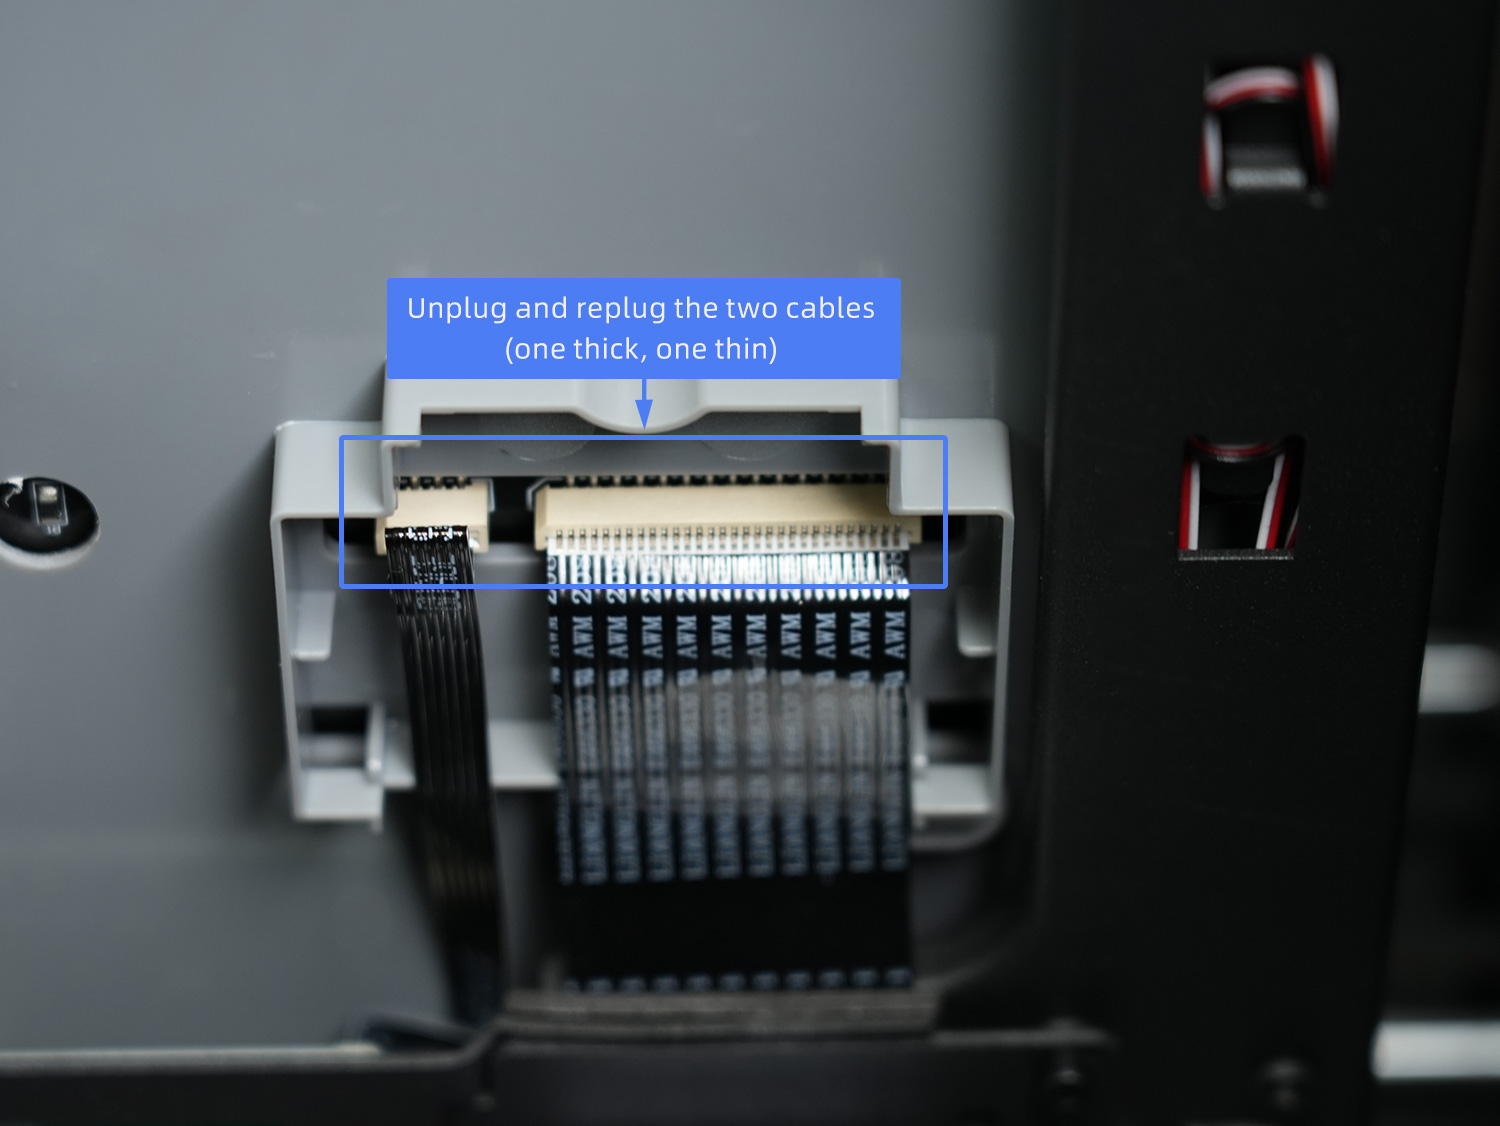
Step 2: Unplug and replug the cable
Step 3: Unplug and replug the motherboard cable (remove all screws on the back panel of the printer).
6. Magnetic Bed Sticker Unstuck and Warped.
Cause: Sticker adhesive failure
Usage Tips: When printing high-temperature models, please remove it after the bed cools down.
Solution: Replace the aluminum substrate and magnetic sticker.View Replacement Guide [ad5mseries-replace-the-platform-heating-plate&heating-plate-cable](/en/adventurer-series/maintenance/ad5mseries-replace-the-platform-heating-plate&heating-plate-cable =650x).
7. Printer Stops / Extruder stops Mid-print/ Screen Unresponsive.
Cause: Abnormal firmware; this issue is optimized in the latest beta firmware.
Solution:
Step 1: Restart the printer and try again.
Step 2: If the issue persists, please update to the latest firmware.
Step 3: If the issue persists, please provide us with logs for assistance.
8. Sizzling Noise During Bed Preheating.
Cause: Part misalignment
Solution: Loosen the four bolts under the print bed and re-tighten. Please use the model below to print the disassembly tool.
leveling_nut_socket.stl
9. Both the Nozzle Temperature and Bed Temperature Displays as 0.
Cause: Extruder connection cable in poor contact or extruder board damaged, resulting in communication interruption between the motherboard and the extruder.
Solution:
Step 1: Restart the printer and observe if the same issue persists. If so, please proceed to Step 2.
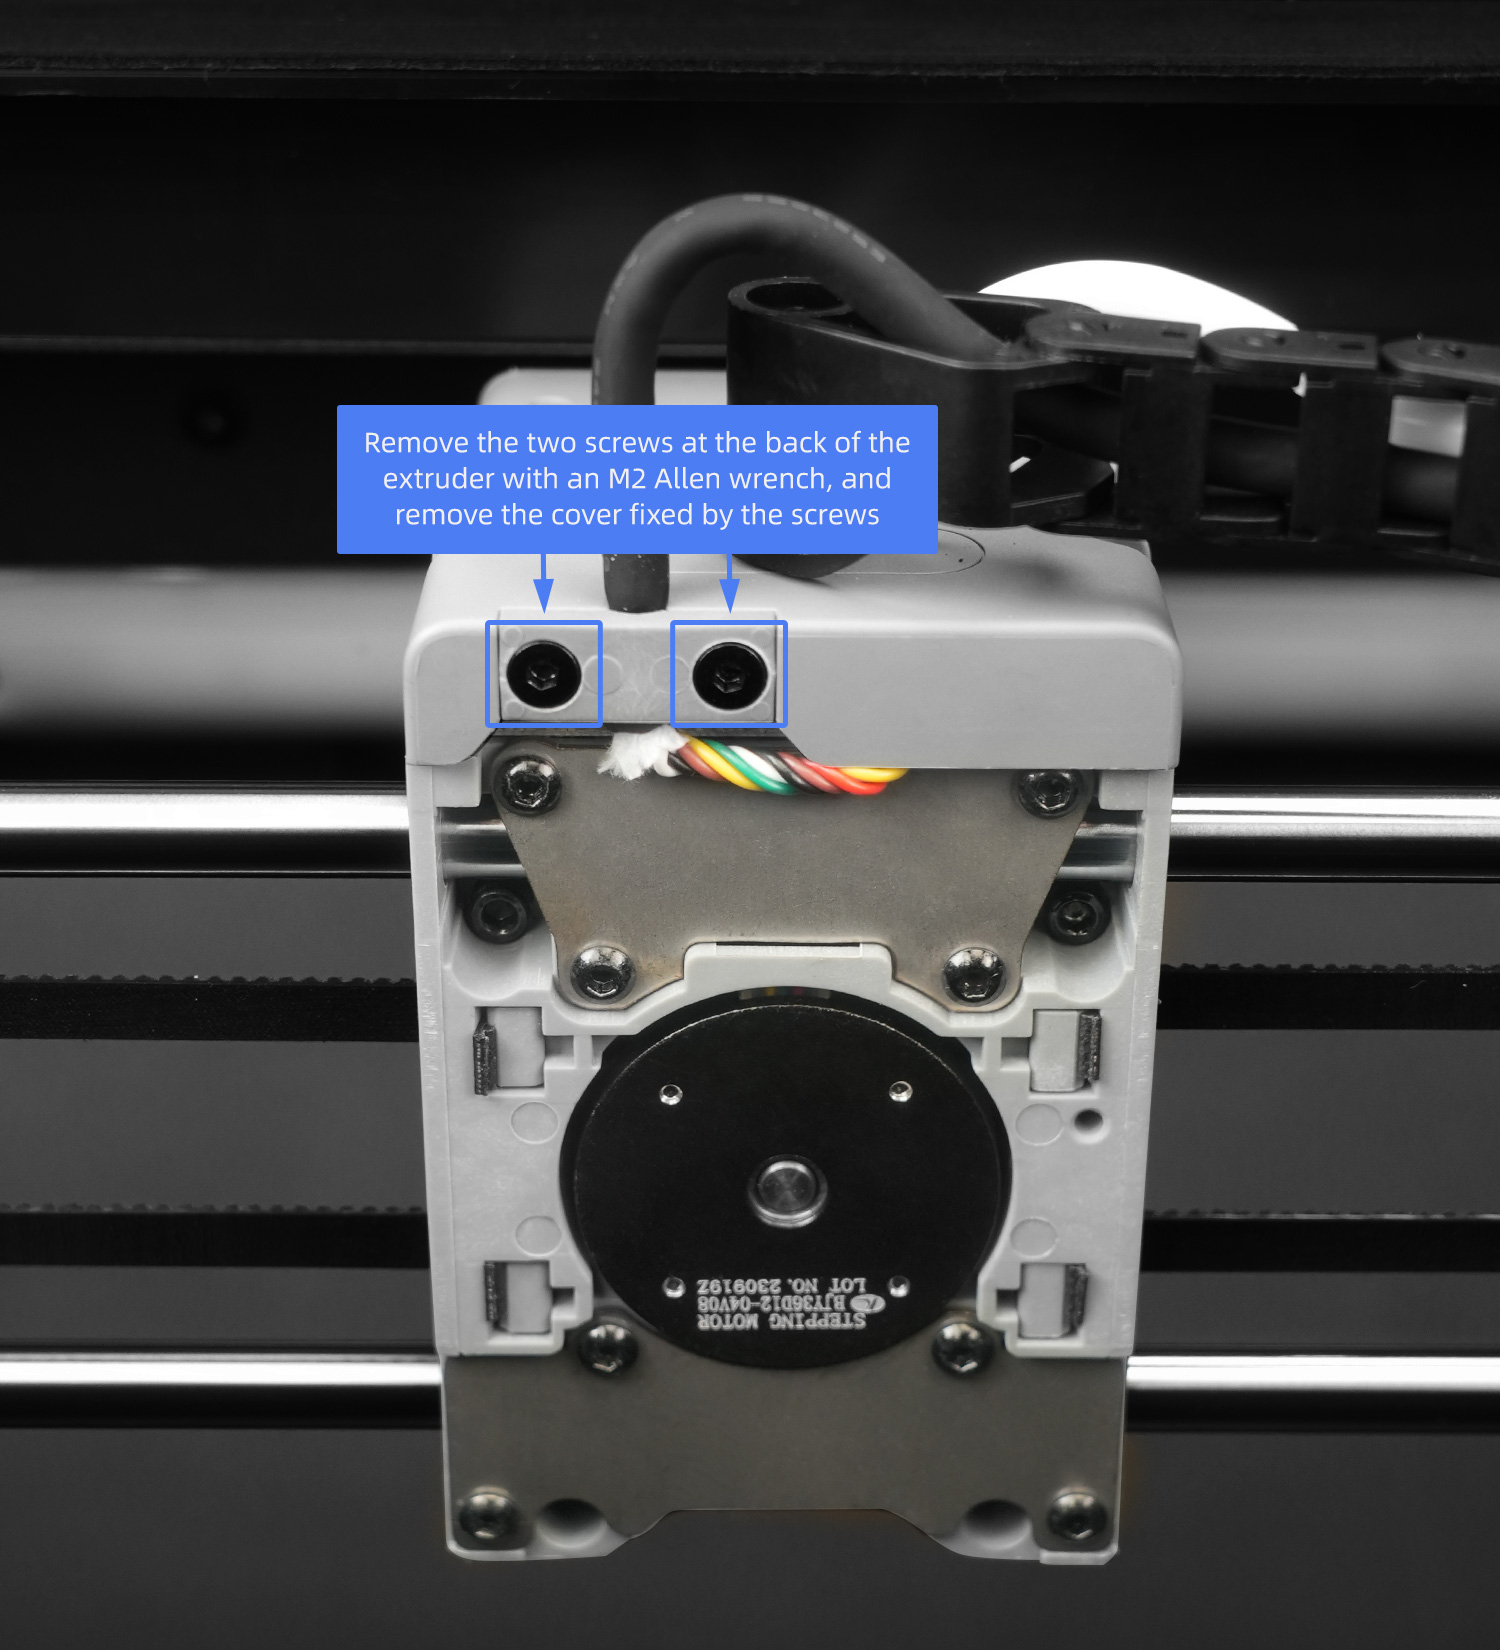
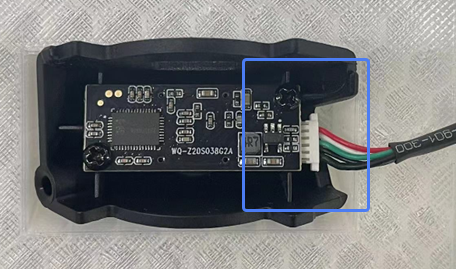
Step 2: After shutting down the printer, follow the pictures below to open the rear cover of the extruder and check for poor contact or damage to the extruder connection cable. Try unplugging and replugging the extruder connection cable before restarting the printer.


Cause: Extruder connection cable in poor contact or extruder board damaged, resulting in communication interruption between the motherboard and the extruder.
Solution:
Step 1: Restart the printer and observe if the same issue persists. If so, please proceed to Step 2.
Step 2: After shutting down the printer, follow the pictures below to open the rear cover of the extruder and check for poor contact or damage to the extruder connection cable. Try unplugging and replugging the extruder connection cable before restarting the printer.
Step 3: If Step 2 does not work, please contact customer support to replace the extruder connection cable/extruder board/motherboard. (Please refer to the Replace the extruder cable video for replacement instructions:
Troubleshooting: Equipment Error Messages
1. Error Reported: Failed to Enable the Camera
Cause: Loose camera connection or damaged camera.
Solution:
Step 1: Restart the printer.
Step 2: If Step 1 doesn’t work, turn off the printer, check for loose electrical connection of the camera, unplug and replug the cable, and then restart the printer.
Step 3: If Step 2 doesn’t work, replace the camera.
Step 4: If the above steps still don’t solve the problem, please copy logs to a USB flash drive and contact customer support.
2. Error Reported: Host Error, please Restart!
Cause: Several abnormalities reported by the printer leading to communication errors
Solution:
Step 1: Restart the printer and try again.
Step 2: If Step 1 does not work, check for firmware updates. If available, upgrade the firmware and retry.
Step 3: If the issue persists, please copy the machine logs to a USB flash drive and contact customer support. Please refer to the Copy logs video for copying instructions
3. Error Reported: The Printer Moves out of Range
Cause: The printer’s actual movement coordinates exceed the maximum range of the printer, possibly due to errors in XYZ homing coordinates.
Solution:
Step 1: Home the printer and check if XYZ coordinates are [110, 110, 220]. If XYZ coordinates are correct, repeat the operation before the error. If not, restart the printer, home it again, and confirm the correct coordinates before repeating the operation.
Step 2: If the issue persists, please copy the machine logs to a USB flash drive and contact customer support. Please refer to the 6. Copy logs video for copying instructions.
4. Error Reported: Level Probe Can Not Clear. Please Check the Level Probe
Cause: Values of the pressure sensors on the bottom of the bed can not be cleared.
Solution:
Step 1: Repeat the operation before the error.
Step 2: If Step 1 does not work, restart the printer and repeat the operation.
Step 3: If Step 2 does not work, raise the bed to its maximum height, turn off the printer, and check for loose cables at the bed bottom. Replug them and restart the printer before repeating the operation.
Step 4: If the issue persists, please copy the machine logs to a USB flash drive and contact customer support.
Troubleshooting: Network-related Issues
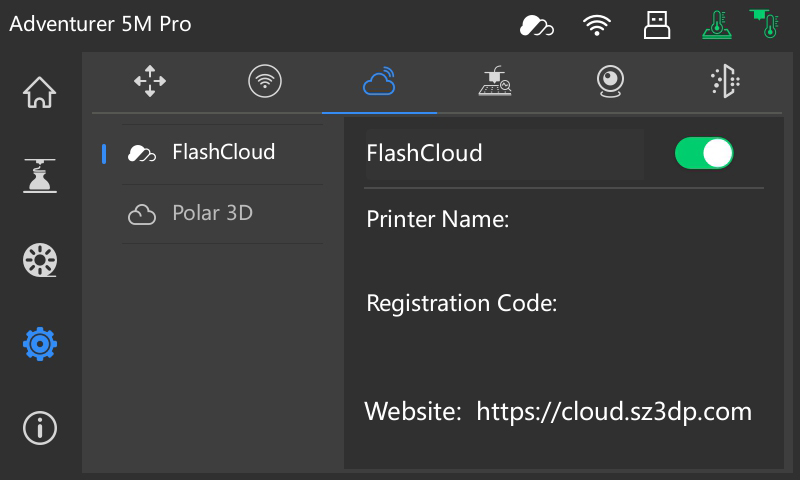
1. No Registration Code Displayed on the FlashCloud Interface
Cause 1: Static IP is enabled.
Solution:
- Before the first network connection, check if [Static IP] is enabled. Disable it, and then turn off and turn on the FlashCloud switch.
- If there is still no registration code after assigning a static IP, please change the DNS server address, and then turn off and turn on the FlashCloud switch.
Cause 2: Poor network
Solution: Change the network cable or connect to a mobile hotspot.


