
Dear Users
Thank you for choosing our products. For the best experience, please read this User Manual carefully and strictly follow the instructions to operate the printer. Our
teams will always be ready to provide you with the best services. Please contact us via the phone number or e-mail address provided at the end of this User
Manual when you encounter any problem with the printer. For a better experience in using our products, you can also learn how to use the printer in the following
ways: Accompanied instructions: you can find the relevant instructions and videos on the USB flash disk.
NOTES
- Do not use the printer in any way other than described herein to avoid personal injury or property damage;
- Do not place the printer near any heat source or flammable or explosive objects. We suggest placing it in a well-ventilated, cool, and dustless environment;
- Do not expose the printer to a violent vibration or any other unstable environment, as this may cause poor print quality;
- Please use recommended filaments to avoid clogging the extrusion head and causing damage to the machine;
- Do not use the power cable of other products during installation. Always use a grounded three-prong power outlet, which accompanies the printer;
- Do not touch the nozzle and the heated bed during operation to avoid burns or personal injury;
- Do not wear gloves or wraps while operating the machine to prevent entrapment of movable parts that could cause crushing and cutting injuries to bodily parts;
- Use the provided tools to clean the filament from the extruder in time taking advantage of the residual temperature after printing. Do not touch the extruder directly when cleaning, otherwise it may cause burns;
- Clean the printer frequently. Clean the printer body with a dry cloth regularly after powering off the printer, wipe away dust, bonded print filament, and foreign objects on the guide rails;
- Children under 10 years old should not use the printer without supervision, otherwise it may cause personal injury;
- Users should comply with the laws and regulations of the corresponding countries and regions where the equipment is located (used), abide by professional ethics, pay attention to safety obligations, and strictly prohibit the use of our products or equipment for any illegal purposes; Creality will not be responsible for any violators’ legal liability under any circumstance;
- Tip: Do not plug in or unplug wires on a charged basis.
1. About the Device
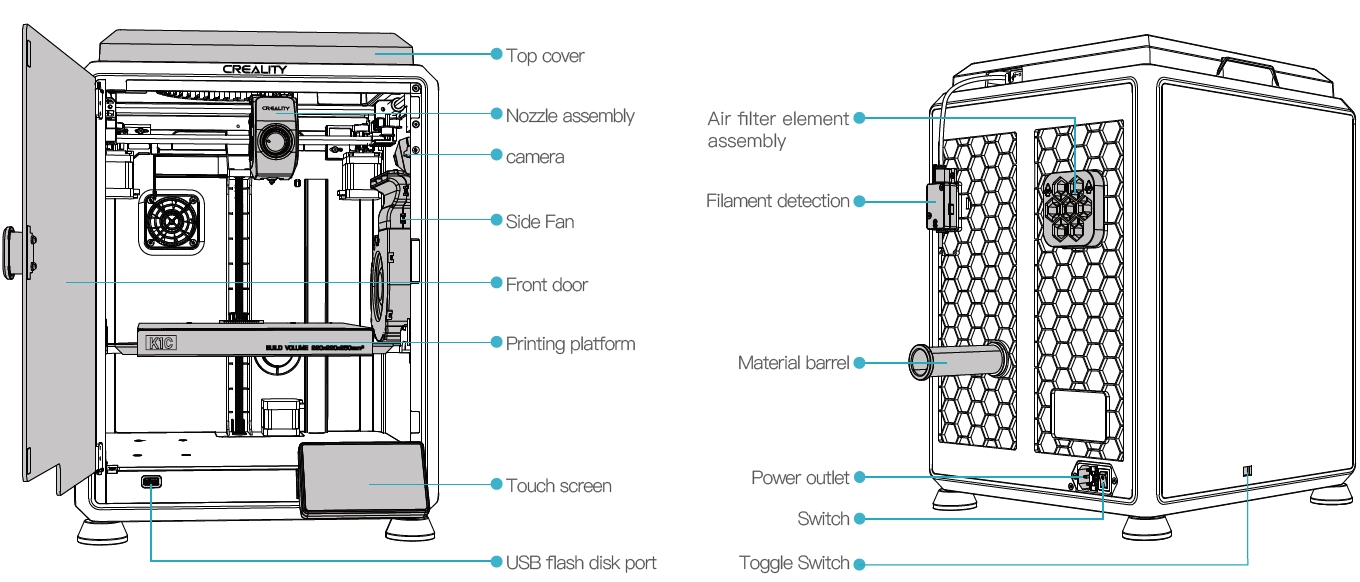
1.1 About the Printer
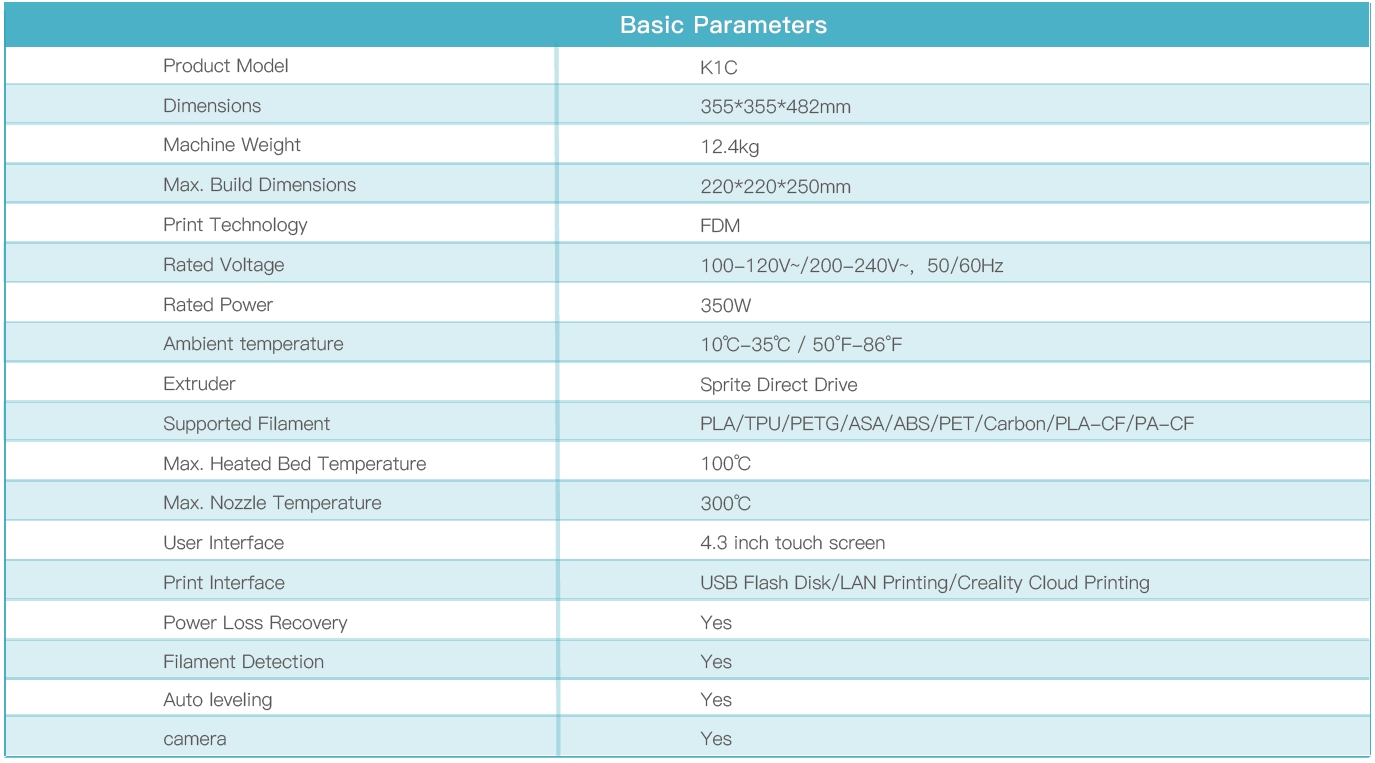
1.2 Device Specifications
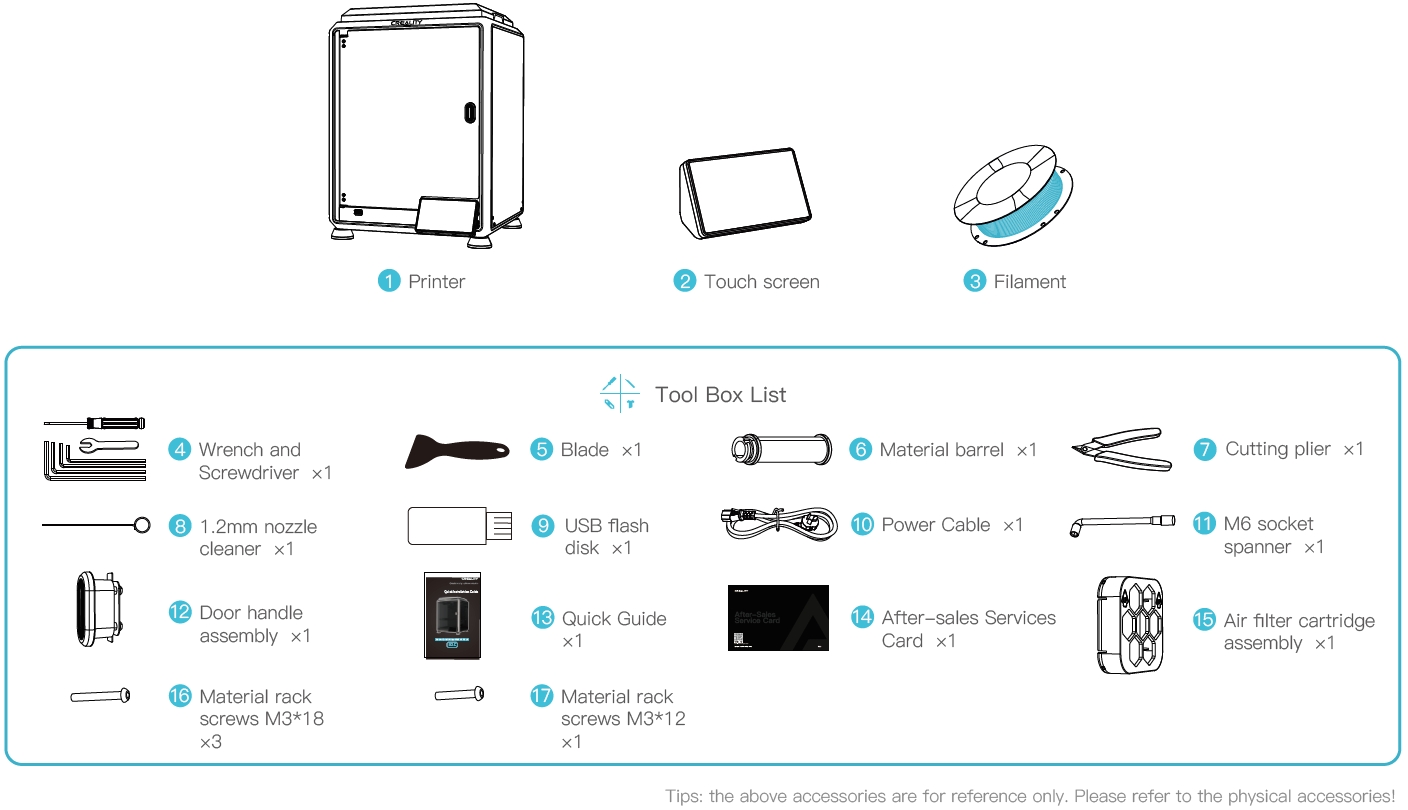
1.3 Packing List
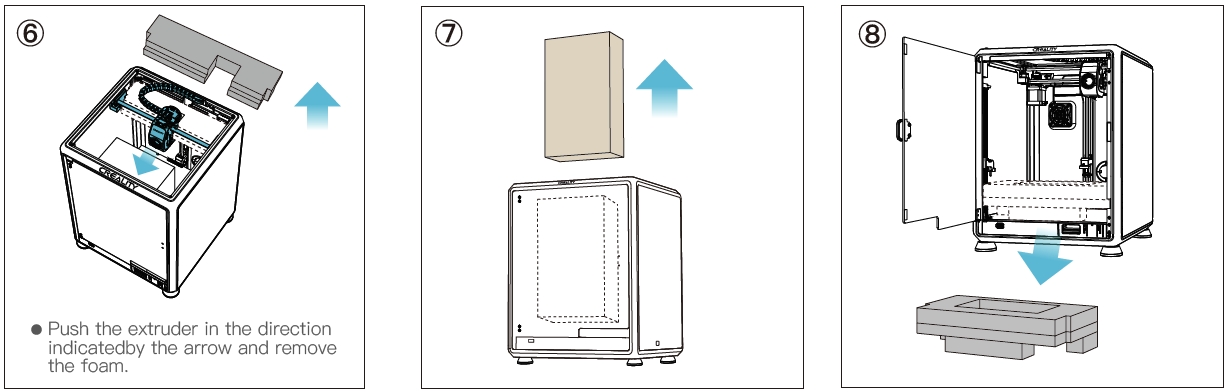
2. Unboxing
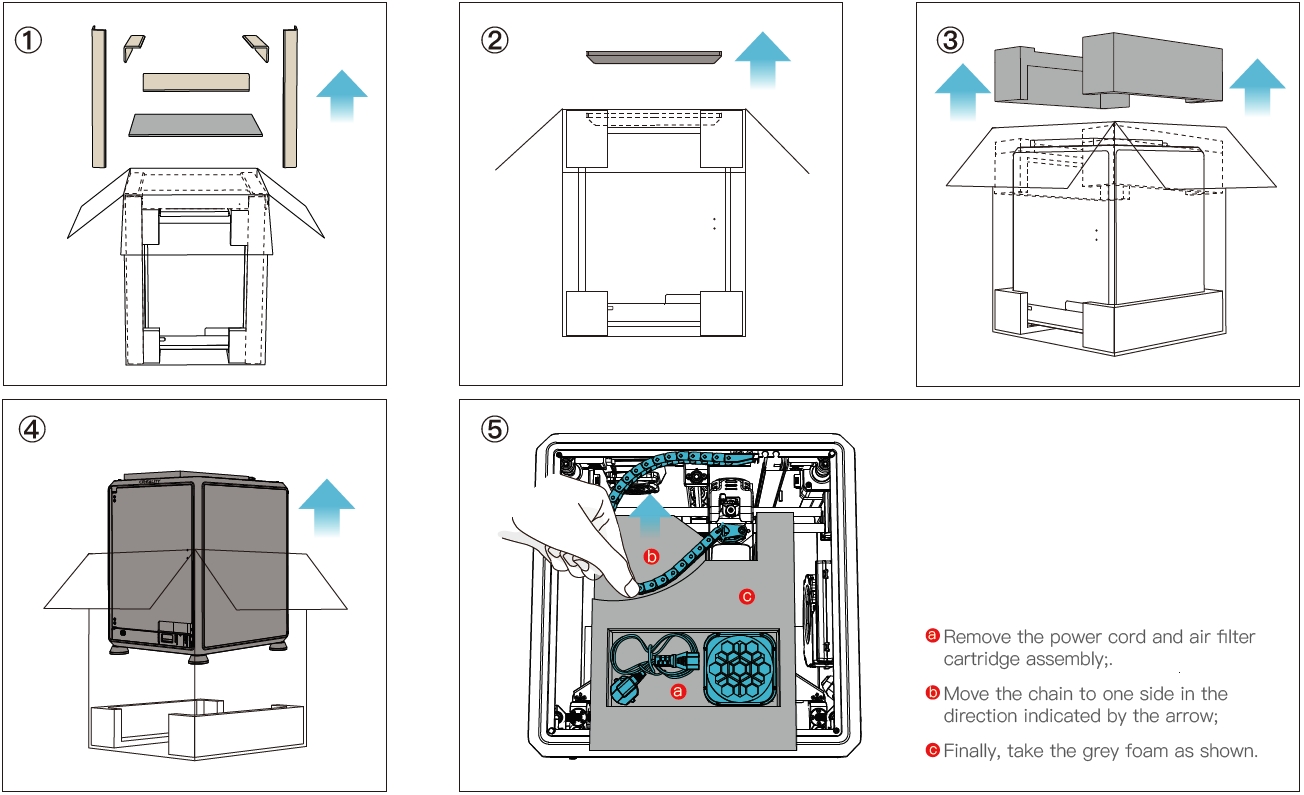
2.1 Unpacking Steps
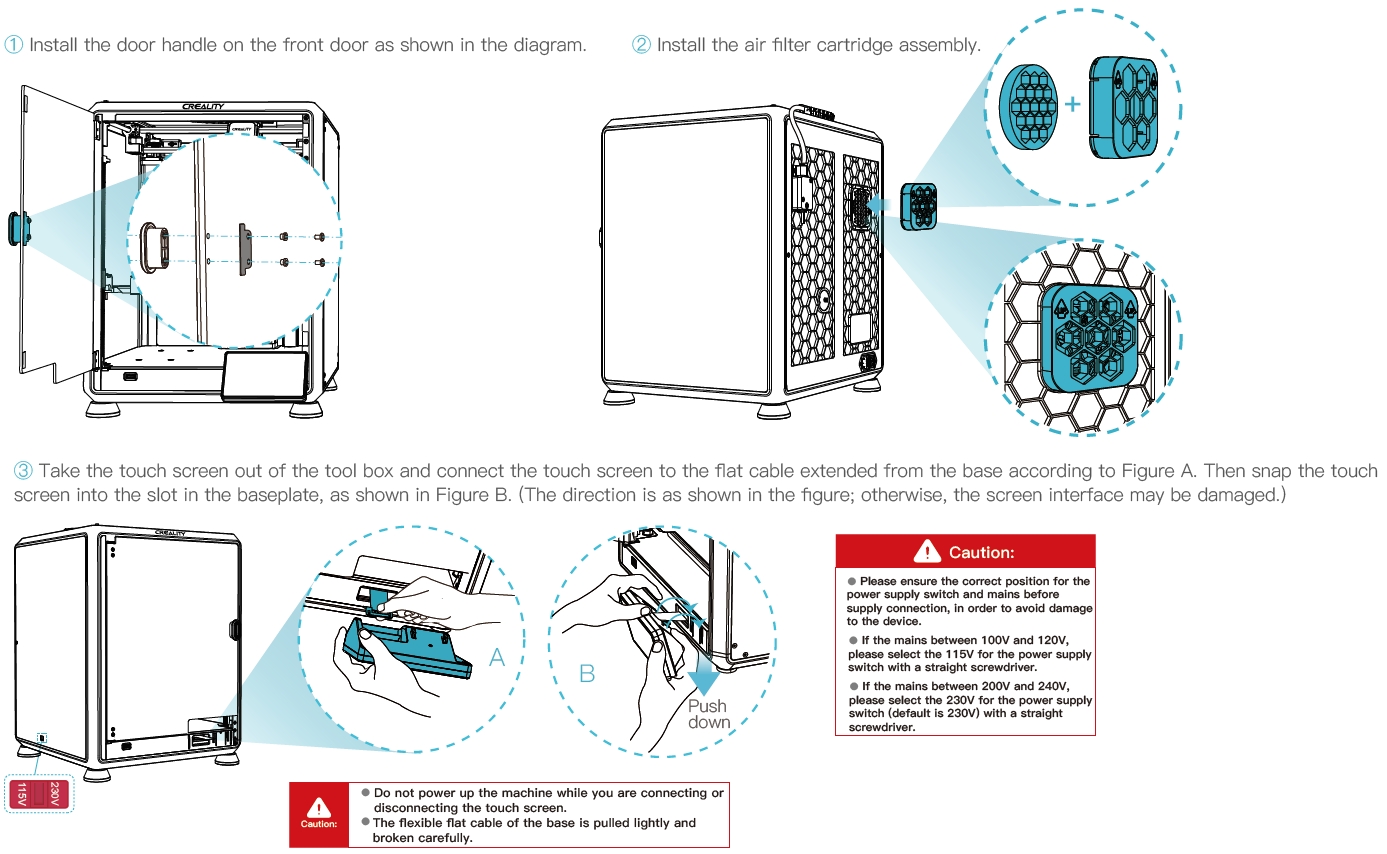
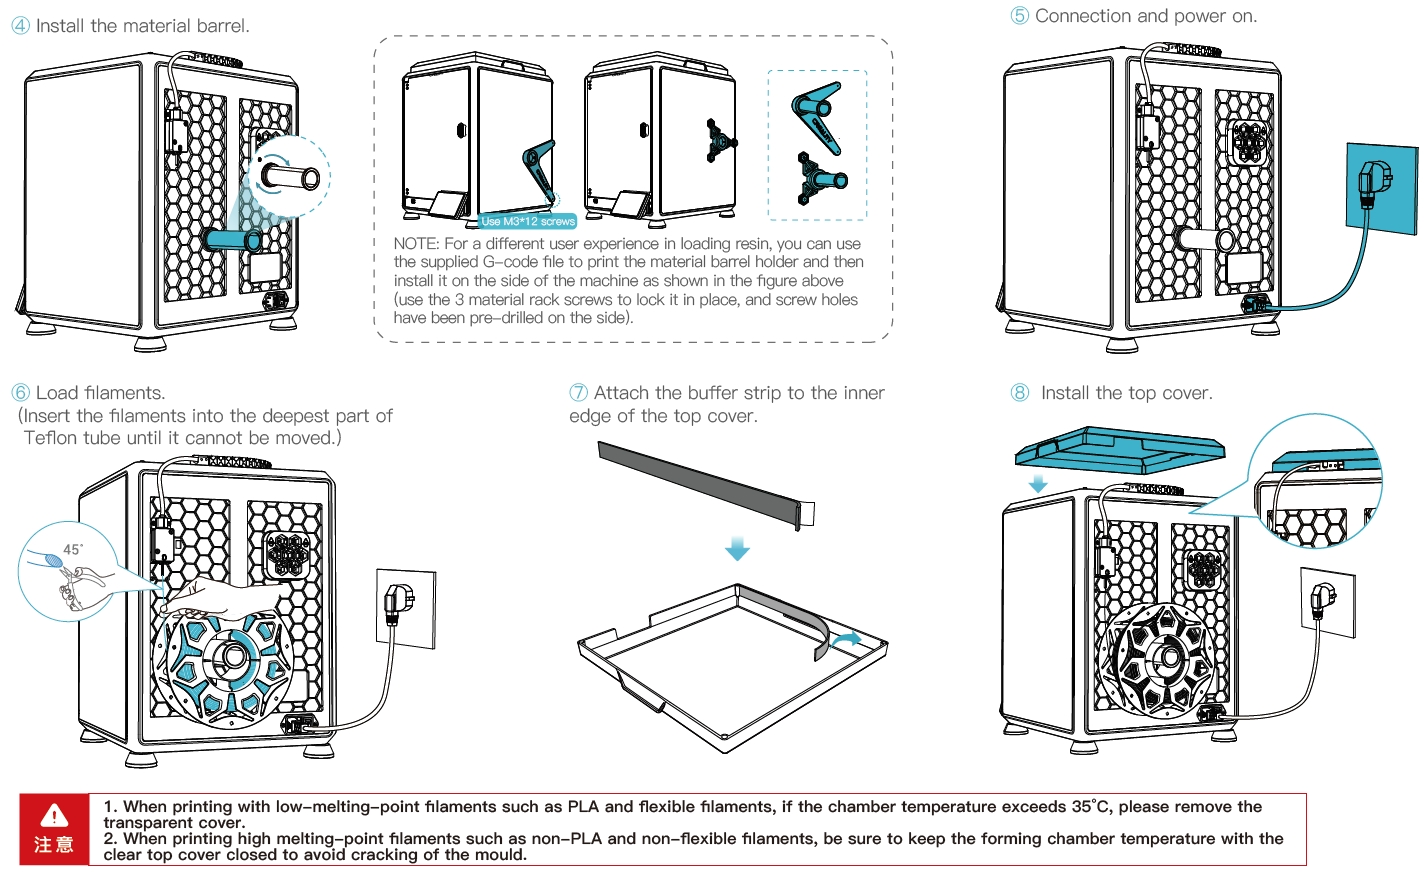
2.2 Install the Product

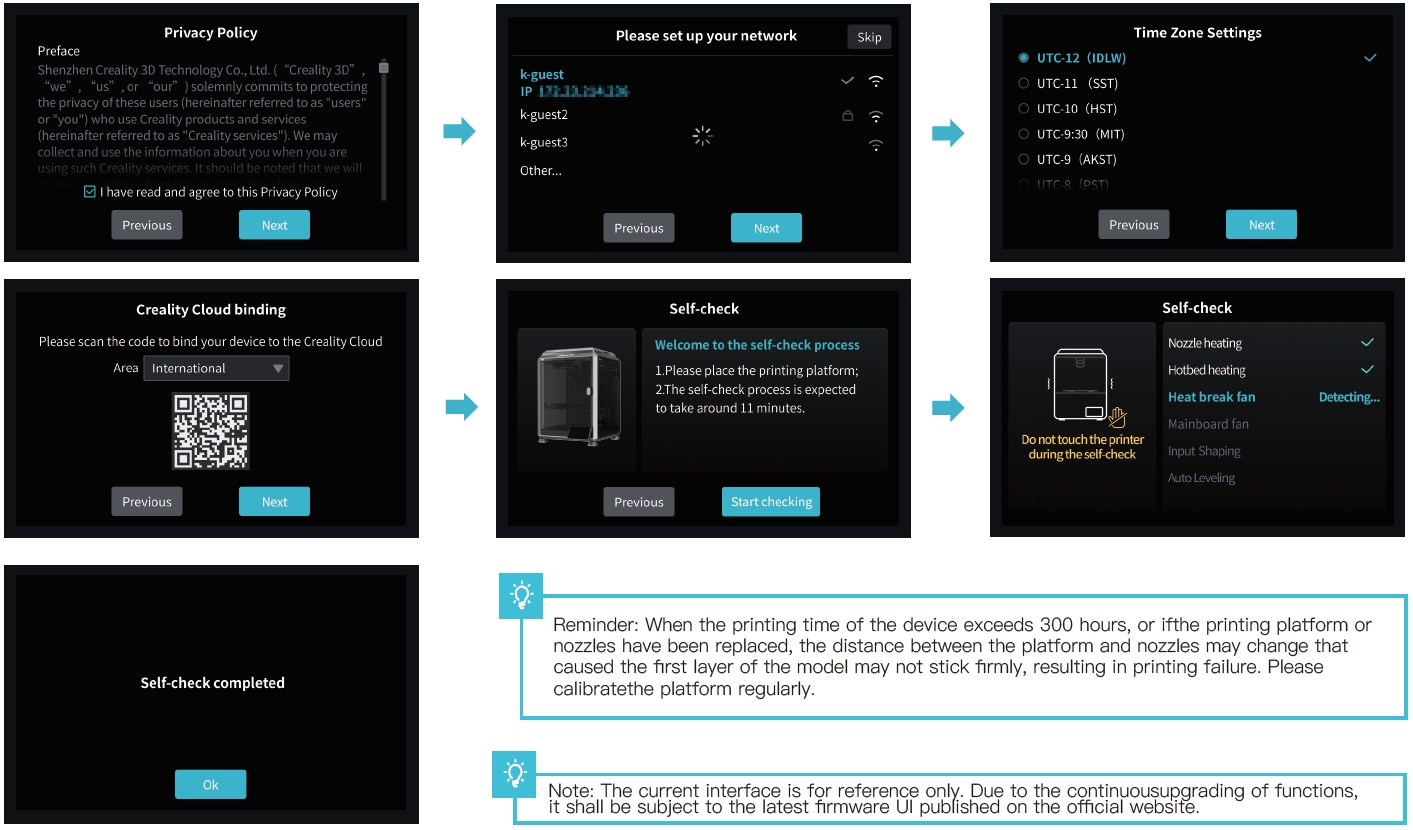
2.3 Power-on guide
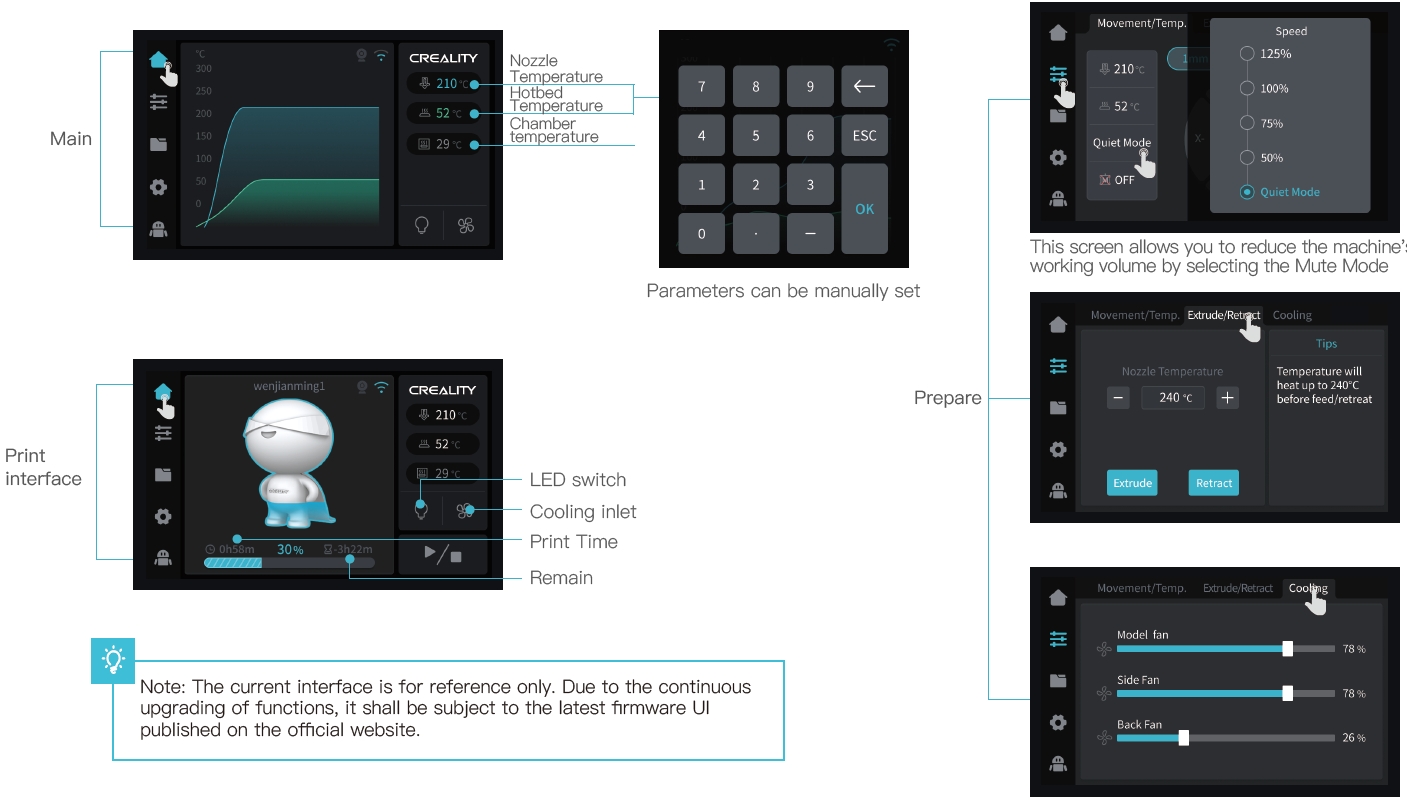
3. About the User Interface
3.1 Tune、Prepare
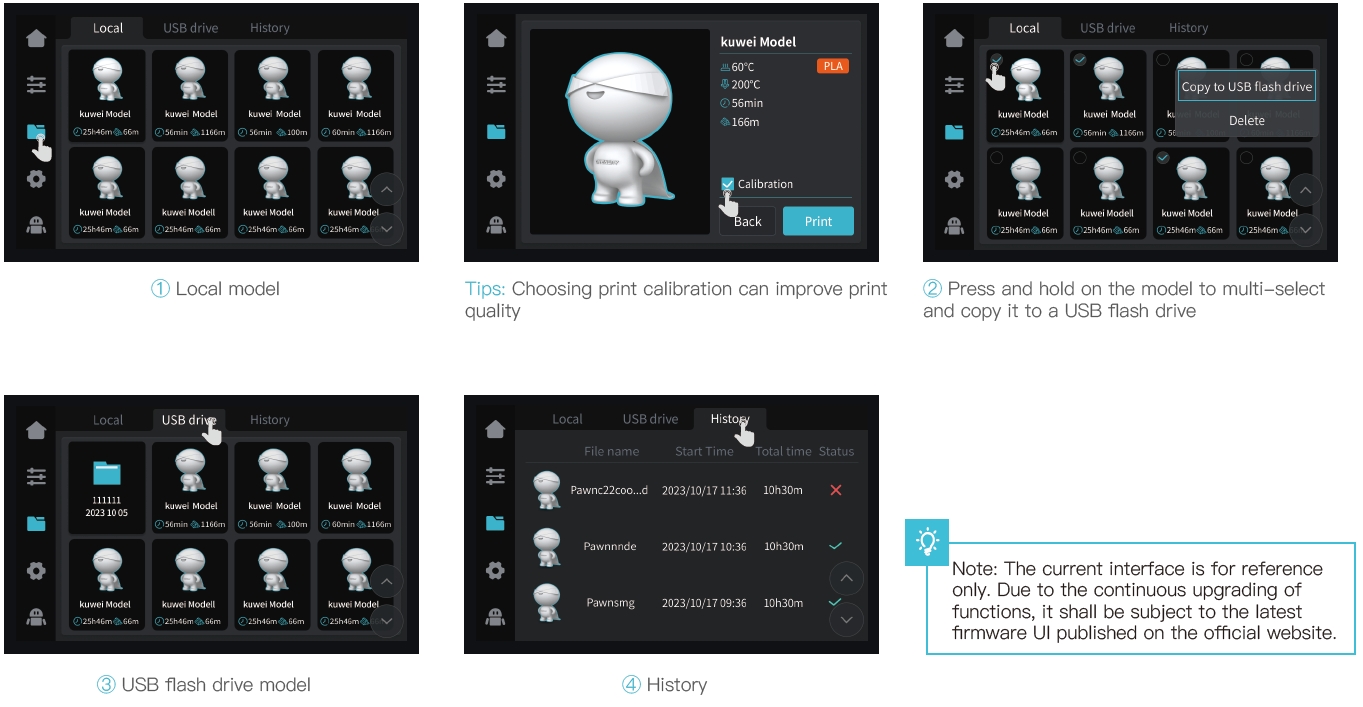
3.2 Files
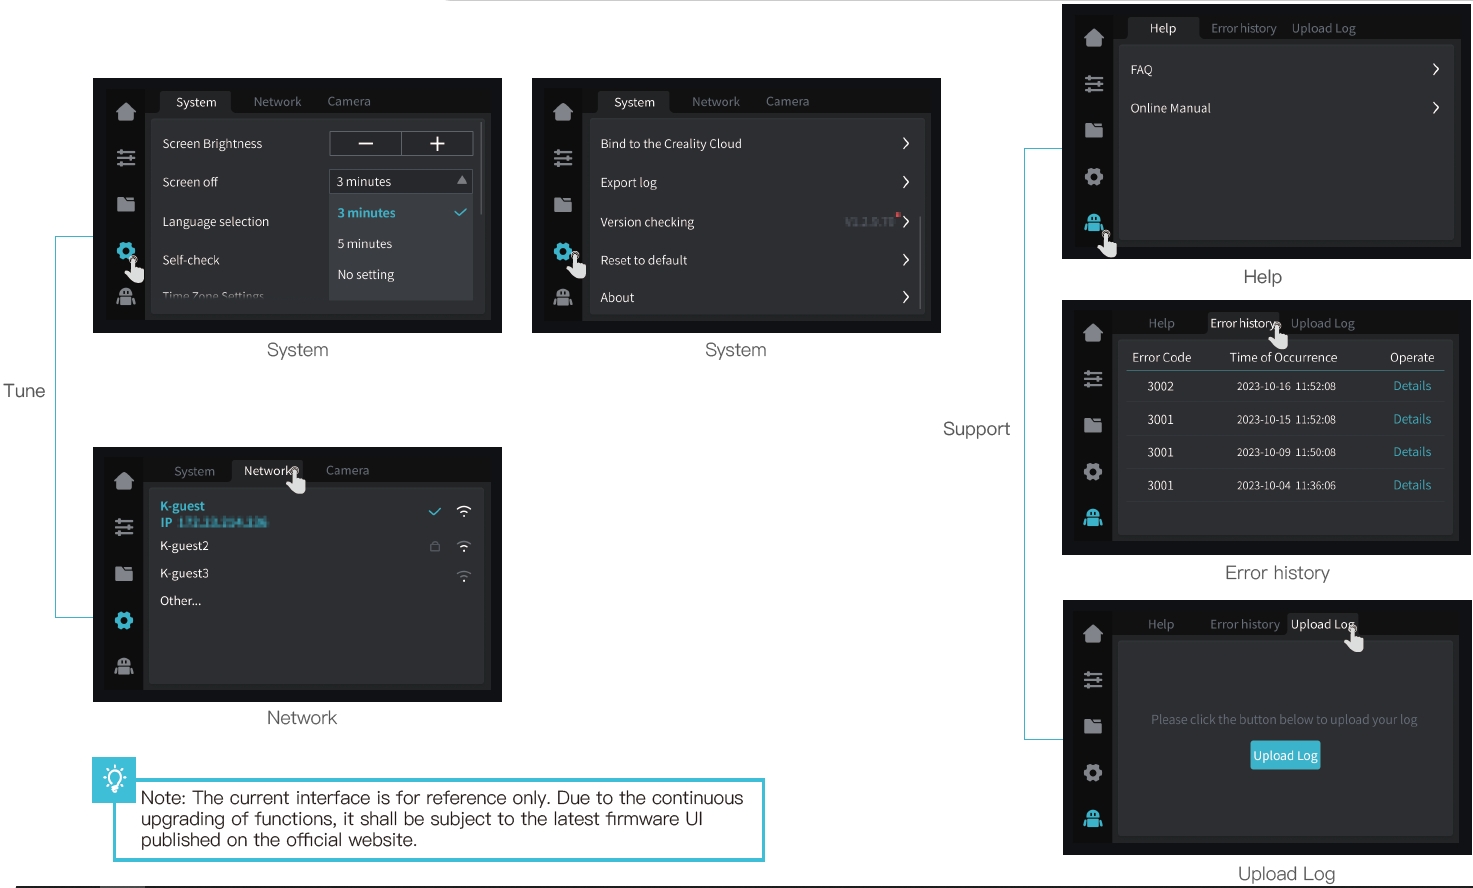
3.3 Tune、Support
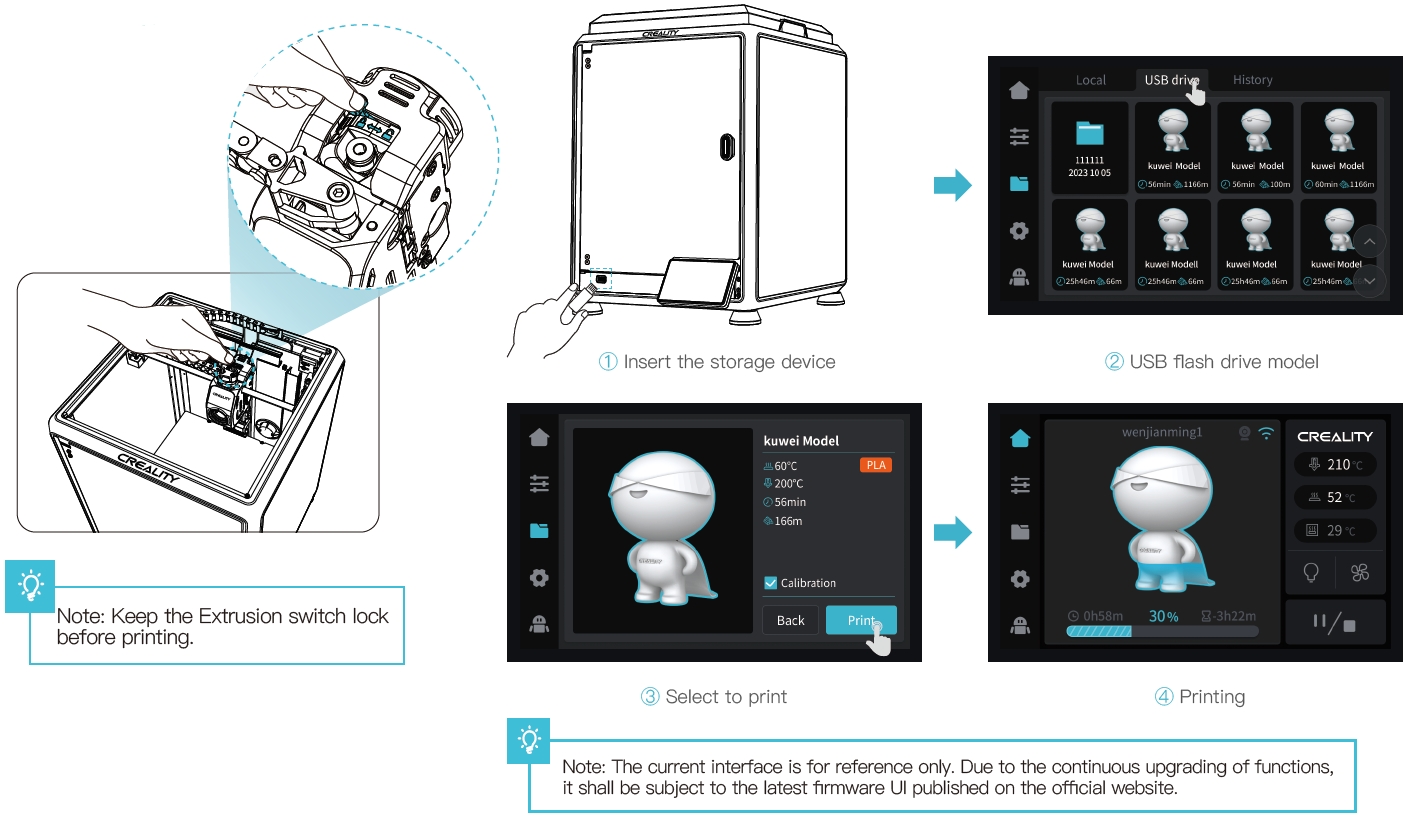
4. First Printing
4.1 USB Flash Disk Printing
4.2 LAN Printing
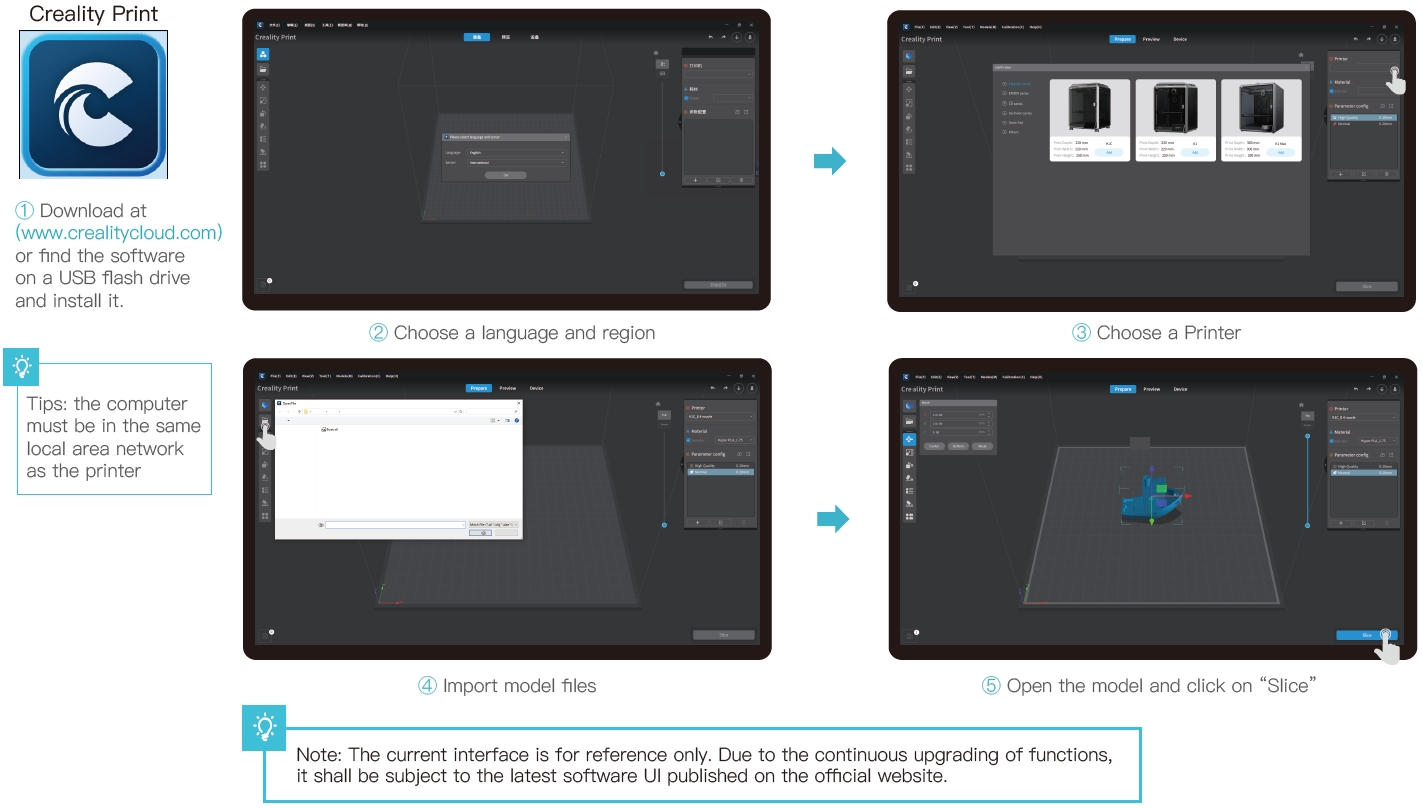

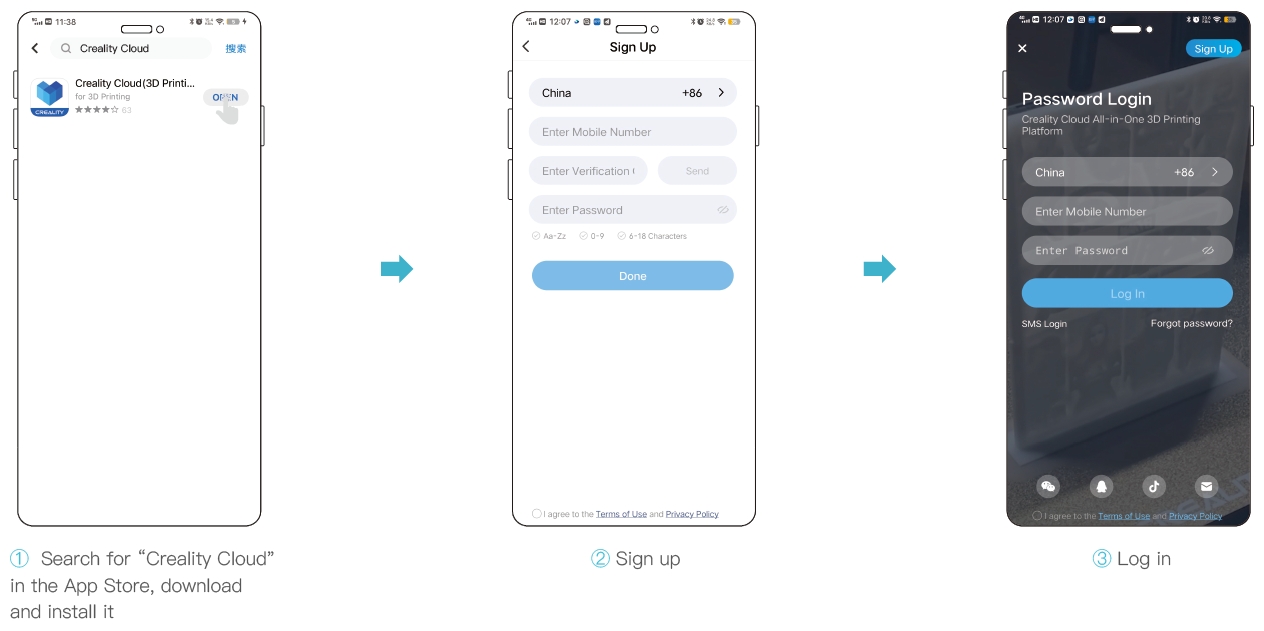
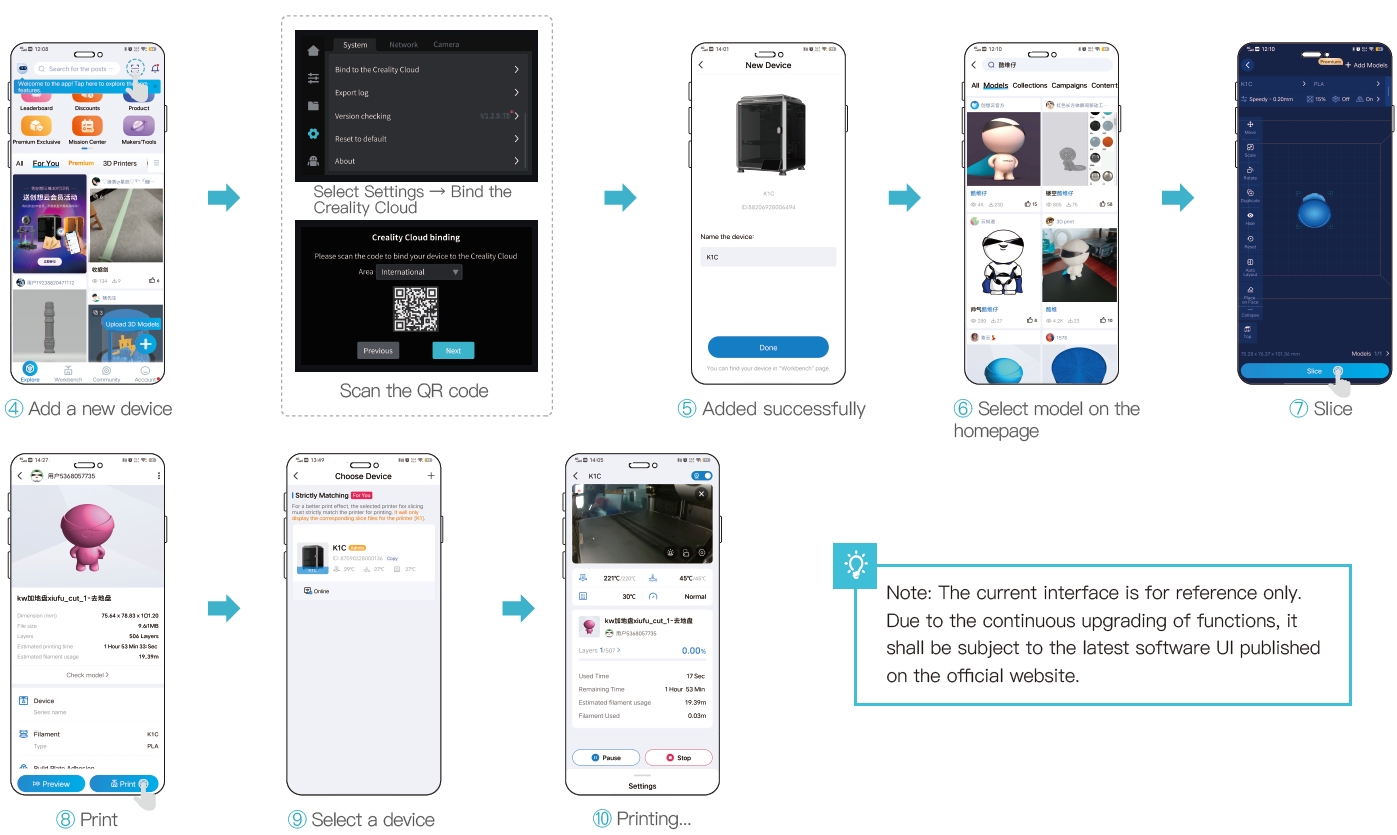
4.3 Creality Cloud printing
5. Functional Specification
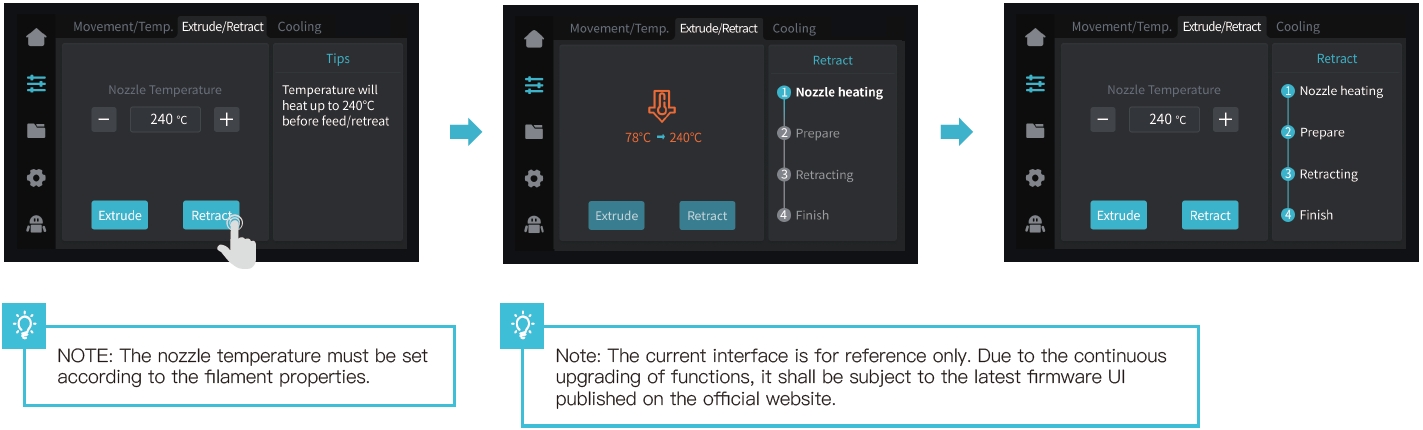
5.1 Extrude、Filament Retreat
Extrude
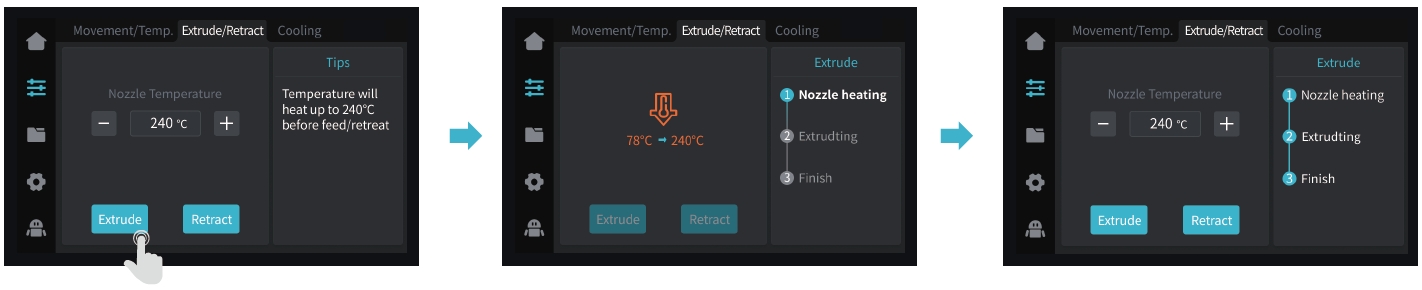
Filament Retreat
5.2 AI camera
5.2.1 View the AI camera image using Creality Print or the Creality Cloud App. (The AI camera monitors the printing process, and captures time-lapse photography.
The AI detects foreign matters on the platform before printing, and detects printing abnormalities while printing is in progress.)

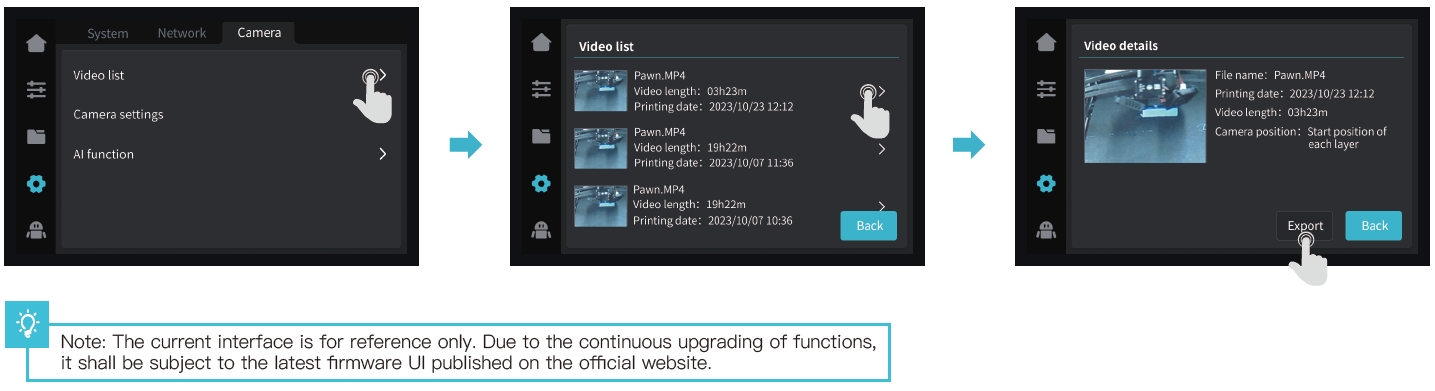
5.2.2 Viewing time-lapse photography
Method 1:
Click on “System Settings” – “Camera” – “Video List” – “Export to USB flash disk”
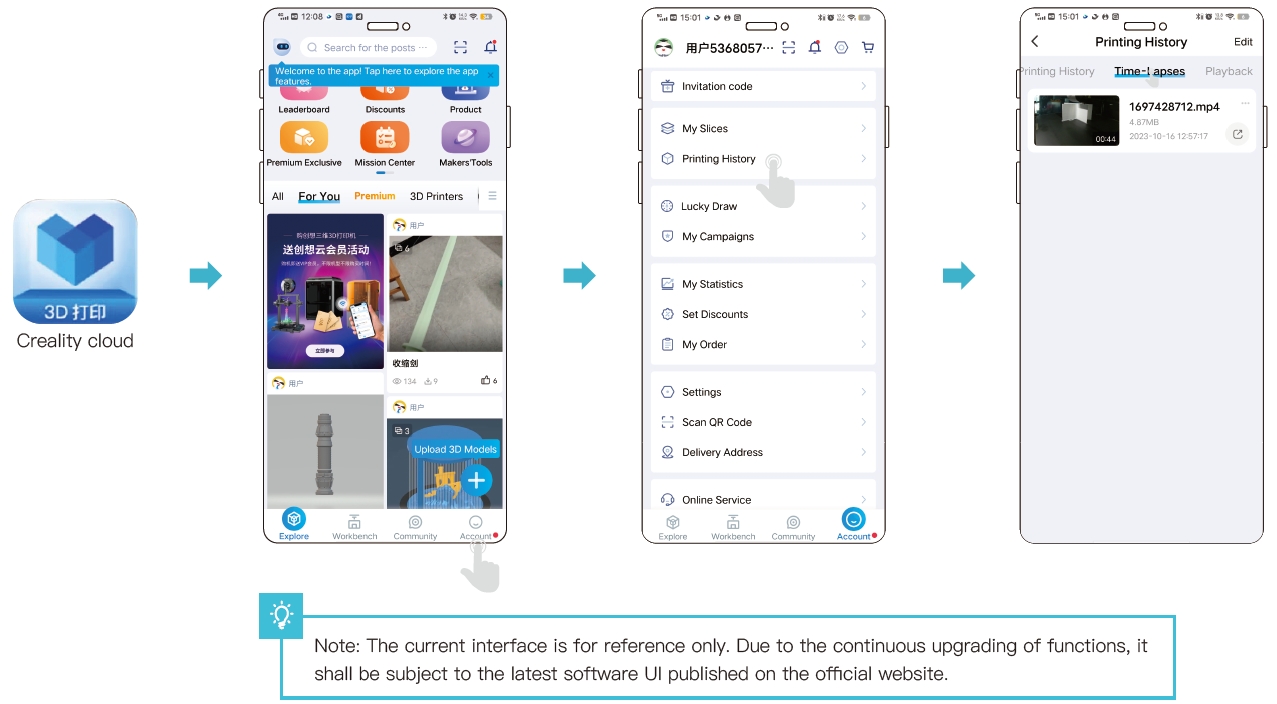
Method 2:
Open “Creality Cloud”, and click on “Account” – “Print Records” – “Time-lapse Photography” (Note: Creality Cloud must be linked to the device first)
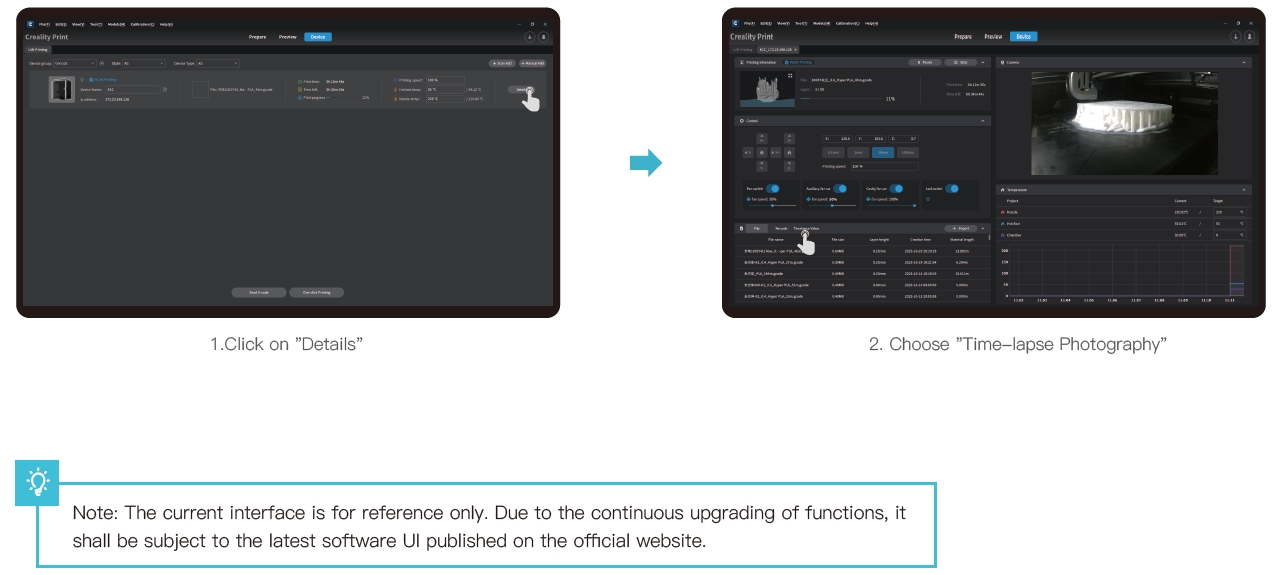
Method 3:
 TENTS
TENTS
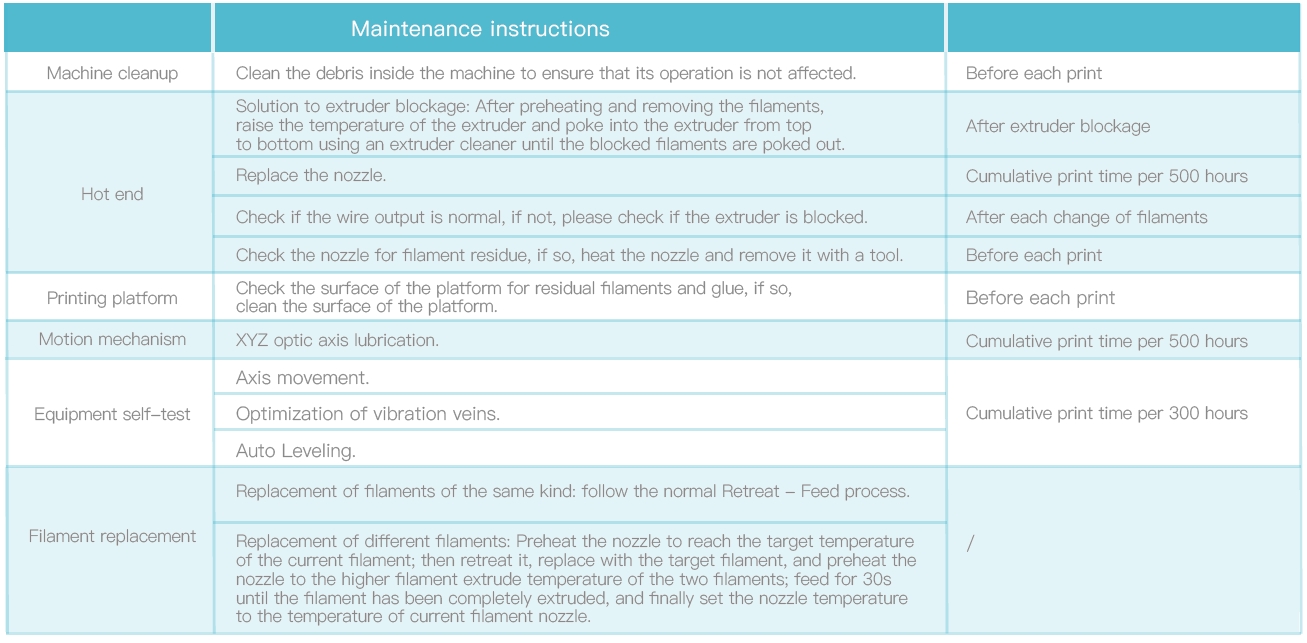
6.Maintenance Tips
1. Maintenance Items
2.Precautions for printing
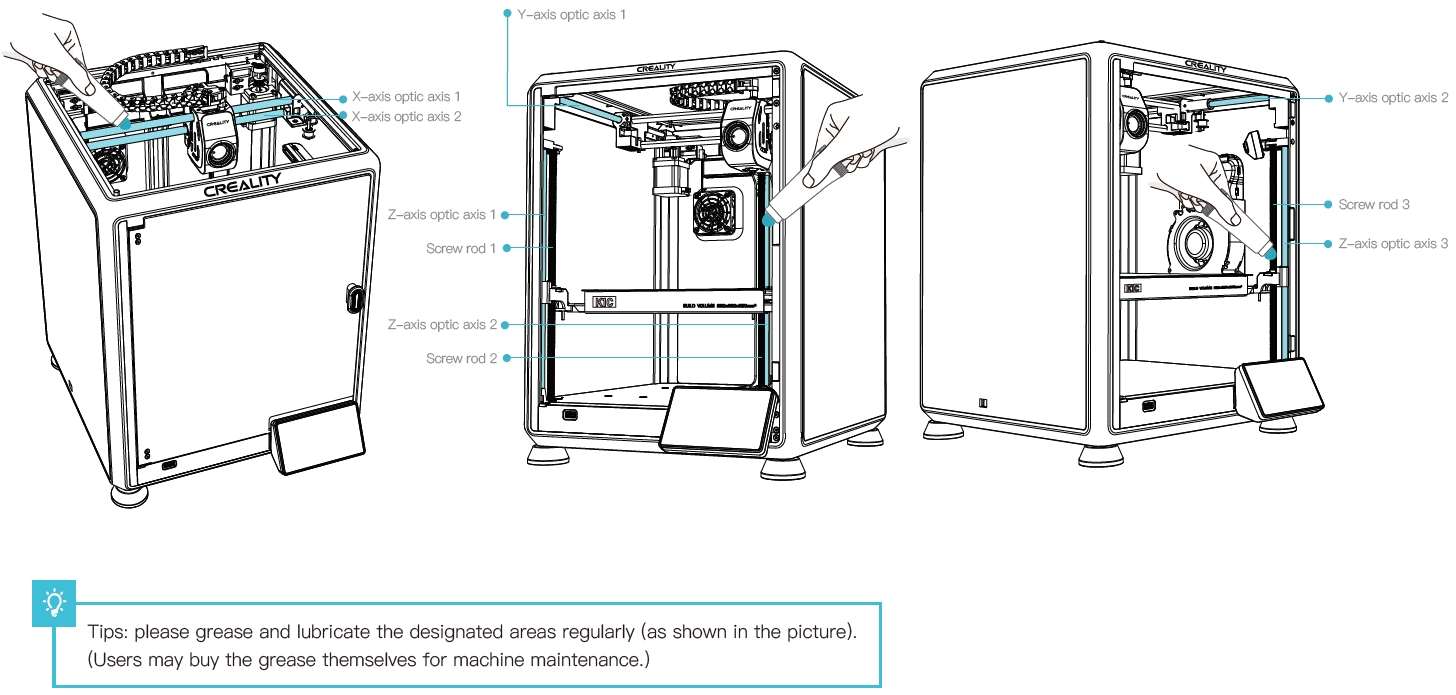
2.1Lubrication and maintenance
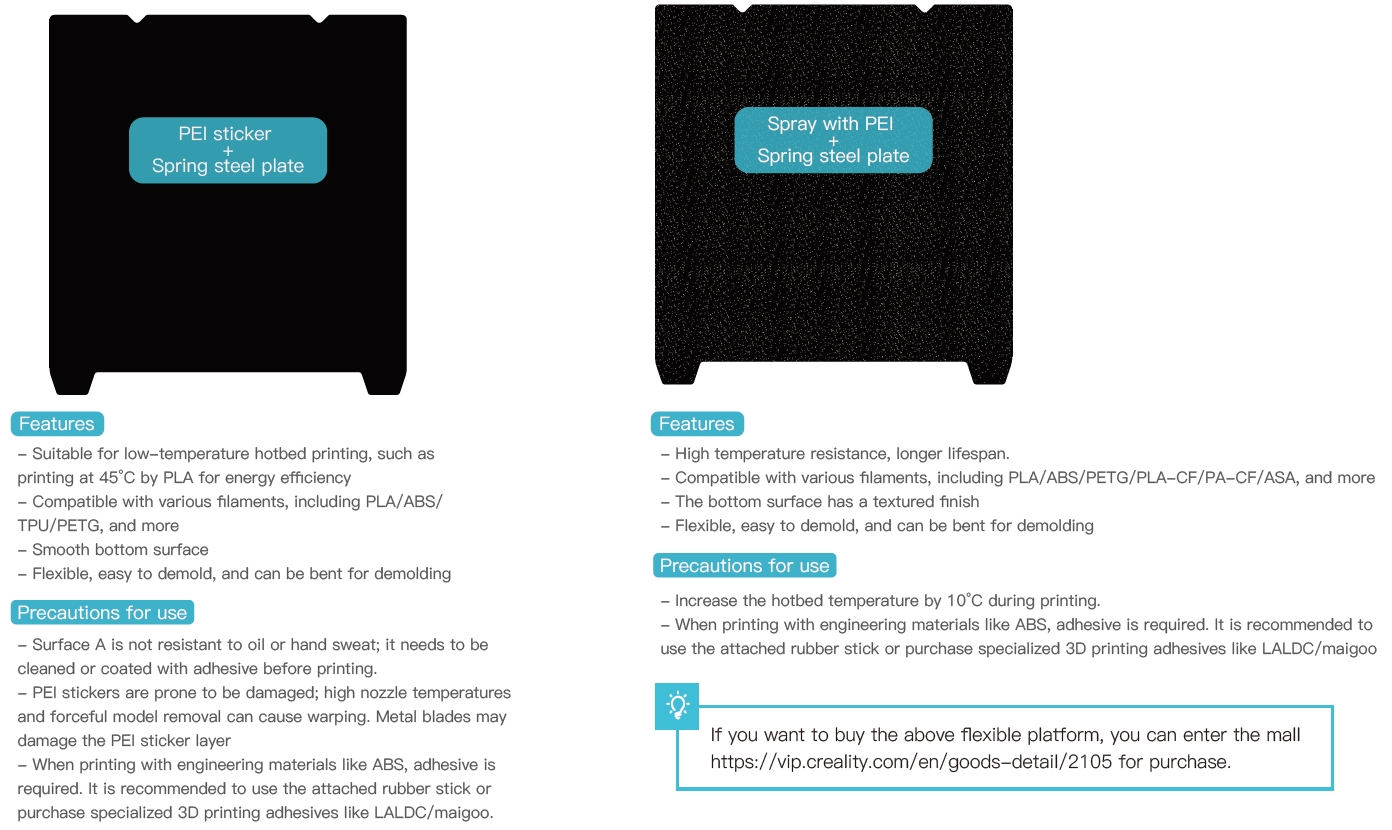
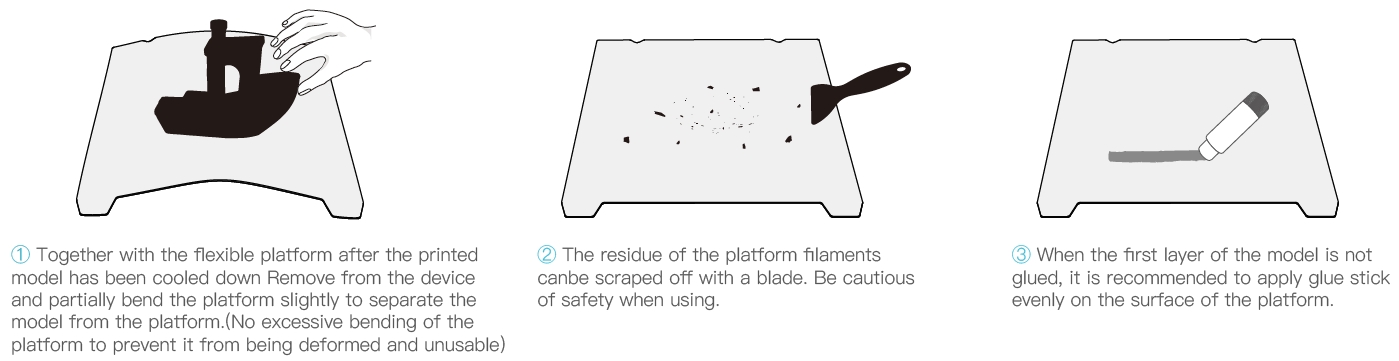
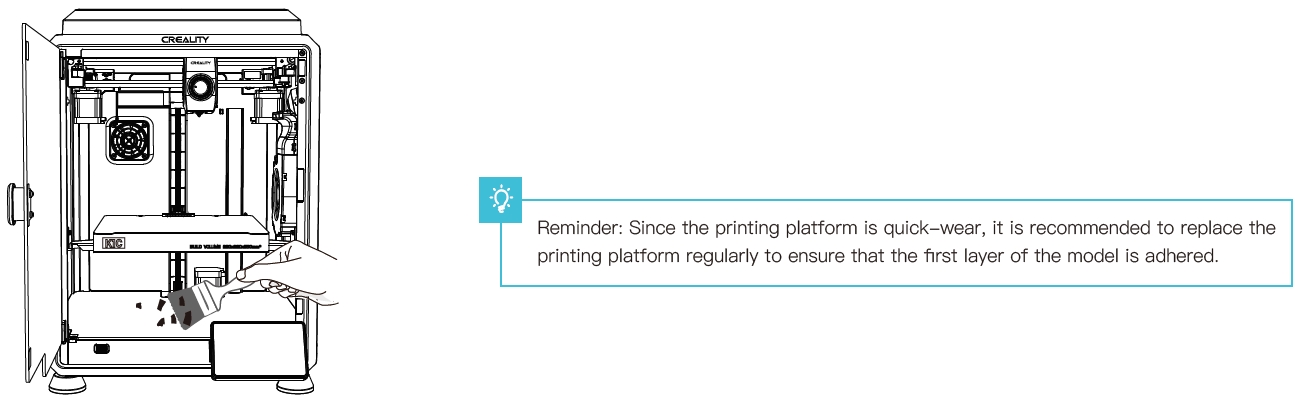
2.2 Use and maintenance of a flexible platform
2.3 Cleaning of debris inside the chassis
Since each model is different, the actual product may be different from the picture. Please refer to the actual product.
7. Troubleshooting
7.1 Error Code Trouble Shooting
109 Error Trouble Shooting
1. Phenomenon description
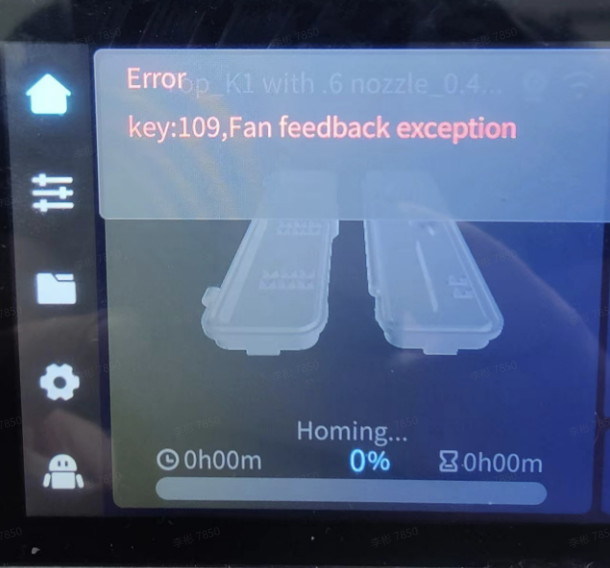
2. Cause analysis
The fan wire is not properly connected or broken.
3. Troubleshooting and solution
3.1 Heat the nozzle to 60 degrees (the throat fan starts working when the nozzle exceeds 60 degrees) and check if the fan is spinning.
3.2 Inspect the fan wiring connections and reseat the connector.
2092 Error Trouble Shooting
1. Phenomenon description
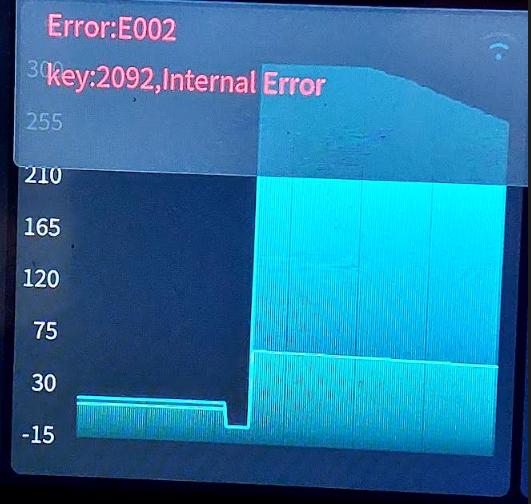
2. Cause analysis
2.1 Heated Bed or Hotend Thermistor Disconnection
2.2 Slicing Issues
3. Troubleshooting and solution
3.1 Conduct print tests using random models.
3.2 Inspect the heated bed thermistor or extruder thermistor wiring, and reconnect the thermistor.
3.3 Individually heat the extruder and the thermistor to determine which module is problematic, and replace the corresponding parts.
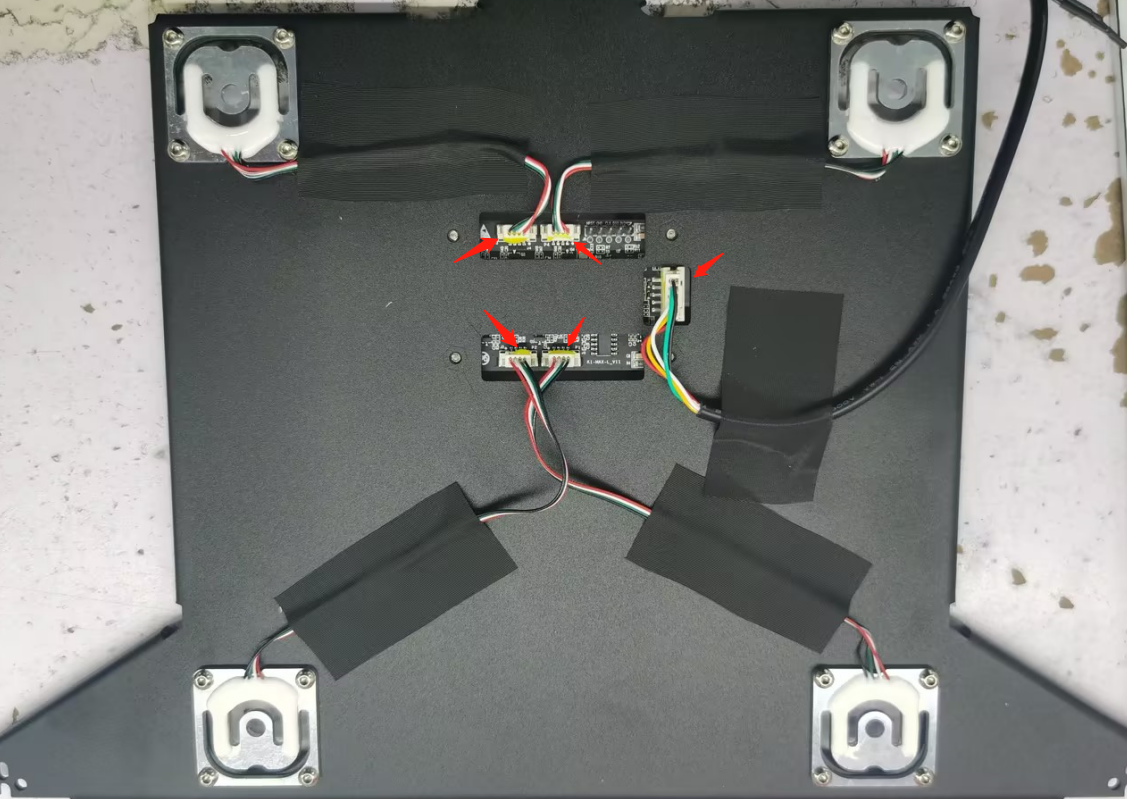
2522 Error Trouble Shooting
1. Phenomenon description
The screen displays “Error, key: 2522, leveling sensor data transmission anomaly.”
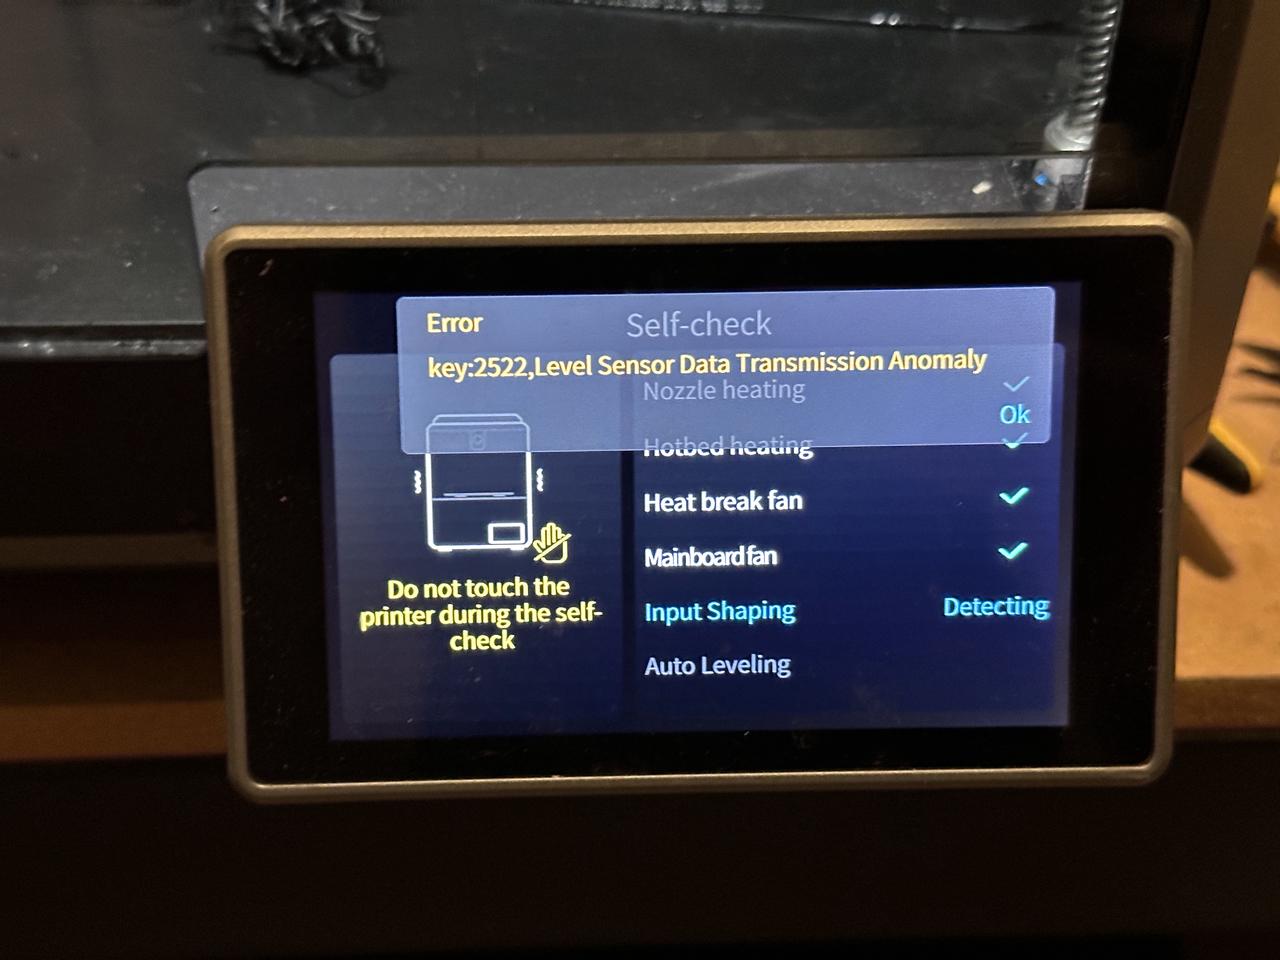
3. Troubleshooting and solution of the four strain gauge connectors.
7.2 Troubleshooting Other Issues
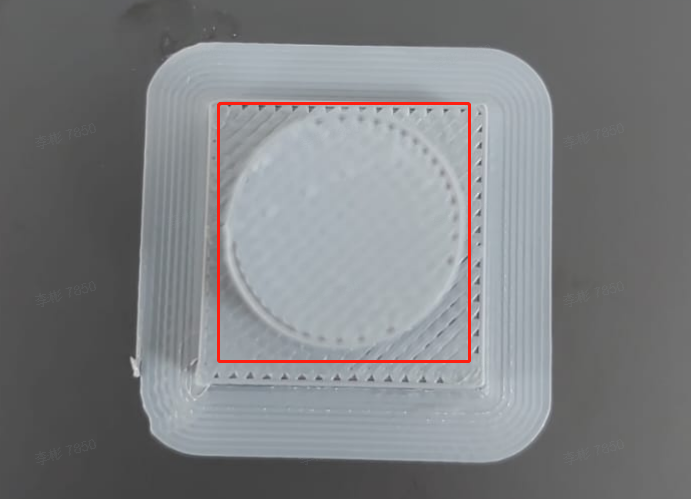
Handling Issues With Printing Non-Circular Cylinders
1. Phenomenon description
Printed cylinders at 45° orientation have oversized or undersized dimensional measurements.
Printed cubes have diagonals of unequal length.
2. Cause analysis
2.1 Inconsistent XY Belt Tension
2.2 XY Upper Frame Deformation
2.3 Incorrect Vibration Compensation
2.4 X/Y Axis Movement Not Smooth
3. Troubleshooting and solution
3.1 Tuning based on reference moiré pattern optimization. Printing Ringing Trouble Shooting
3.2 Please refer to the second part of the layer pattern processing video for belt tension adjustment (starting at 38 seconds):
3.3 Use a square ruler to measure if the frame is deformed.
3.4 Push the print head along the X-axis to check for smooth operation. If it is not smooth, clean the residual black graphite substance on the guide rail with a dry towel. The X-axis guide rail requires a thinner lubricant or metal anti-rust oil, and regular maintenance should be performed on the guide rail. The Y-axis uses a ball-bearing bronze bushing, which can be lubricated with oil or grease to ensure smoother operation.
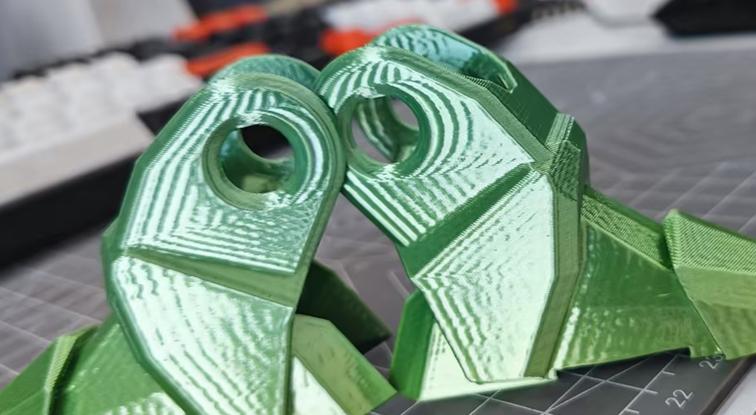
Printing Ringing Trouble Shooting
1. Problem description
Model vibration is obvious in print.
2. Cause analysis
2.1. The tensioning
2.2. Insufficient lubrication of the XY-axis
2.3. External interference during vibration optimization
3. Troubleshooting and solutions
3.1 Check the left and right belt tensioning mechanism for release of tensioning screws
3.1.1 The released situation, using the left tensioning mechanism as an example:
- ① The screw used for tensioning has been removed.
- ② Lock the screw in the middle
- ③ Natural elongation of the spring

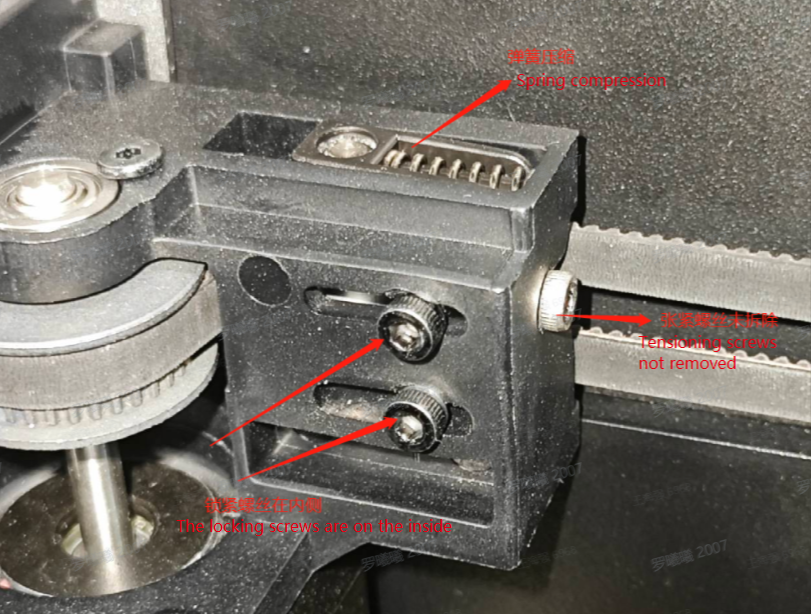
3.1.2 The unreleased situation, taking the left tensioning mechanism as an example:
- ① The tensioning screw has not been removed.
- ② Lock the screws on the inside
- ③ Spring Compression
3.2 Check whether lubrication on the XY axis is exhausted
3.2.1 The X-axis needs to be cleaned repeatedly to check whether there is toner on the surface of the optical axis. If necessary, clean it with a coarse cloth.
3.2.2 The X-axis optical axis needs to be coated with thinner grease or metal rust inhibitor.
3.2.3 Put the grease on the Y-axis rail (available in accessories).
3.3 Rerun Input Shaping
When inputting shaping, please place the machine in a sturdy and vibration-free environment.
STEP1: Click Settings – Device Self-inspection
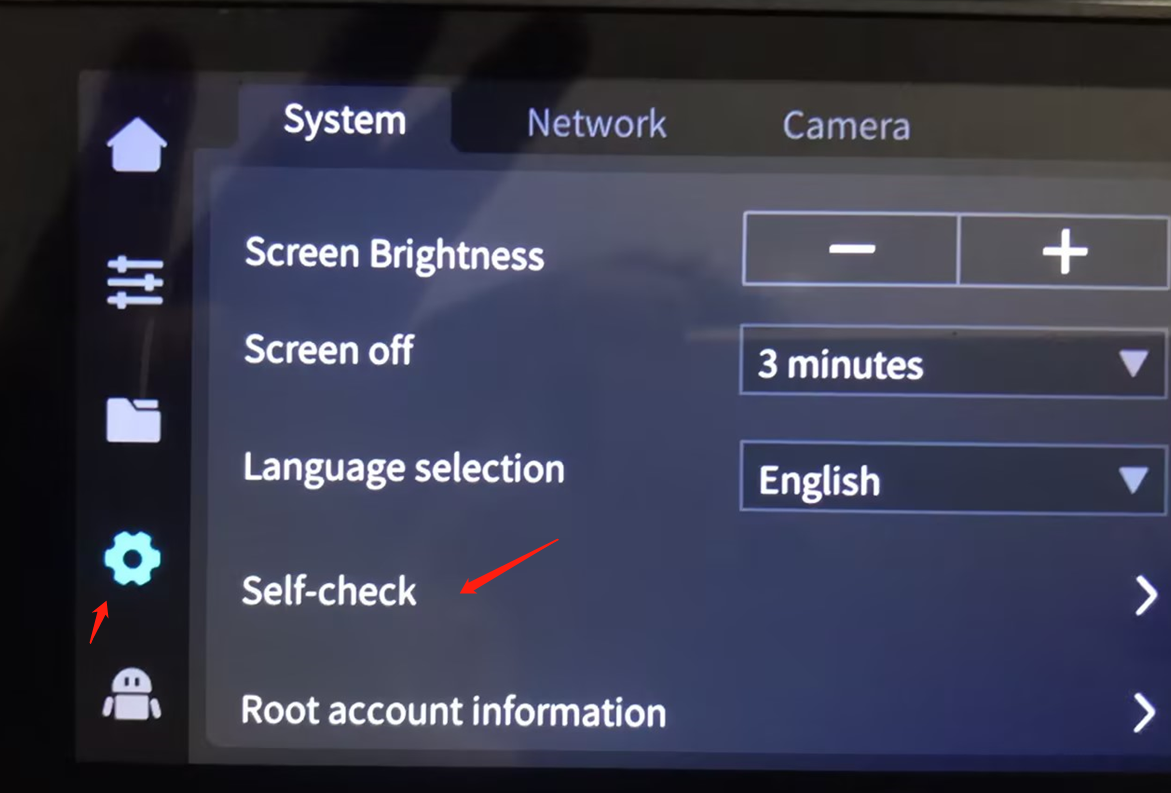
STEP2: Click “Start Detection” after checking Input Shaping. (Estimated time: 3 minutes.)
Z-Axis Abnormal Noise Handling Procedure
1. Phenomenon description
Z-axis elevation abnormal noise during printing
2. Cause analysis
2.1 Threaded rod deformation
2.2 There are obstructions on the printing threaded rod, causing abnormal 2.3 noise when rising
2.4 The platform has serious tilting issues
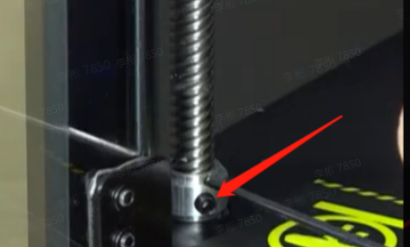
2.5 Threaded rod limit sleeve is loose/not properly installed
2.6 Z-axis motor fixing screw is loose
3. Troubleshooting and solution
3.1 Check if there are any bends or deformations in the three lead screws of the Z-axis.
3.2 Clean any foreign objects off the lead screws and apply lubricating oil.
3.3 Check the flatness of the heated bed to see if there is any tilt, then readjust according to the video.
3.4 Manually move the filament rod up and down, and check for any looseness. Refer to the after-sales tutorial K1 Layer Pattern Troubleshooting (Part One).
3.5 Disassemble the base plate of the machine, and reassemble and tighten the fixing screws of the Z-axis motor.


