
Today we’re gonna take a look at Anbernic’s new premium retro gaming handheld, the RG351M.
Specifications
The following are the specifications for the RG351M:
CPU: RK3326 1.5GHz (it may be 1.3GHz, not 1.5Ghz – See discussions here)
GPU: Mali-G31 MP2
OS: EmuElec v3.8 (not OpenDingux)
1GB DDR3L RAM
3.5″ IPS display (320×480 on the RG351M, 640×480 on the RG351V)
Aluminum alloy shell on the RG351M / Plastic on the RG351V
Built-in WiFi
3500mAh Battery on the RG351M (~8 hrs.) & 3900mAh on the RG351V (~8 hrs.)
Colors: Black / Gray (RG351M) or Transparent Black, Gray and Wood-Grain on the RG351V.
microSD 64GB Storage (up to 256GB) on the RG351M / 16GB Firmware & 64GB Games microSD on the RG351V (x2 microSD slots).
Helpful Tips
| Tip | Details |
| Safe Shutdown | Holding down the power button to shutdown the RG351 will result in a dirty shutdown which could result in file corruption. Instead, from the Main Menu press the Select button and press A on SHUTDOWN SYSTEM, then YES. This will cleanly shutdown and power off your device. |
| Charging RG351M | For charging the RG351M, you should use a power adapter that supplies 5volts/2Amps ( Example here ). |
| Larger microSD card | The included microSD will suffice for getting started, but you may prefer a more reputable brand, such as: Samsung, SanDisk or Gigastone. Or if you want to try out alternate operating systems such as ArkOS. |
Button Layout and Settings
The following will identify the button layout on the RG351M as well as demonstrate the general button functions and System / Emulator operations. The button layout below corresponds to the EmuElec button layout (OS included with the RG351M) and may differ with alternate operating systems. The buttons shown in the diagram below correspond to the bold items shown in the tables.
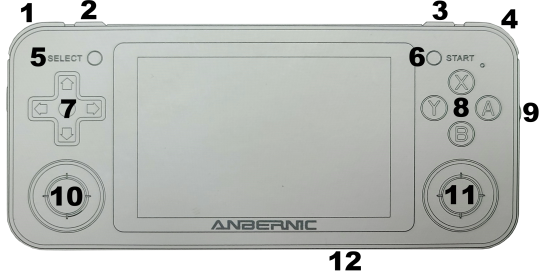
General Button Operations
| Button | Function | Button | Function |
| 1 | L1 | 7 | D-Pad (Up/Down/Left/Right) |
| 2 | L2 | 8 | Action Buttons A/B/X/Y |
| 3 | R2 | 9 | Volume Control |
| 4 | R1 | 10 | Left Analog Stick or Press Down for L3 |
| 5 | Select | 11 | Right Analog Stick or Press Down for L4 |
| 6 | Start | 12 | Reset |
Main System Interface
Once entering the main interface, see the table below for key operations.
| Button | Button Location (above) |
Function |
| A | 8 | Enter or confirm |
| B | 8 | Return / Cancel or bring up a Quick menu |
| Start | 6 | Main Menu Settings – Game, UI, Network, etc. Start again to return. |
| Select | 5 | Restart or Shutdown settings.. B (8) to return. *NOTE – use this to properly shutdown the system. |
| L2 / R2 | 2 /3 | Skip left/right through emulator list |
| D-Pad Left / Right | 7 | Cycle through Emulators |
Emulator Selected
Once an emulator is selected from the main menu, the following will apply.
| System | Function | Notes |
| Emulator Selected | Select (11) | Enters the options menu. Press once to enter the Options, a 2nd time to exit. Options allow changing the sort, list style and more. |
| Game List | L2 (2) / R2 (3) | Press L2 or R2 to page up/down through the game list. |
Game Operation
Once an emulator has been selected and a game launched, the following table will apply.
| Emulator | Action | Notes |
| Save State | R3 (11) + R1 (4) | Saves the state in the current game (RetroArch emulators only). |
| Load State | R3 (11) +L1 (1) | Loads the previously saved game state (RetroArch emulators only). |
| Show FPS (Frames per seconds) | R3 (11)+ R2 (3) | Shows / hides Frames per seconds (FPS). |
| Wheel | Volume up/down (9) | Adjust the volume level up/down |
| Arcade (FBA, MAME, Capcom, etc.) | Select (5) | Insert coin |
| Arcade (FBA, MAME, Capcom, etc.) | Start (6) | Start the game |
| Exit MAME | R3 (11) | If in-game, move down and select Exit. Otherwise, the game will exit after pressing the action button. |
| Exit RetroArch Emulators | Press L3 (10) / R3 (11) at the same time | After pressing the action buttons, select Close Content and press A. Then press up and select Quit RetroArch. |
| DS (Drastic) | Enter Configuration menu | Press the L3 (10) button. Use the D-Pad buttons (7) to navigate the options. |
| DS (Drastic) | Exit Emulator | Start (6) + A (8) |


