Hey guys ,
Glad to share some of our experiences with the Creality Ender-3 S1 series 3D Printers. The listed will be updated in a timely manner.
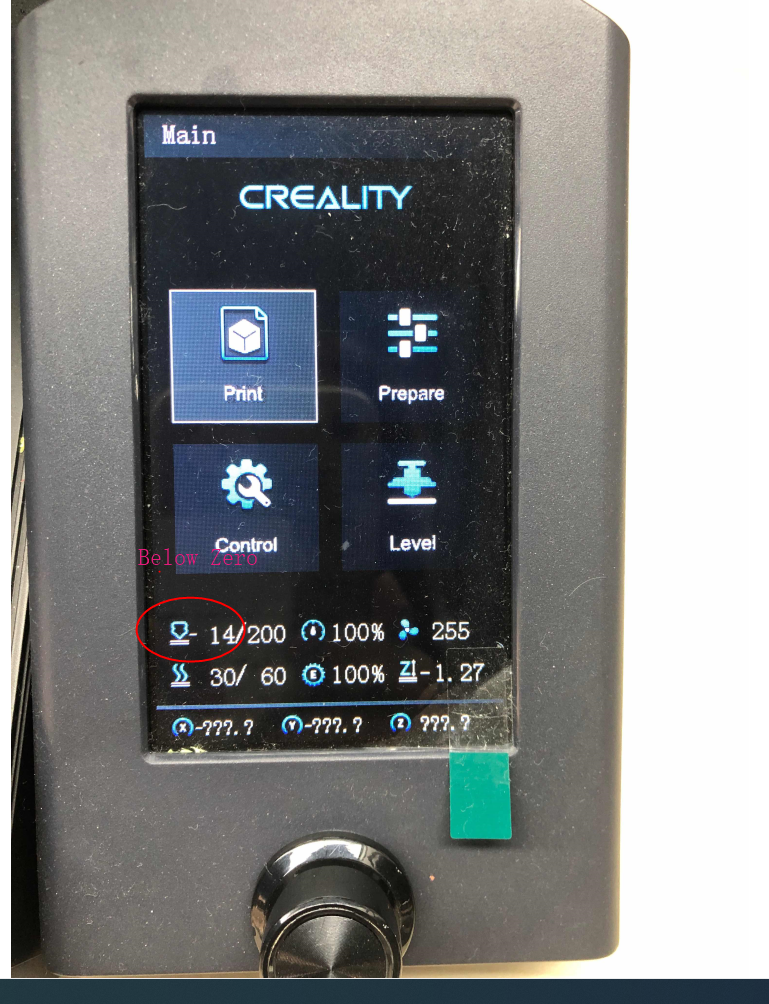
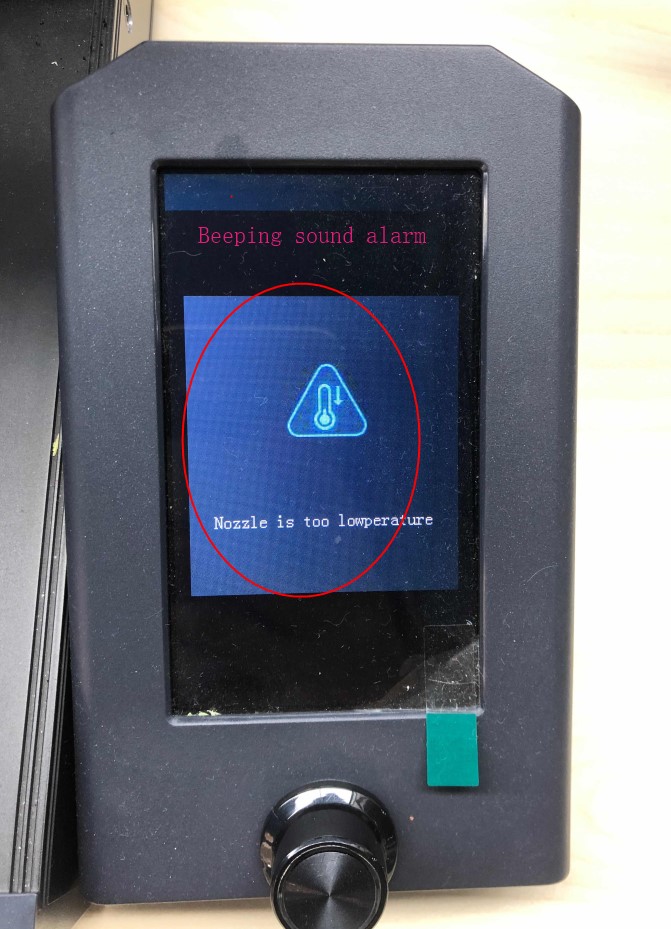
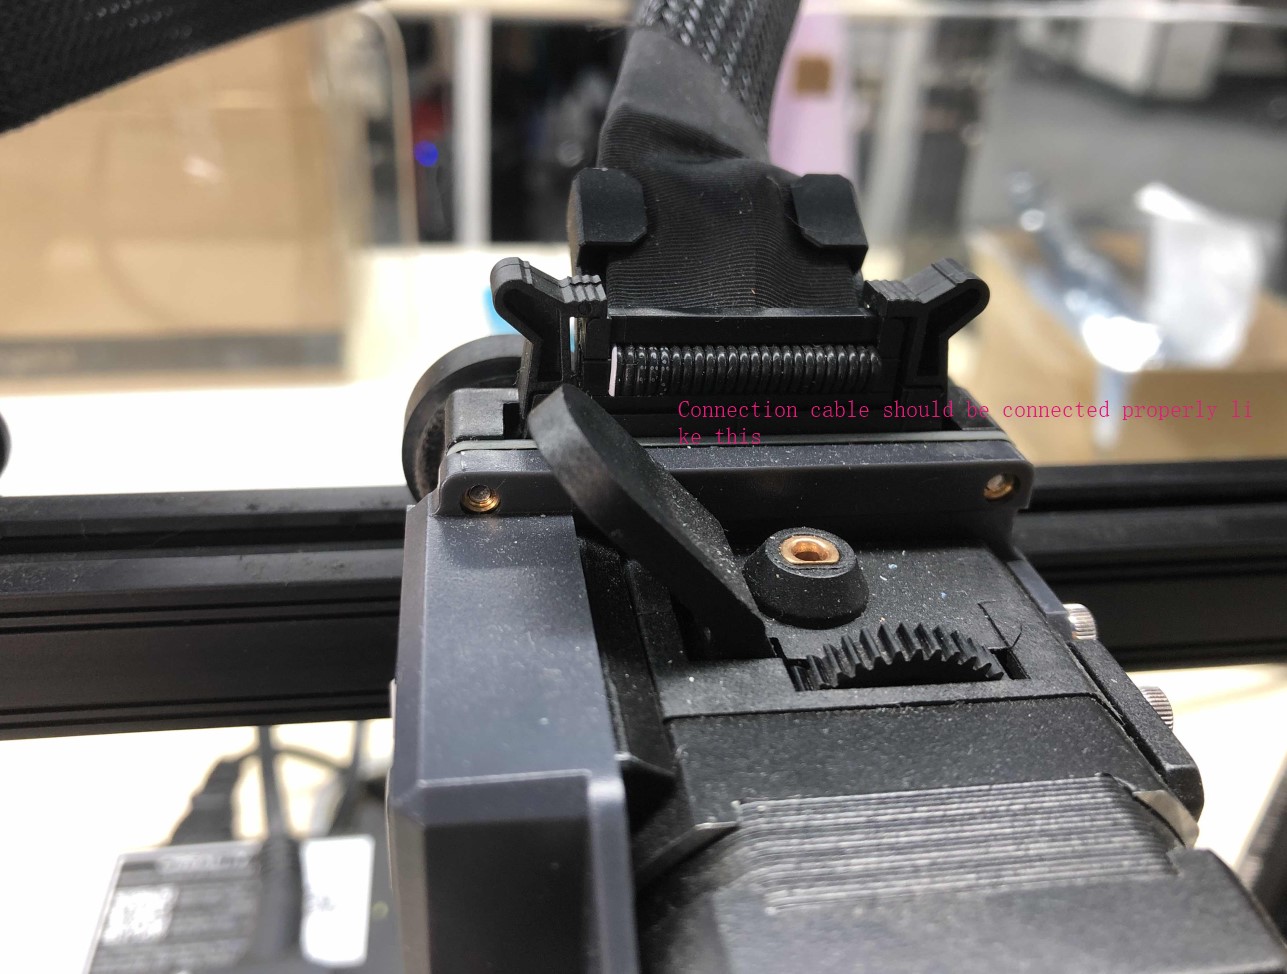
1. The nozzle temperature display error
Solution: Check if the Extruder connection cable is properly connected.
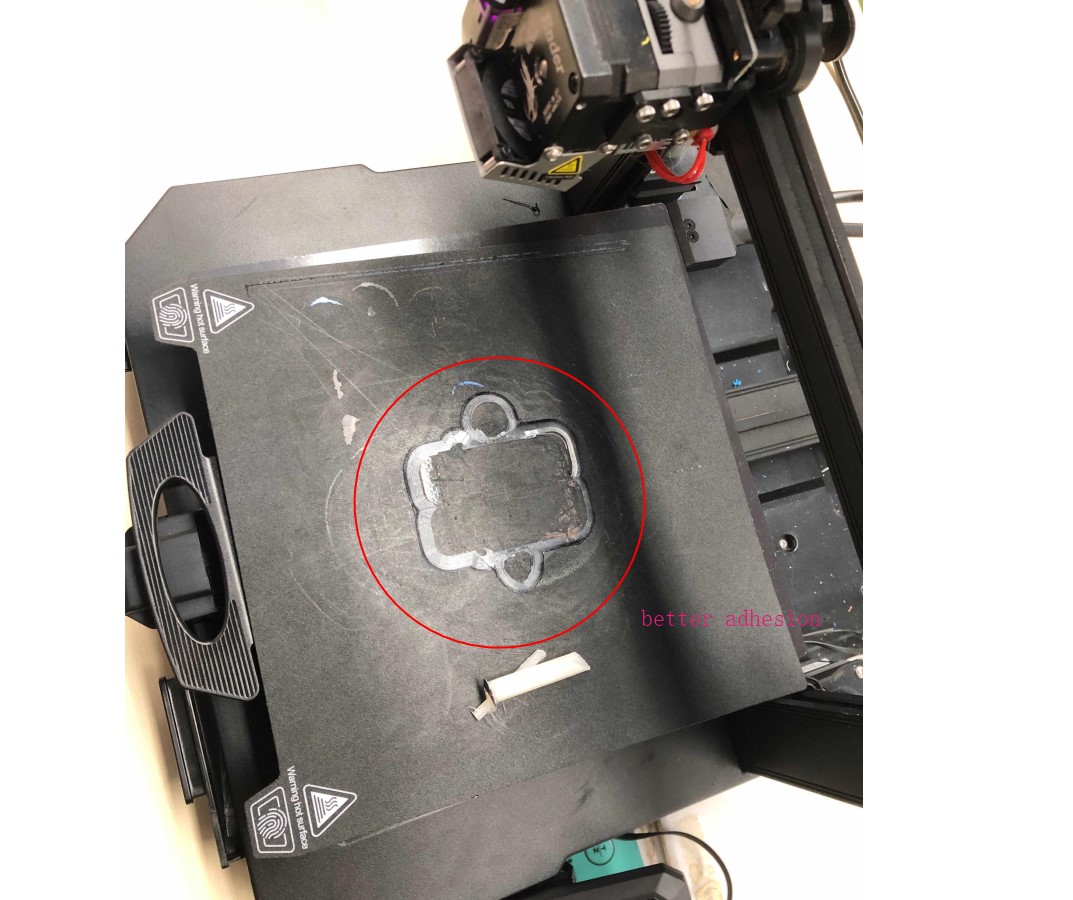
2. PLA + first layer adhesion failure
Solution: Increase the temperature to 70 Celsius degrees or exchange the Soft black magnetic sticker with the Gold PEI Magnetic sticker, both will help to improve first layer adhesion. Note: PLA+ requires a hotbed temperate of 60 – 80 Celsius degrees.
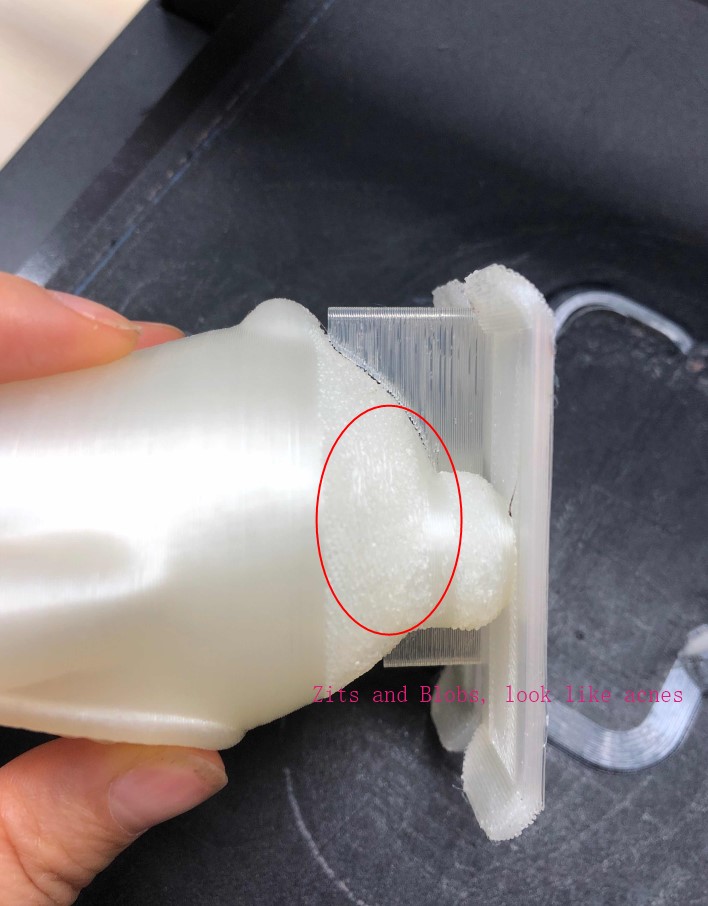
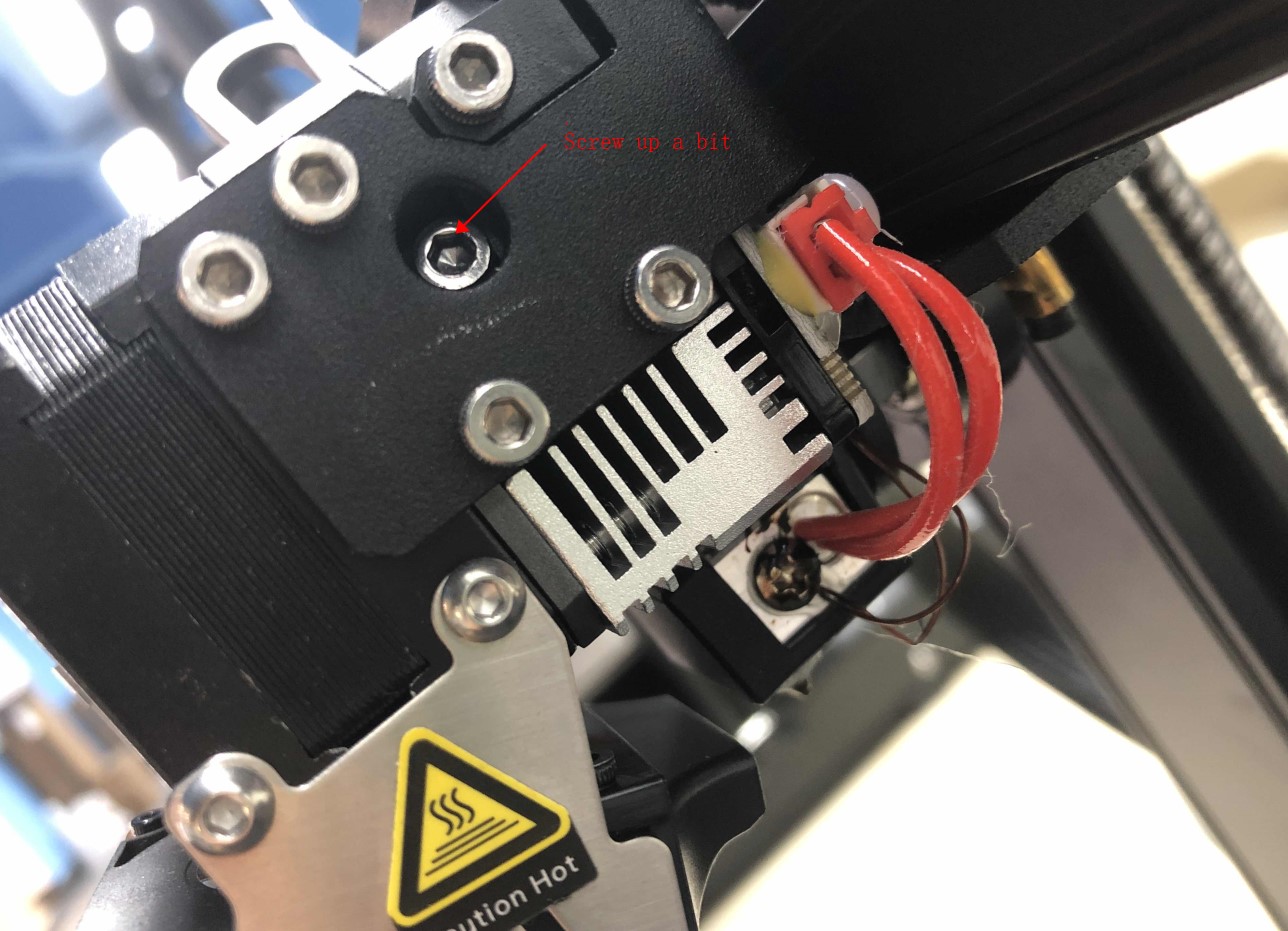
3. Failed Prints – Not extruding enough + prints Zits and Blobs
Solution: 1. The extruder may be clogged. If this happens, check that the filament is clean and the spool is dust-free. If there is a lot of dust on the reel, it can block the extruder as it accumulates inside the nozzle. 2. Not extruding enough: Screw up the adjusting clamp a bit, try again after a bed leveling.
4. “It looks like the last File was interrupted …” – How to get rid of that?
Sometimes happens if my printer is connected to the PC. or maybe the gcode is not saved completely (check the gcode file if it still has End-gcode at the end).
5. Plowing after a good first layer
You’re too close to the bed. Layer 1 is epic, layers 2-4 suck, then pretty good from 5 onwards. The plastic pushes upward. When the next layer goes down, it doesn’t have enough space, so it happens again. Normally, this clears a few layers, and you get an elephant to foot. But it can keep going depending on you level of over extrusion.
In theory, every layer after the first should be perfect but that’s not usually how it is in reality. Imperfections in the v rollers frame not dead nuts square, lead screw backlash, etc, etc all make things less than perfect as it travels up the z-axis. That’s probably why you’re seeing plowing after a good first layer. Even with ABL, what you have to do sometimes when looking for perfection is to set the z offset for the first layer, then adjust a layer or two up to make things just right. That’s assuming all the stuff you initially set is set up well and not cause for concern.
6. Can’t get corners to stay down
Try slowing down your first layer some
Try reducing airflow and/or keeping the bed a bit warmer so the corners peel less
Try bed tramming
7. Calibration
A. Tighten the Screws
Creality 3D printers are known to offer good value, but quality control is something that they can lack. It’s up to the user to make sure that all the screws are tight, which may seem like a silly idea, but the difference it could make is surprising. It will not only remove issues like ghosting, but also reduce the number of possible failures, making troubleshooting later on much easier.
B. Level the Bed
Yep, we’ve still got to deal with knobs. Another very easy yet important step is to correctly level your Ender 3’s bed. It’s one of the most crucial adjustments but also one of the easiest to miss. Adjusting the bed on the Ender 3 is a very simple and quick task that instantly improves the surface quality of your prints (if it’s not already adjusted).
Regardless of what Ender 3 model you have, the steps are the same. Here’s how it’s done:
Home all axes by clicking “Home”.
Click “Disable Steppers” and move the print head to one corner, making sure that there’s adequate distance between the nozzle and the build platform. (The nozzle doesn’t scratch the build platform while moving it.)
Unscrew the knob underneath one corner of your Ender 3 while moving a paperback and forth until you can feel slight friction.
Repeat the previous step with all four corners to ensure that the whole bed is leveled.
C. Calibrate the Extruder
Measuring filament to check E-step calibration.
Measuring filament to check E-step calibration (Source: Let’s Print 3D)
If you’re having problems with under- or over-extrusion, there’s a possibility that your extruder’s E-steps aren’t calibrated. In order to find the right E-steps, you’ll have to do a little bit of math. Using a simple formula, you can calculate the new E-step with only three inputs.
Before starting, make sure that you’re able to navigate to “Control > Motion” on whichever Ender 3 you have. Some users have noted that this option is missing, perhaps due to the status or version of their firmware.
Measure your filament to 100 mm from a set point on your extruder and mark the filament. Mark an extra 10 mm above and under this 100-mm marking to make measuring easier later on.
Heat up your hot end and extrude 100 mm. (The temperature may need to go above 180 °C before the extruder will operate.) You can do this by clicking “Prepare > Move axis > Move 1 mm” and then slowly rotating the knob until you arrive at 100 mm.
Wait until the printer has finished extruding and measure how far from the 100-mm mark the filament stopped. If the mark has passed the extruder, then your extruder is over-extruding, and if it hasn’t reached the mark, then it’s under-extruding.
Use the marks above and under the 100-mm mark in order to estimate the amount of filament extruded.
Now calculate the correct E-steps by multiplying the current E-steps by 100, then dividing by the actual distance your filament was extruded. The resulting value will be your new, correct E-step value.
Click “Control > Motion”, then scroll down to “E-steps/mm” and change it to your new E-step value.
Featured image of Extruder Calibration: 6 Steps to Calibrate Your Extruder
D. Tighten the Belts
The belt tension on the Ender 3s also has a big impact on how your 3D prints turn out. Looser belts can cause severe ghosting, layer shifting, and dimensional accuracy issues.
On the Ender 3 and Pro, you can tighten the belts by unscrewing the brackets that hold the bearings and moving them so that there’s sufficient tension between the stepper motor and the bearing. The V2, on the other hand, has screws built into the end of the X- and Y-axes, which allow you to adjust the tension for those belts on the fly. For the Ender-3 s1/S1 Pro, just turn the knob clockwise. Either way, the belts shouldn’t be super tight or super loose, just somewhere in between.
E. Adjust the Eccentric Nuts
It’s also very important to adjust the eccentric nuts on the Ender 3s. These nuts are located under the bed and on the X carriage. They can be tightened by rotating them with the wrench that comes with the printer.
The eccentric nuts should be tight enough so that you can’t rotate or tilt the bed but not so tight that it inhibits motion. The easiest way to do this is by loosening all the nuts and then tightening them again until the bed is firm.
The X carriage should also be adjusted this way. What you’re looking for is a horizontal carriage that doesn’t have too much resistance when moving up and down.
To be updated ….


