Getting Started
To use Baofeng Moyan camera, please follow these simple steps:
1. Charge your Moyan camera
When Moyan camera is in the state of power off, insert original adapter into 220V/50HZ outlet, and then connect Moyan camera to the original adapter through Micro USB data cable.
When charge is in process, the status light will be red. When the charge is completed, the status light will switch to blue.
*When Moyan camera is in the state of power on, insert adapter into the camera to have a continuous supply of power.
2. Download Baofeng Moyan APP
Android user: search “Baofeng Moyan” in Android app market.
IOS user: search “Baofeng Moyan” in APP store
Or you can scan the QR below.
3. Install the foldable stand
Put screw into Moyan camera’s screw base and tighten it.
Power on/off
Power on
When Moyan is in turned-off period, long pressing power button around 3 seconds, the camera status light turns on (red) and that means the camera is in the started state. At this point, you can release the power button. After waiting for a while, the camera status light will change into blue and that means the camera is successfully turning on.
Low battery: long pressing power button, the camera status light (red) blinks twice and then stop. This means the battery is low. Please charge the battery.
Power off
When Moyan is in the state of power on, long pressing power button around 3 seconds. As soon as the camera status light blinks, you can release the power button. The camera status light will blinks a few seconds and then stop. That means the camera has been successfully turned off.
Shooting
Taking pictures
Press the shutter button once, when hearing the continuous beeping sound, you have 3 seconds to adjust the camera position. After 3 seconds, you will hear a shutter sound, and that means a photo has been taken.
Video recording
Long pressing the shutter button around 2 seconds, then you will hear two beeps and that means the camera has begun recording. In the process of recording, the status light keeps blinking slowly. That means the camera is recording video. When you want to end the shooting, press the shutter button once again. You will hear a beep sound and that means the video recording is end.
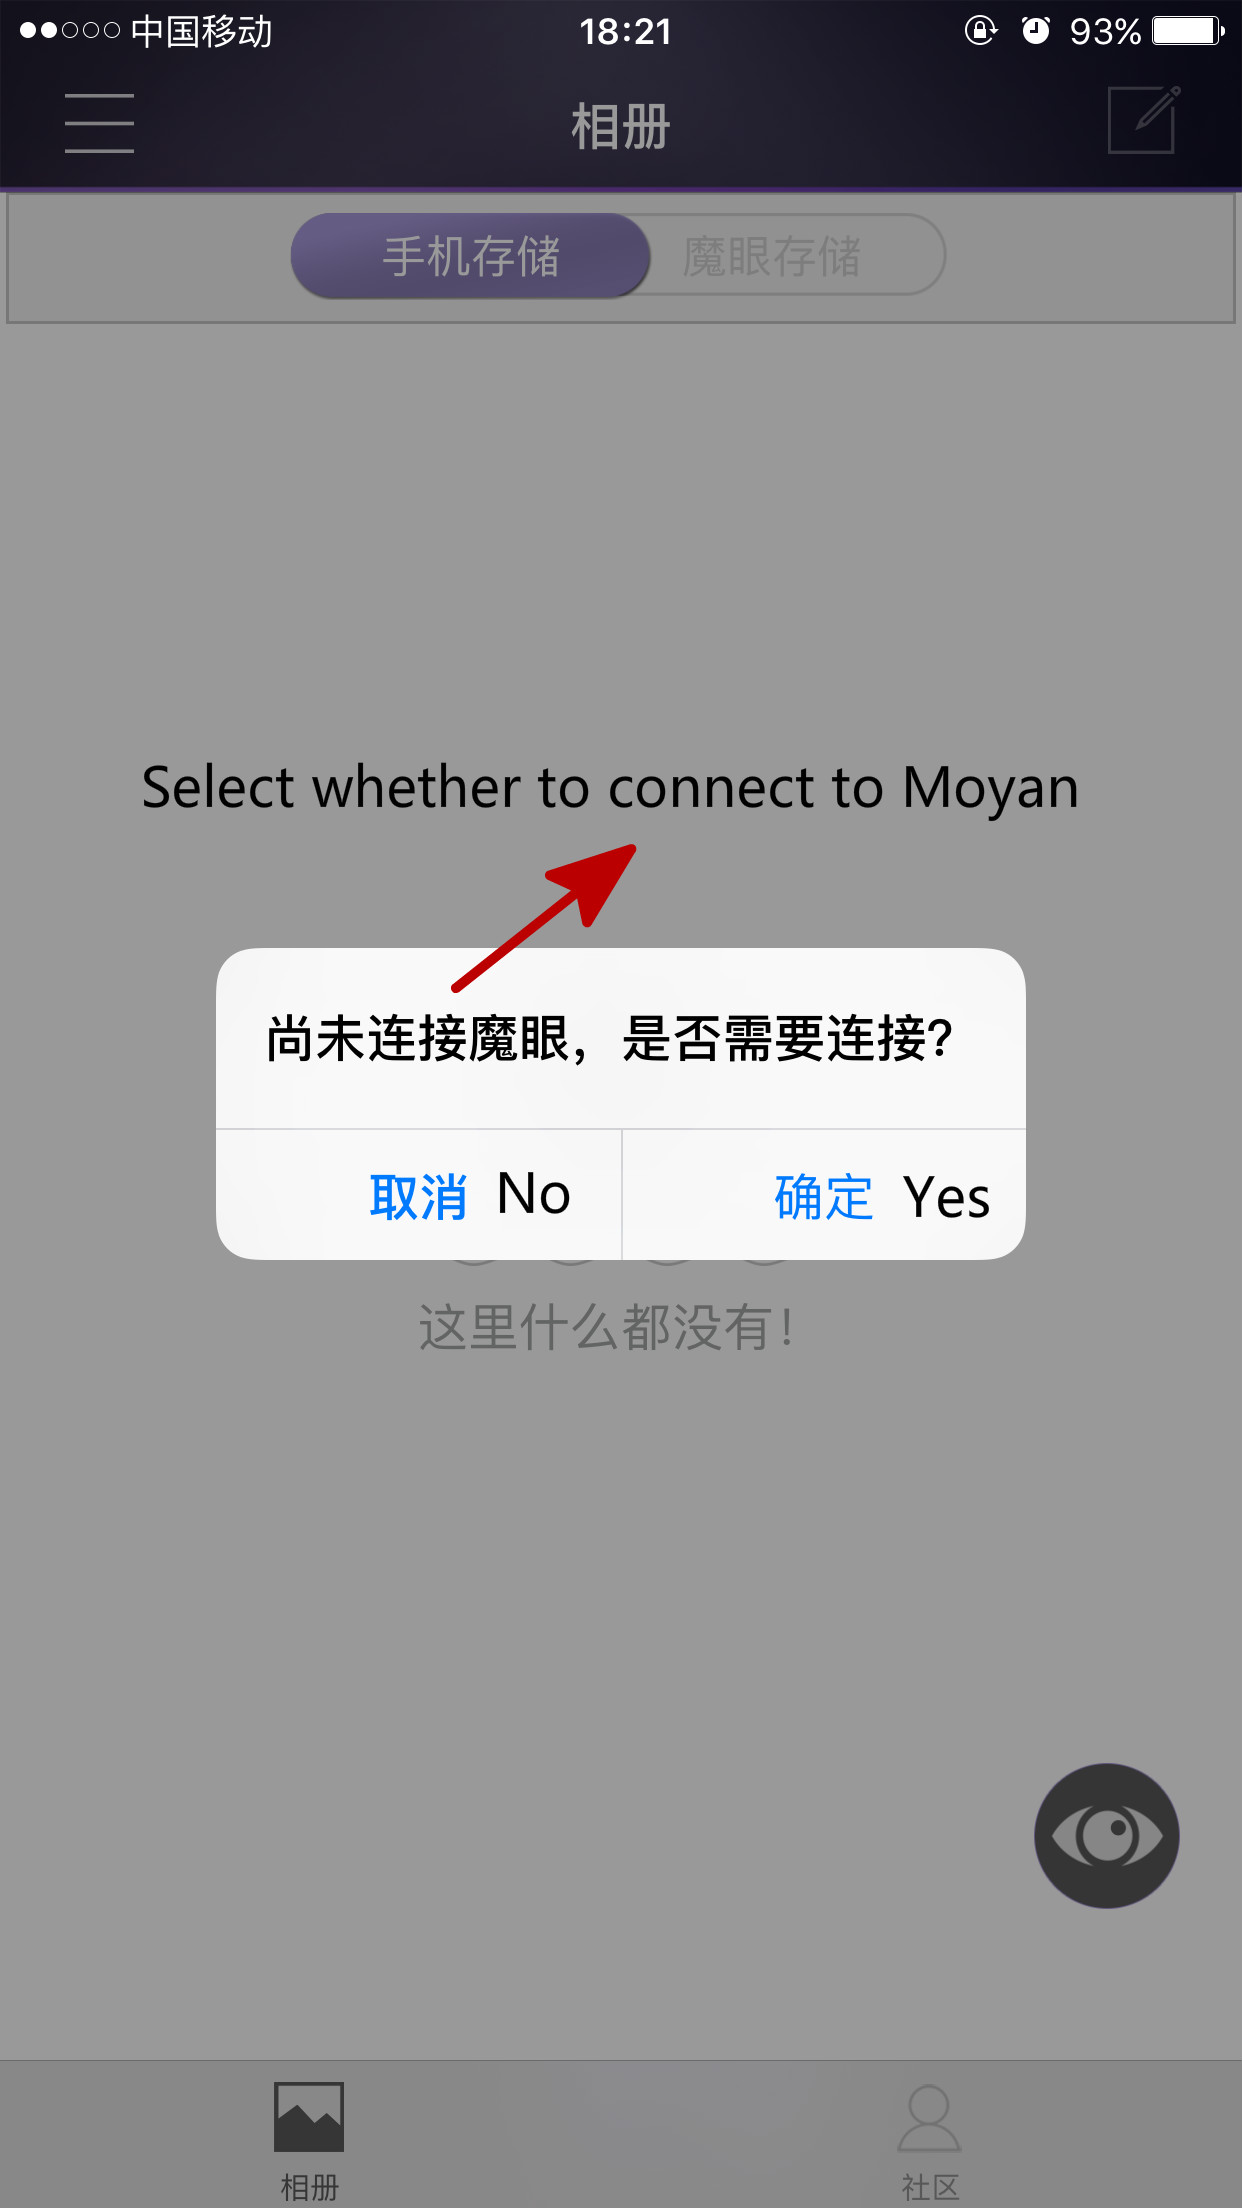
Pairing
Through Baofeng Moyan APP, you can see real-time image of what is going on. You can also control the camera to shoot pictures and videos. Also, you can enjoy the pictures and videos you’ve taken and share it to social network via APP.
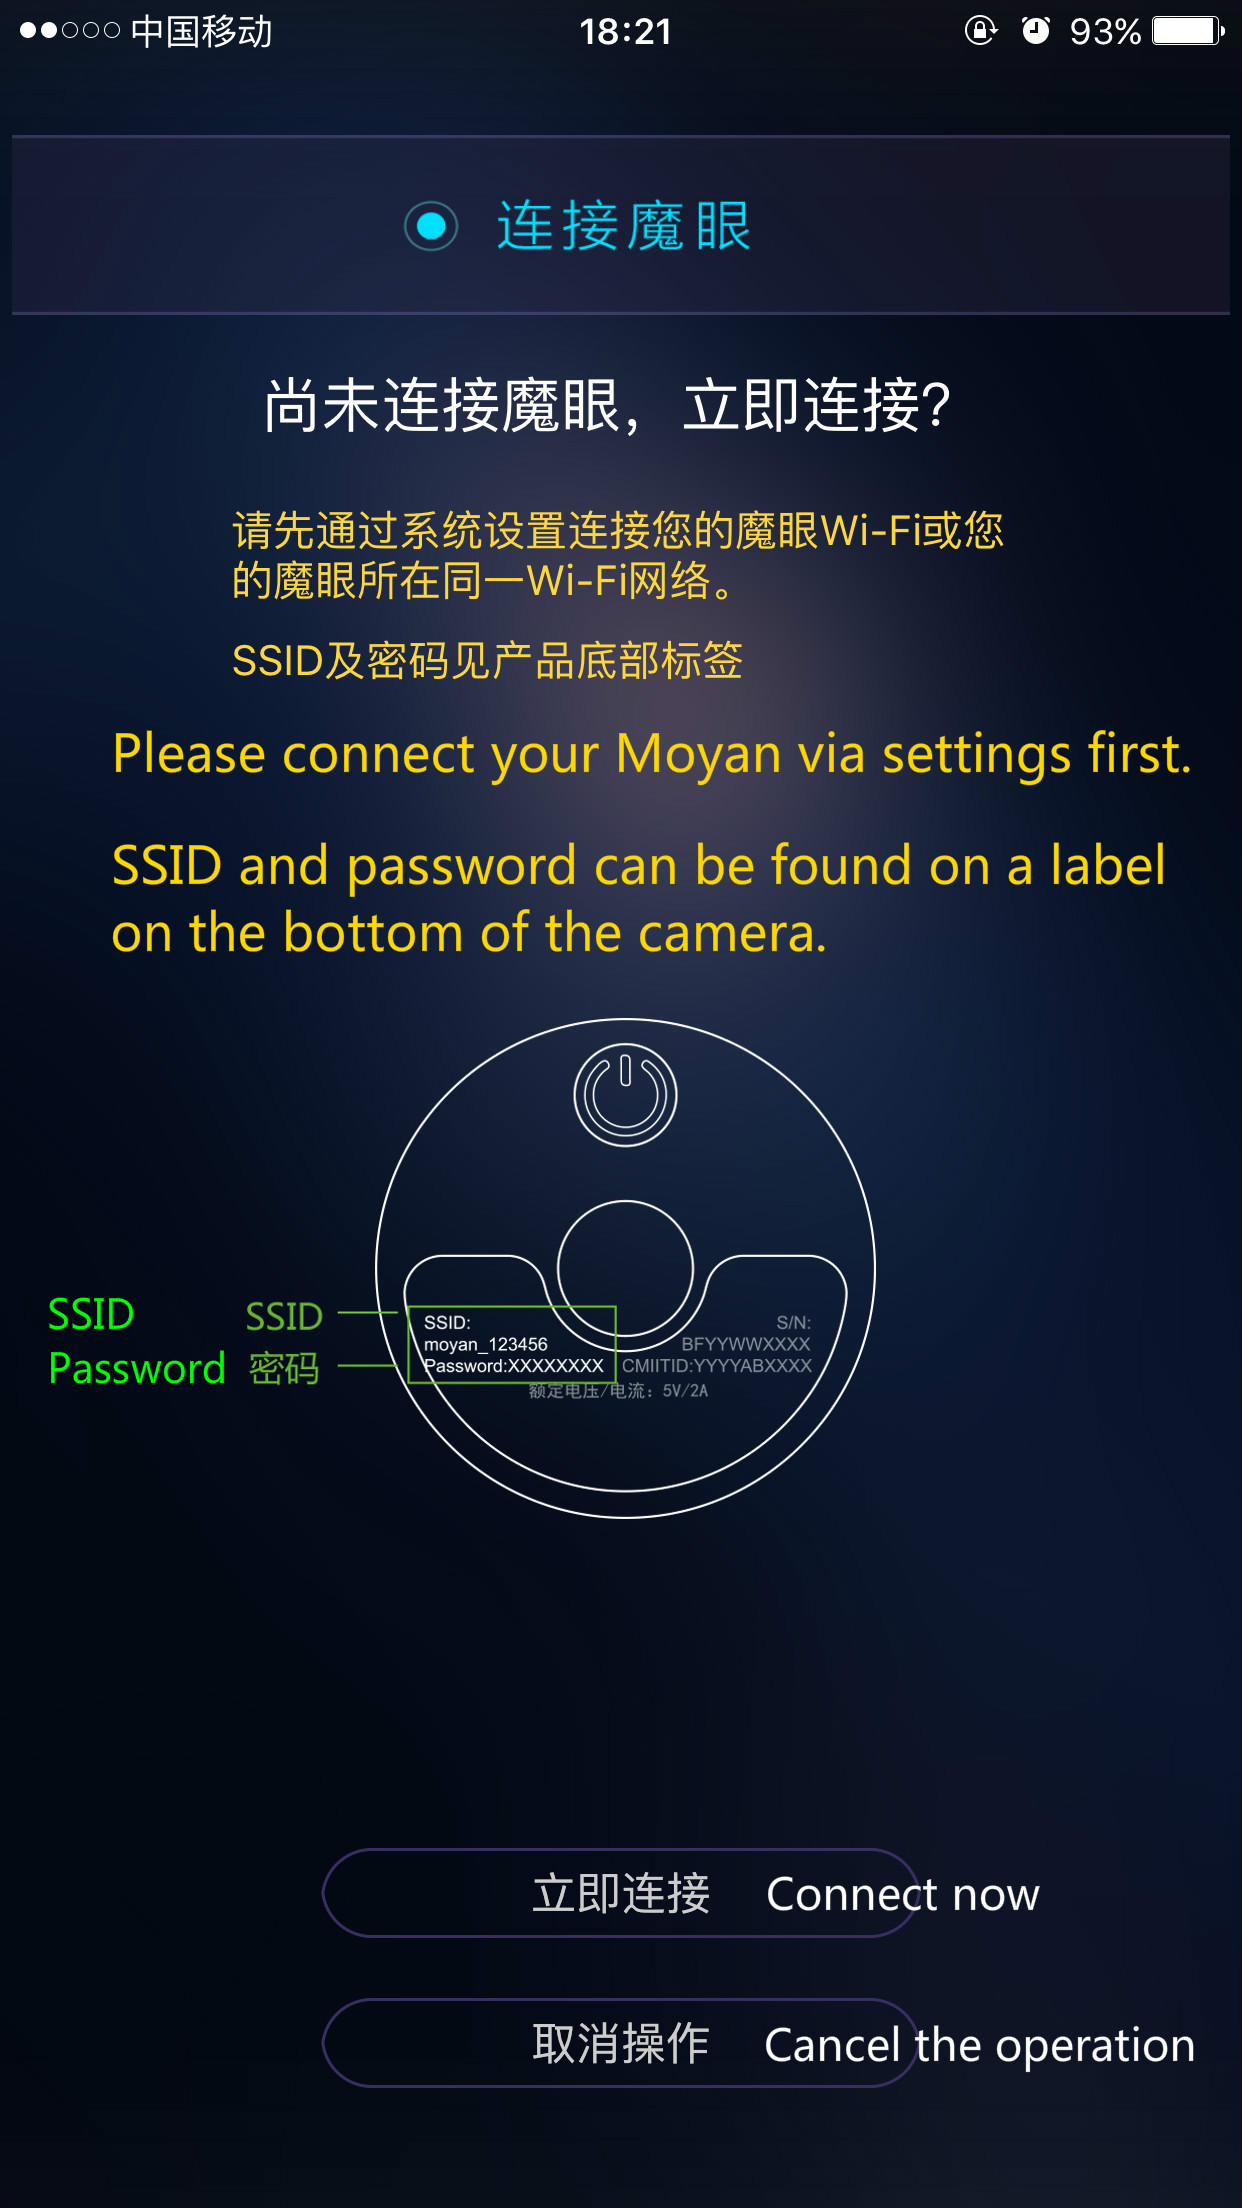
Connection step
1.
Make sure your Moyan camera is turned on: the blue status light is on permanently.
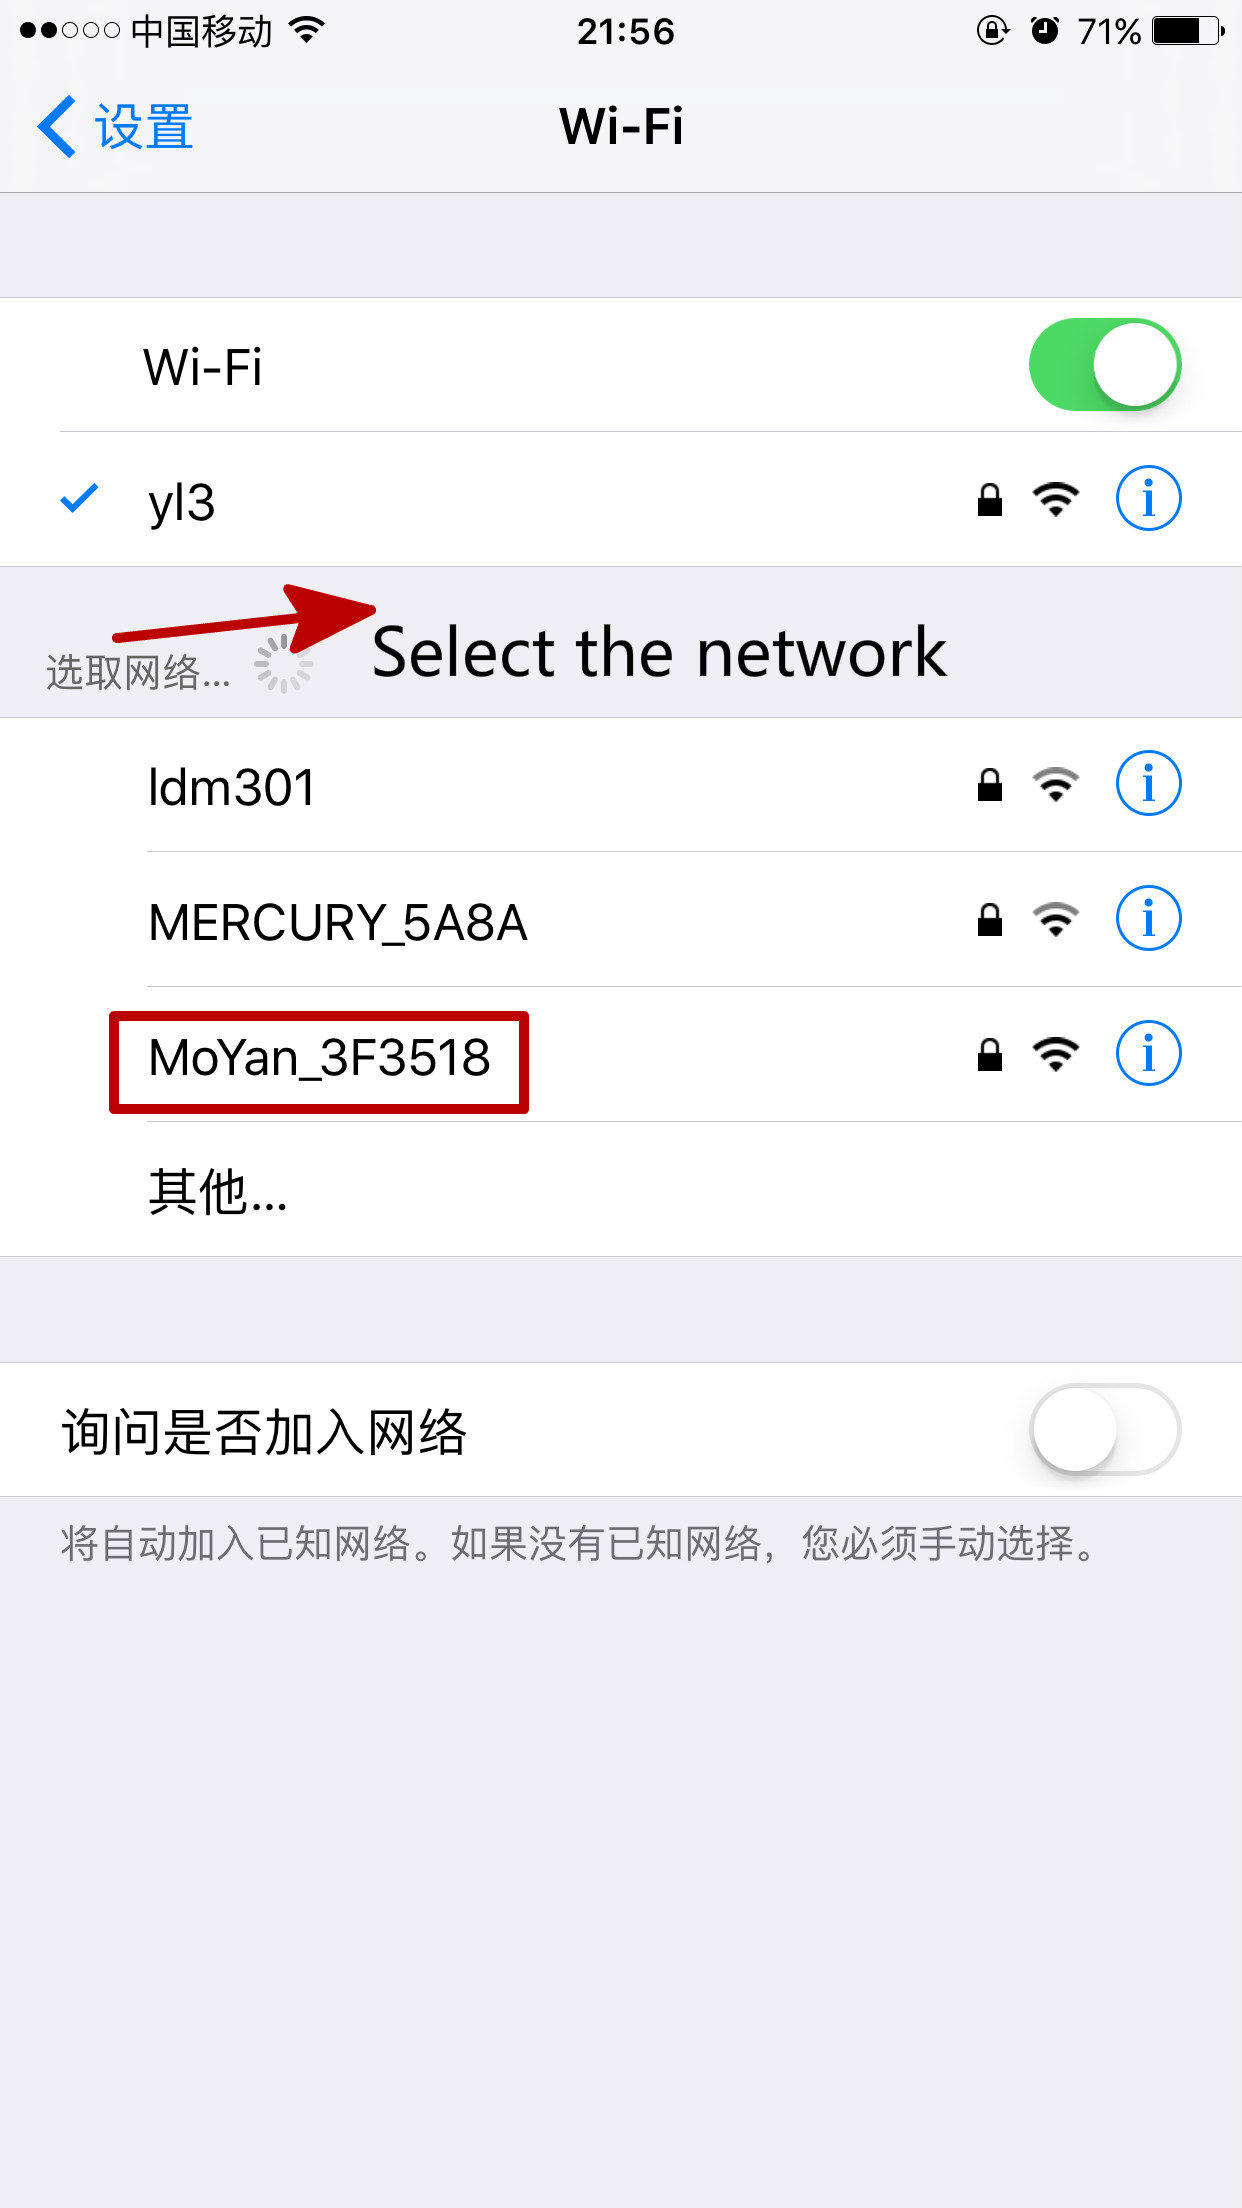
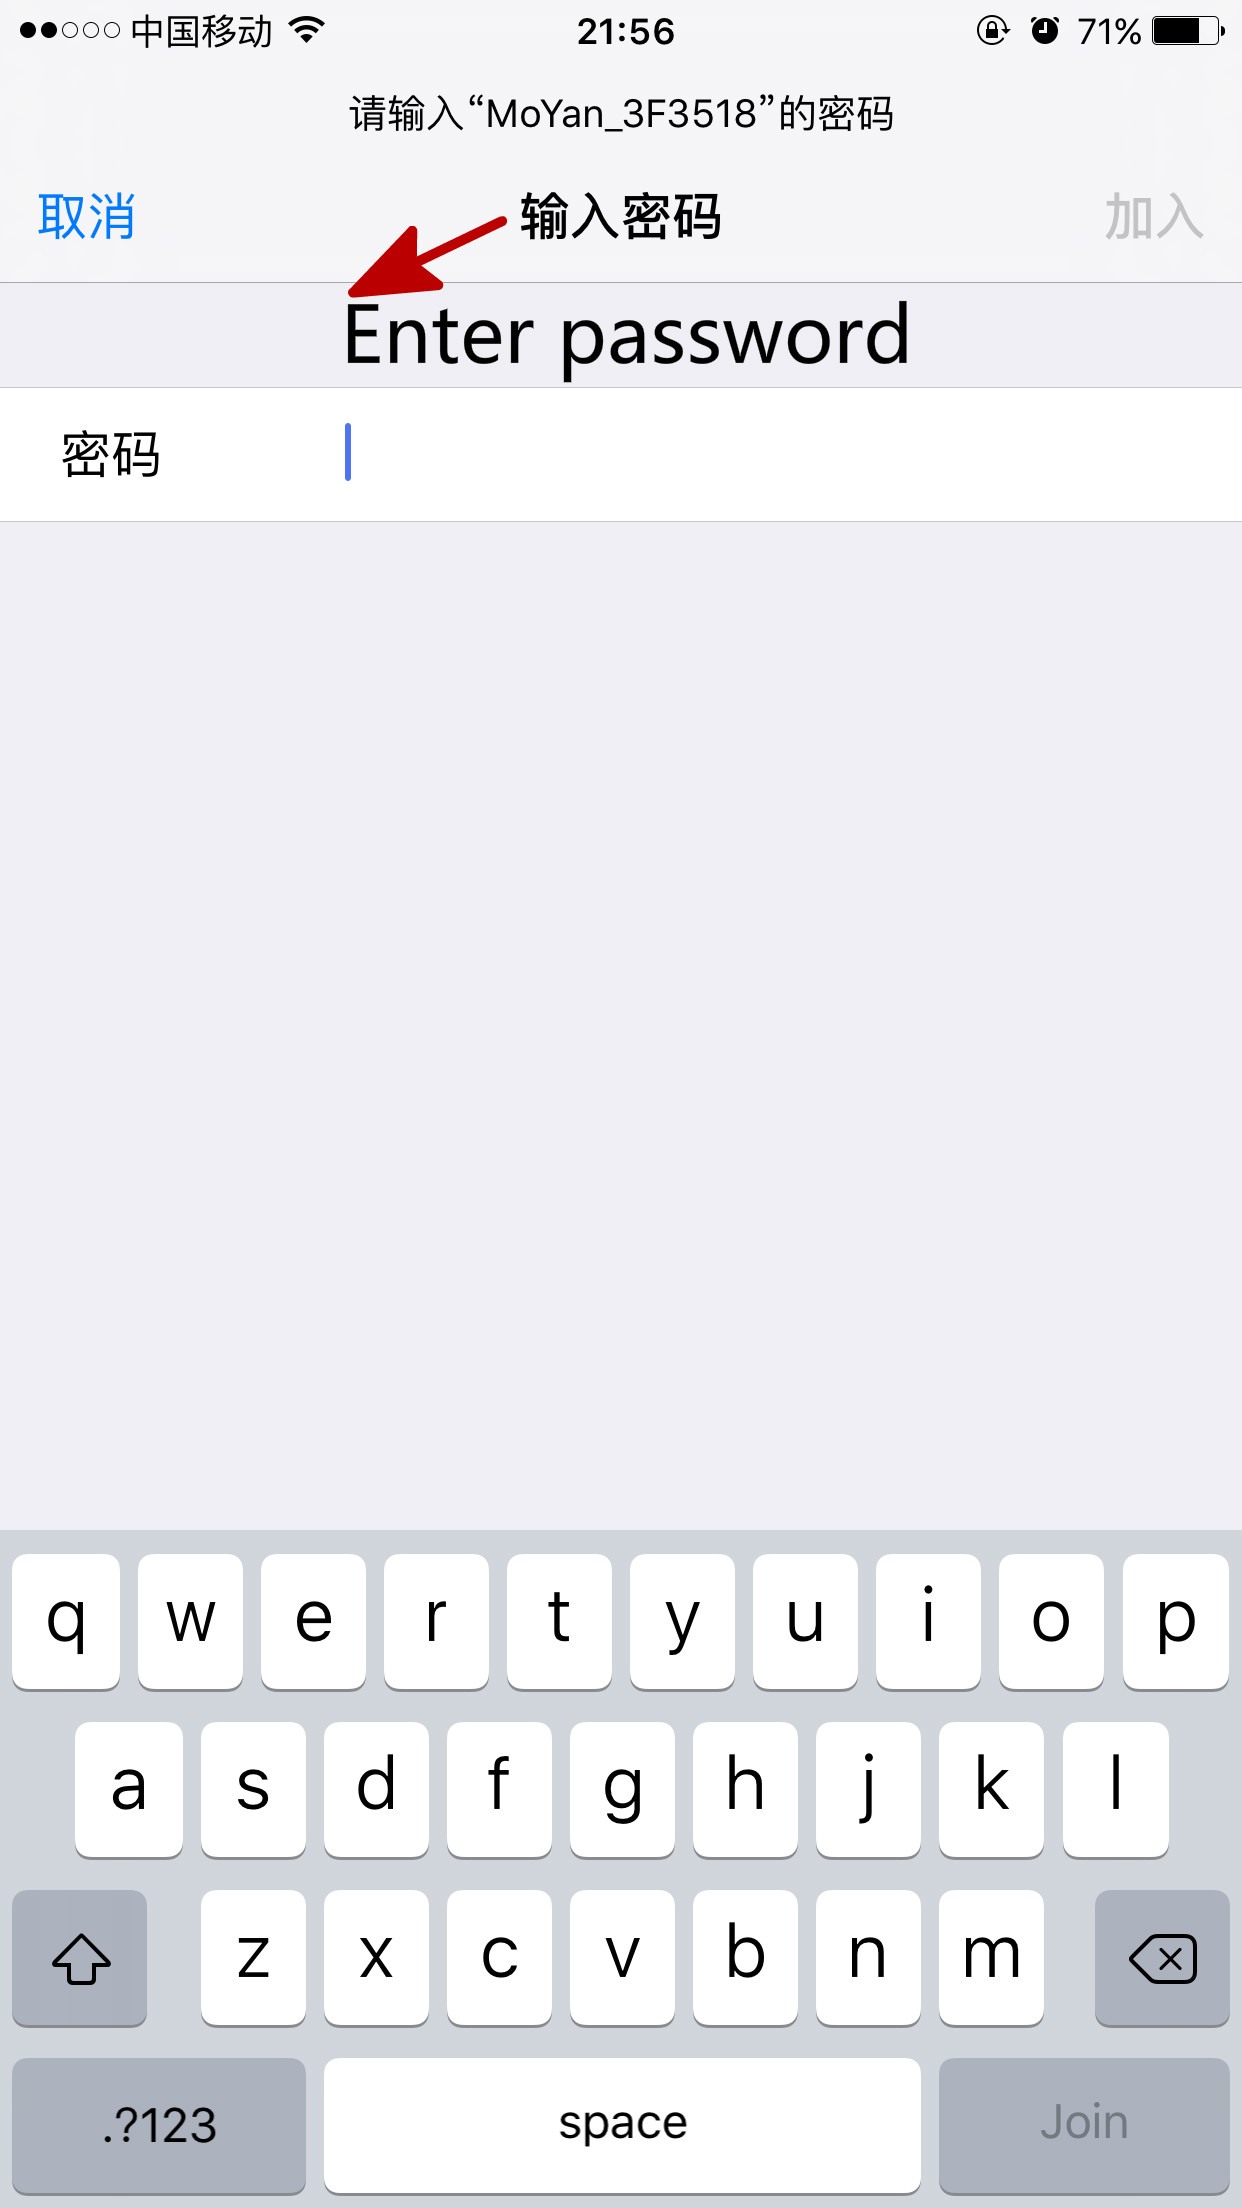
2.
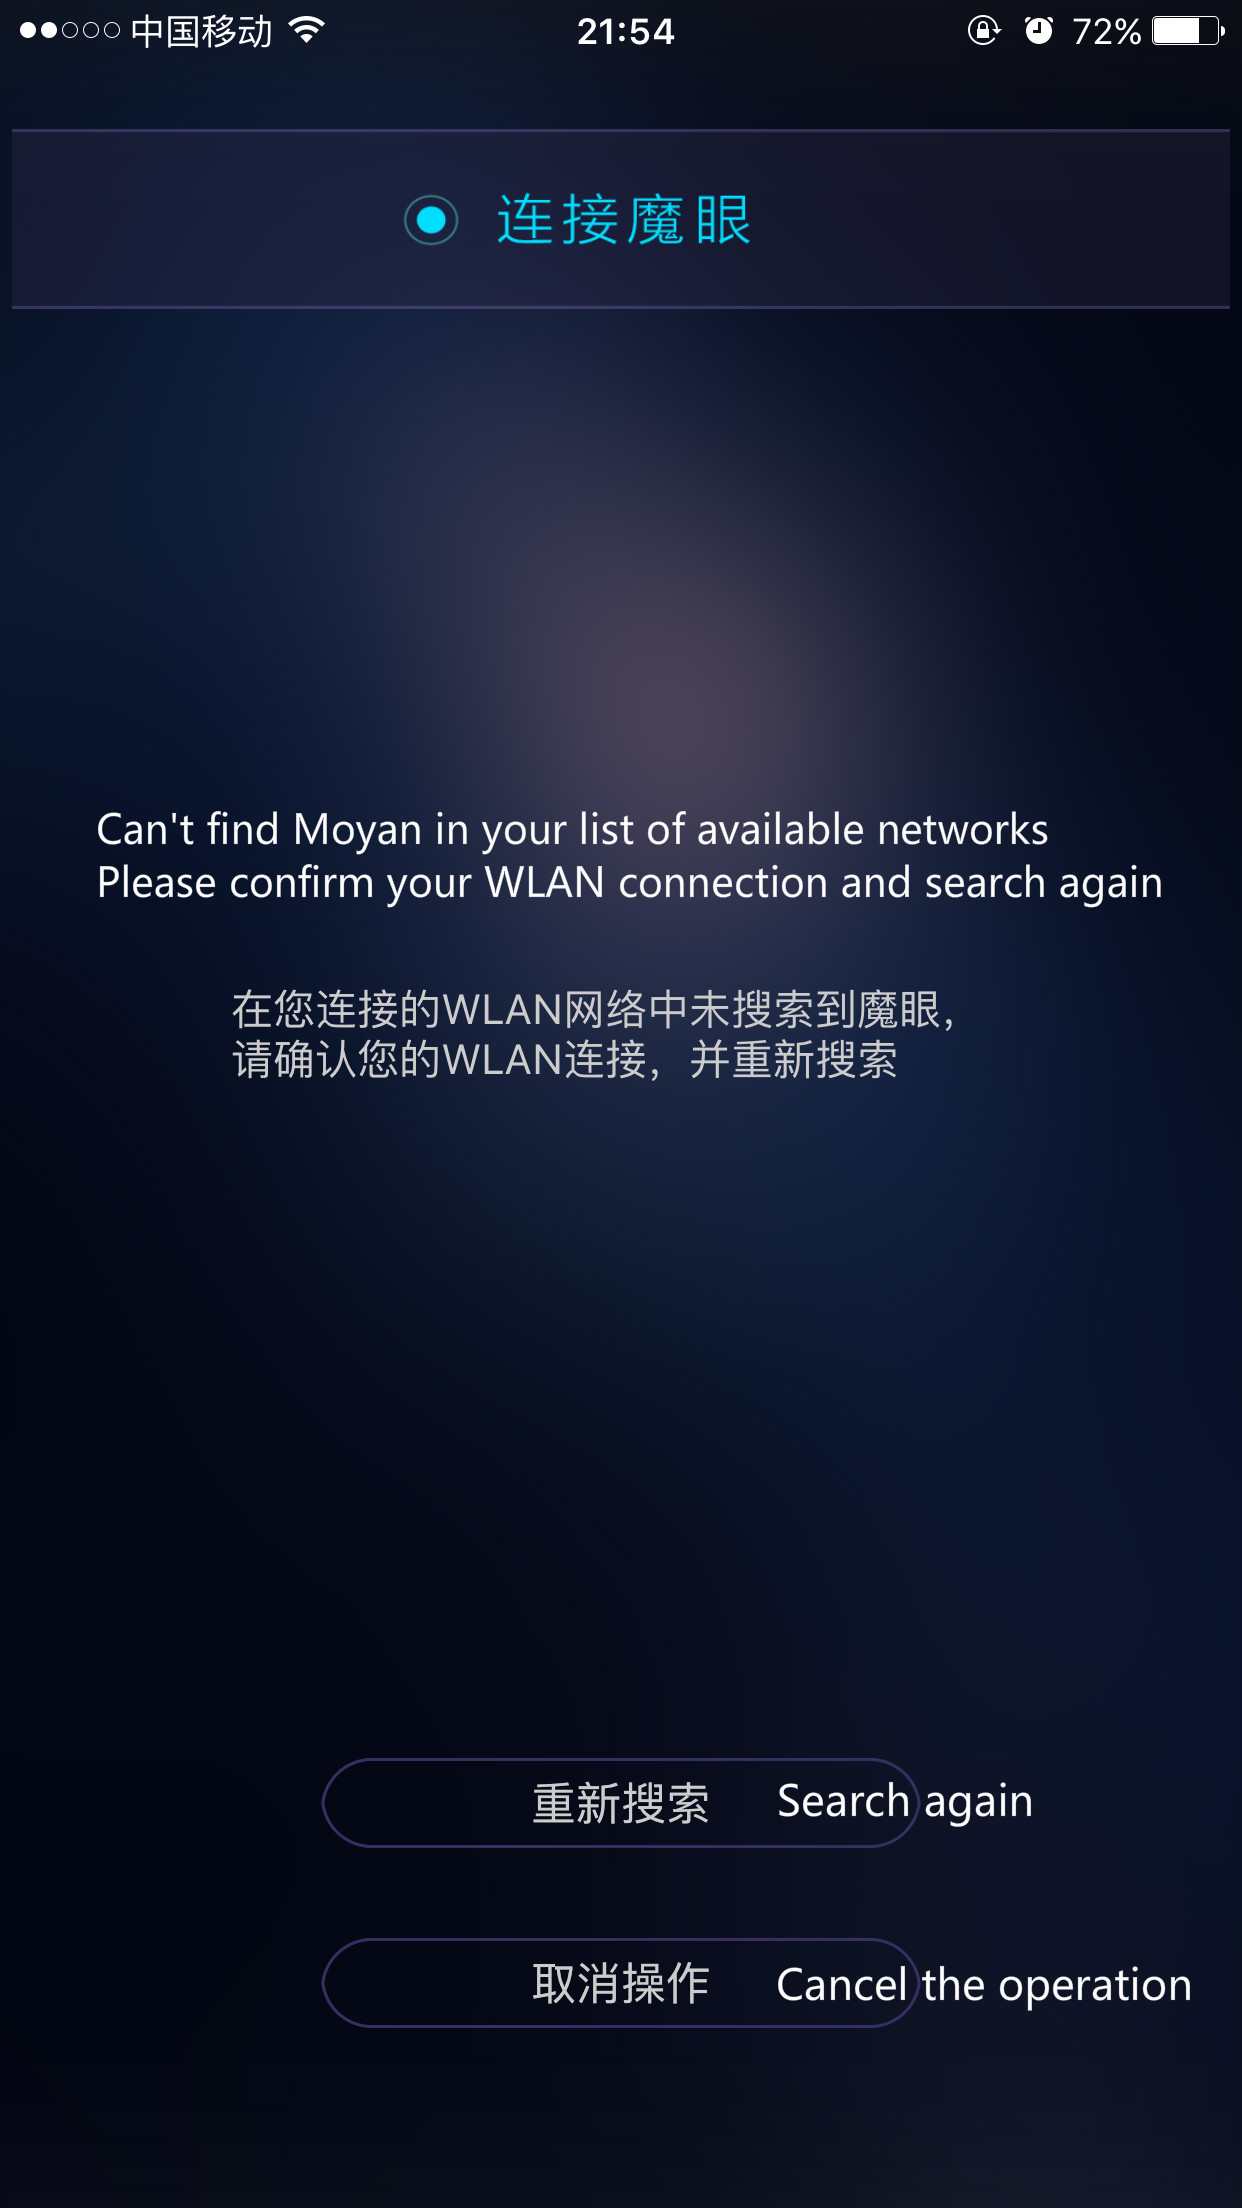
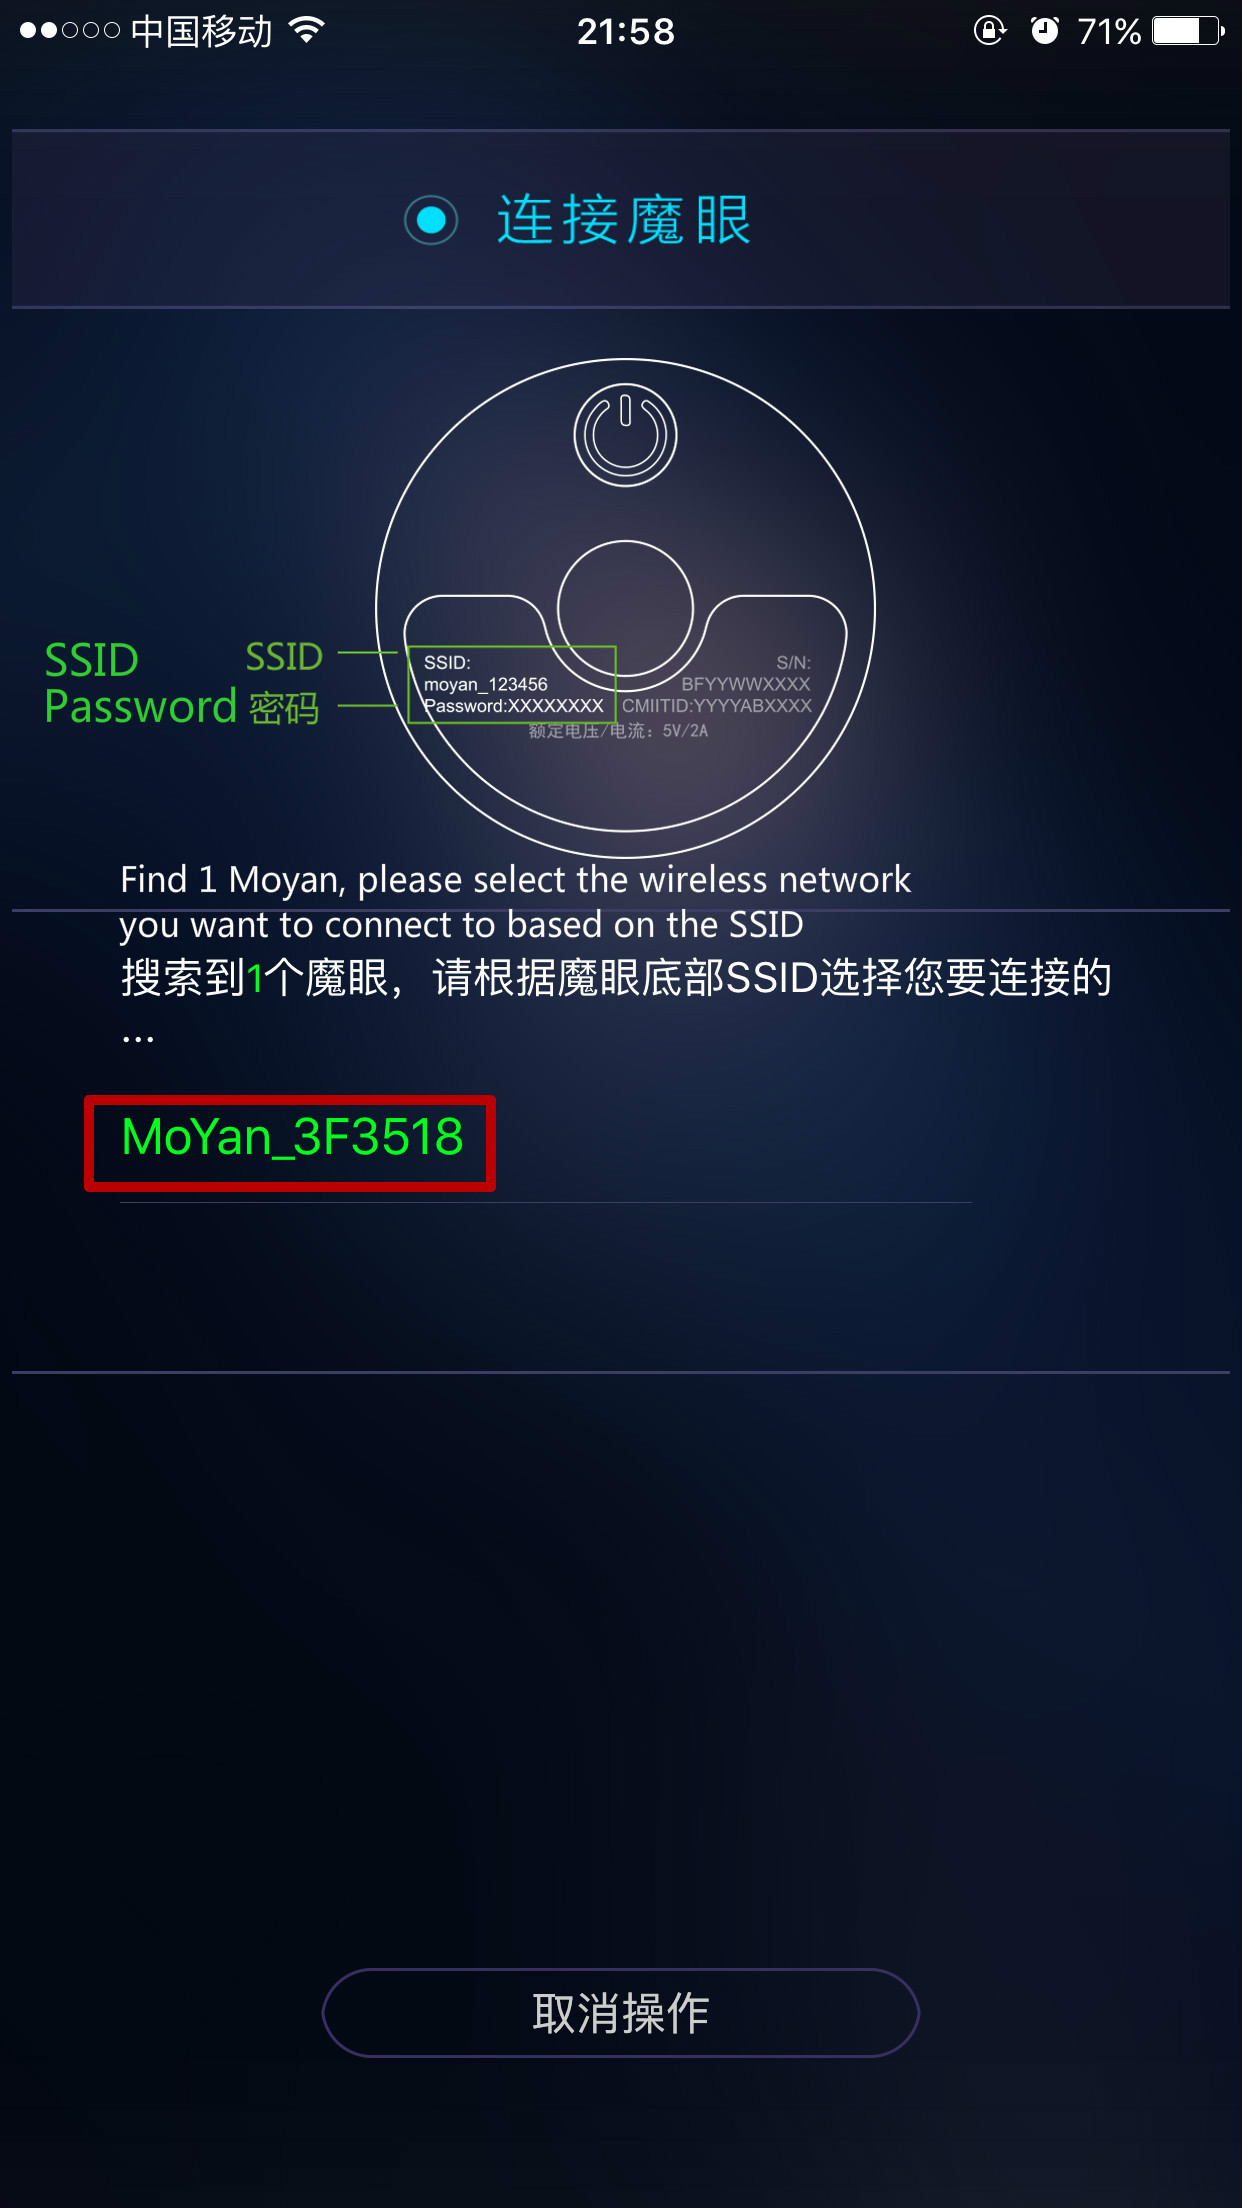
Turn on your phone’s WLAN switch and connect the camera to Moyan Wifi (SSID and password can be found on a label on the bottom of the camera).
3.
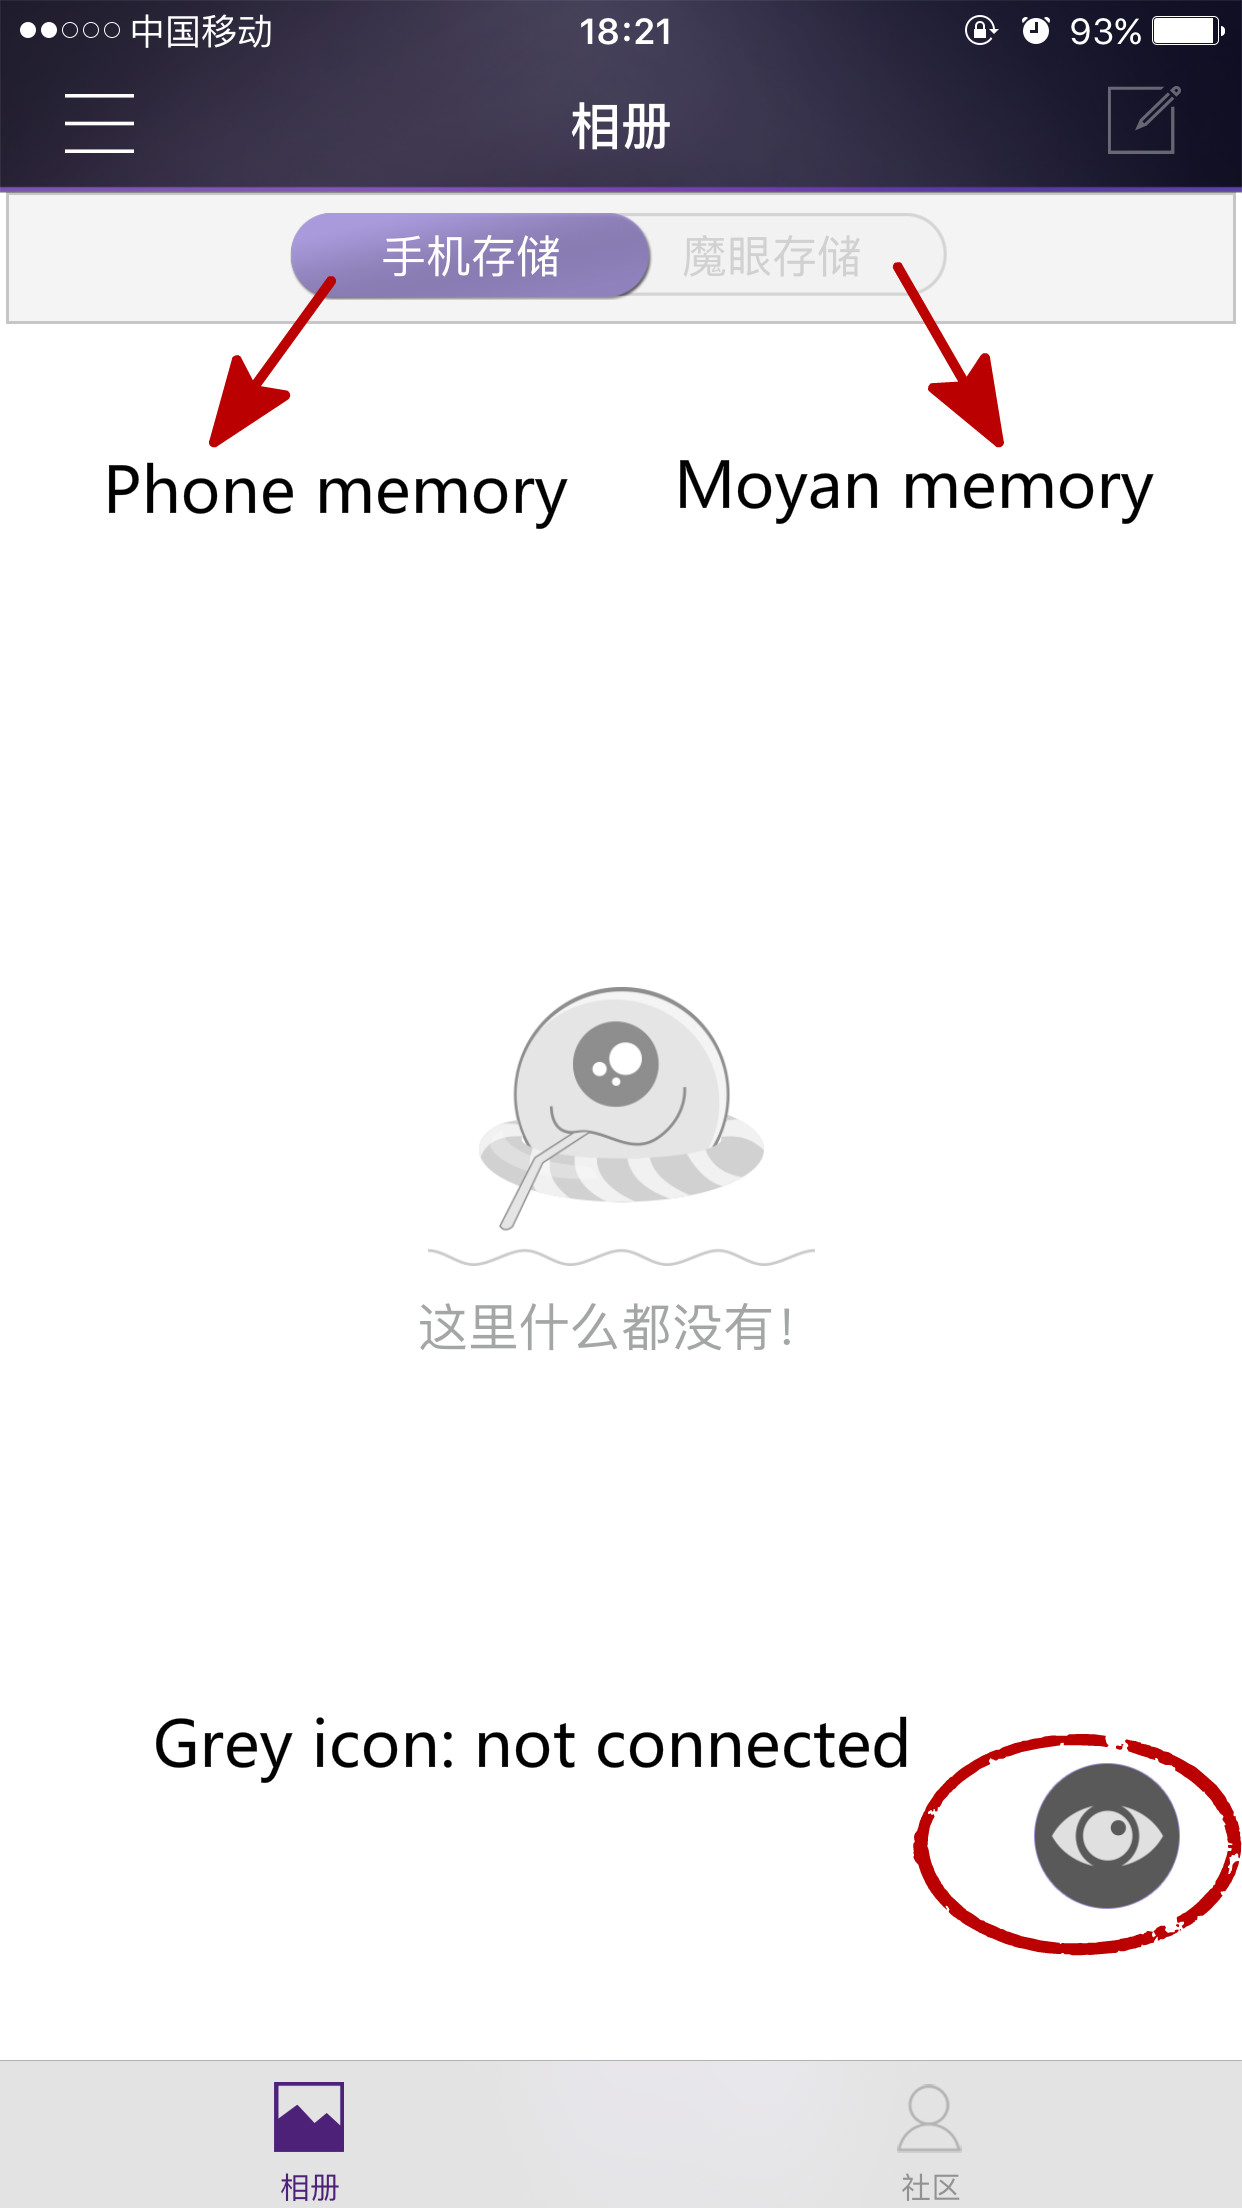
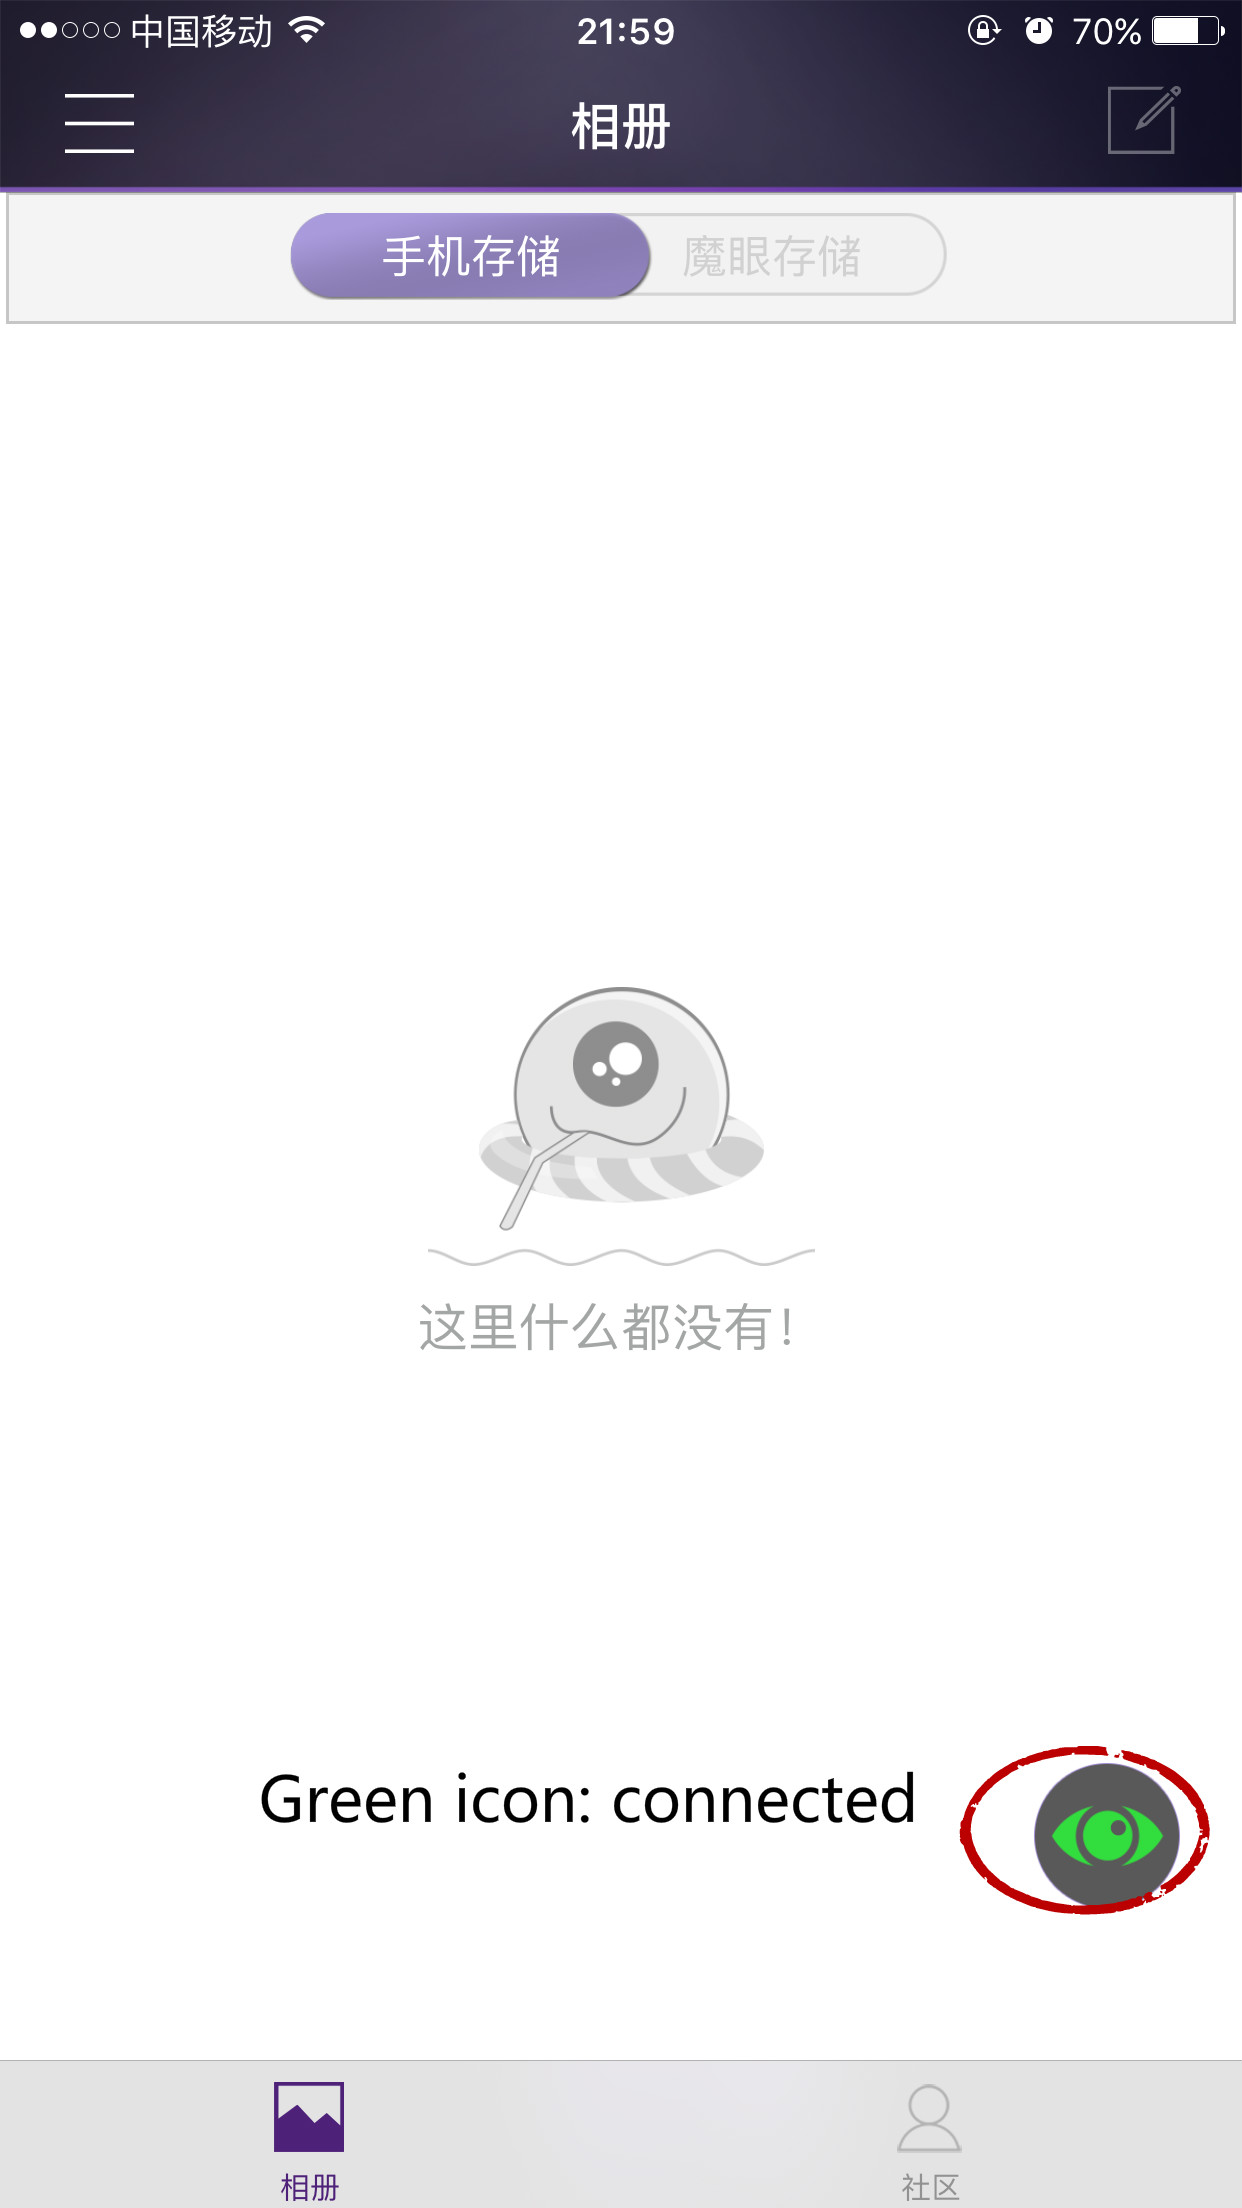
Open Baofeng Moyan APP and click on the lower right corner of the Moyan icon. When prompted, connect your Moyan camera to Baofeng Moyan
Moyan icon turns green: Moyan camera are now connected to Baofeng Moyan
Moyan icon is grey: Moyan camera are not connected to Baofeng Moyan
Connect Moyan camera to Internet
After Moyan camera has connected to Baofeng Moyan APP, you can control Moyan camera to connect to the Internet via APP and then view the real-time videos taken by Moyan camera.
1.
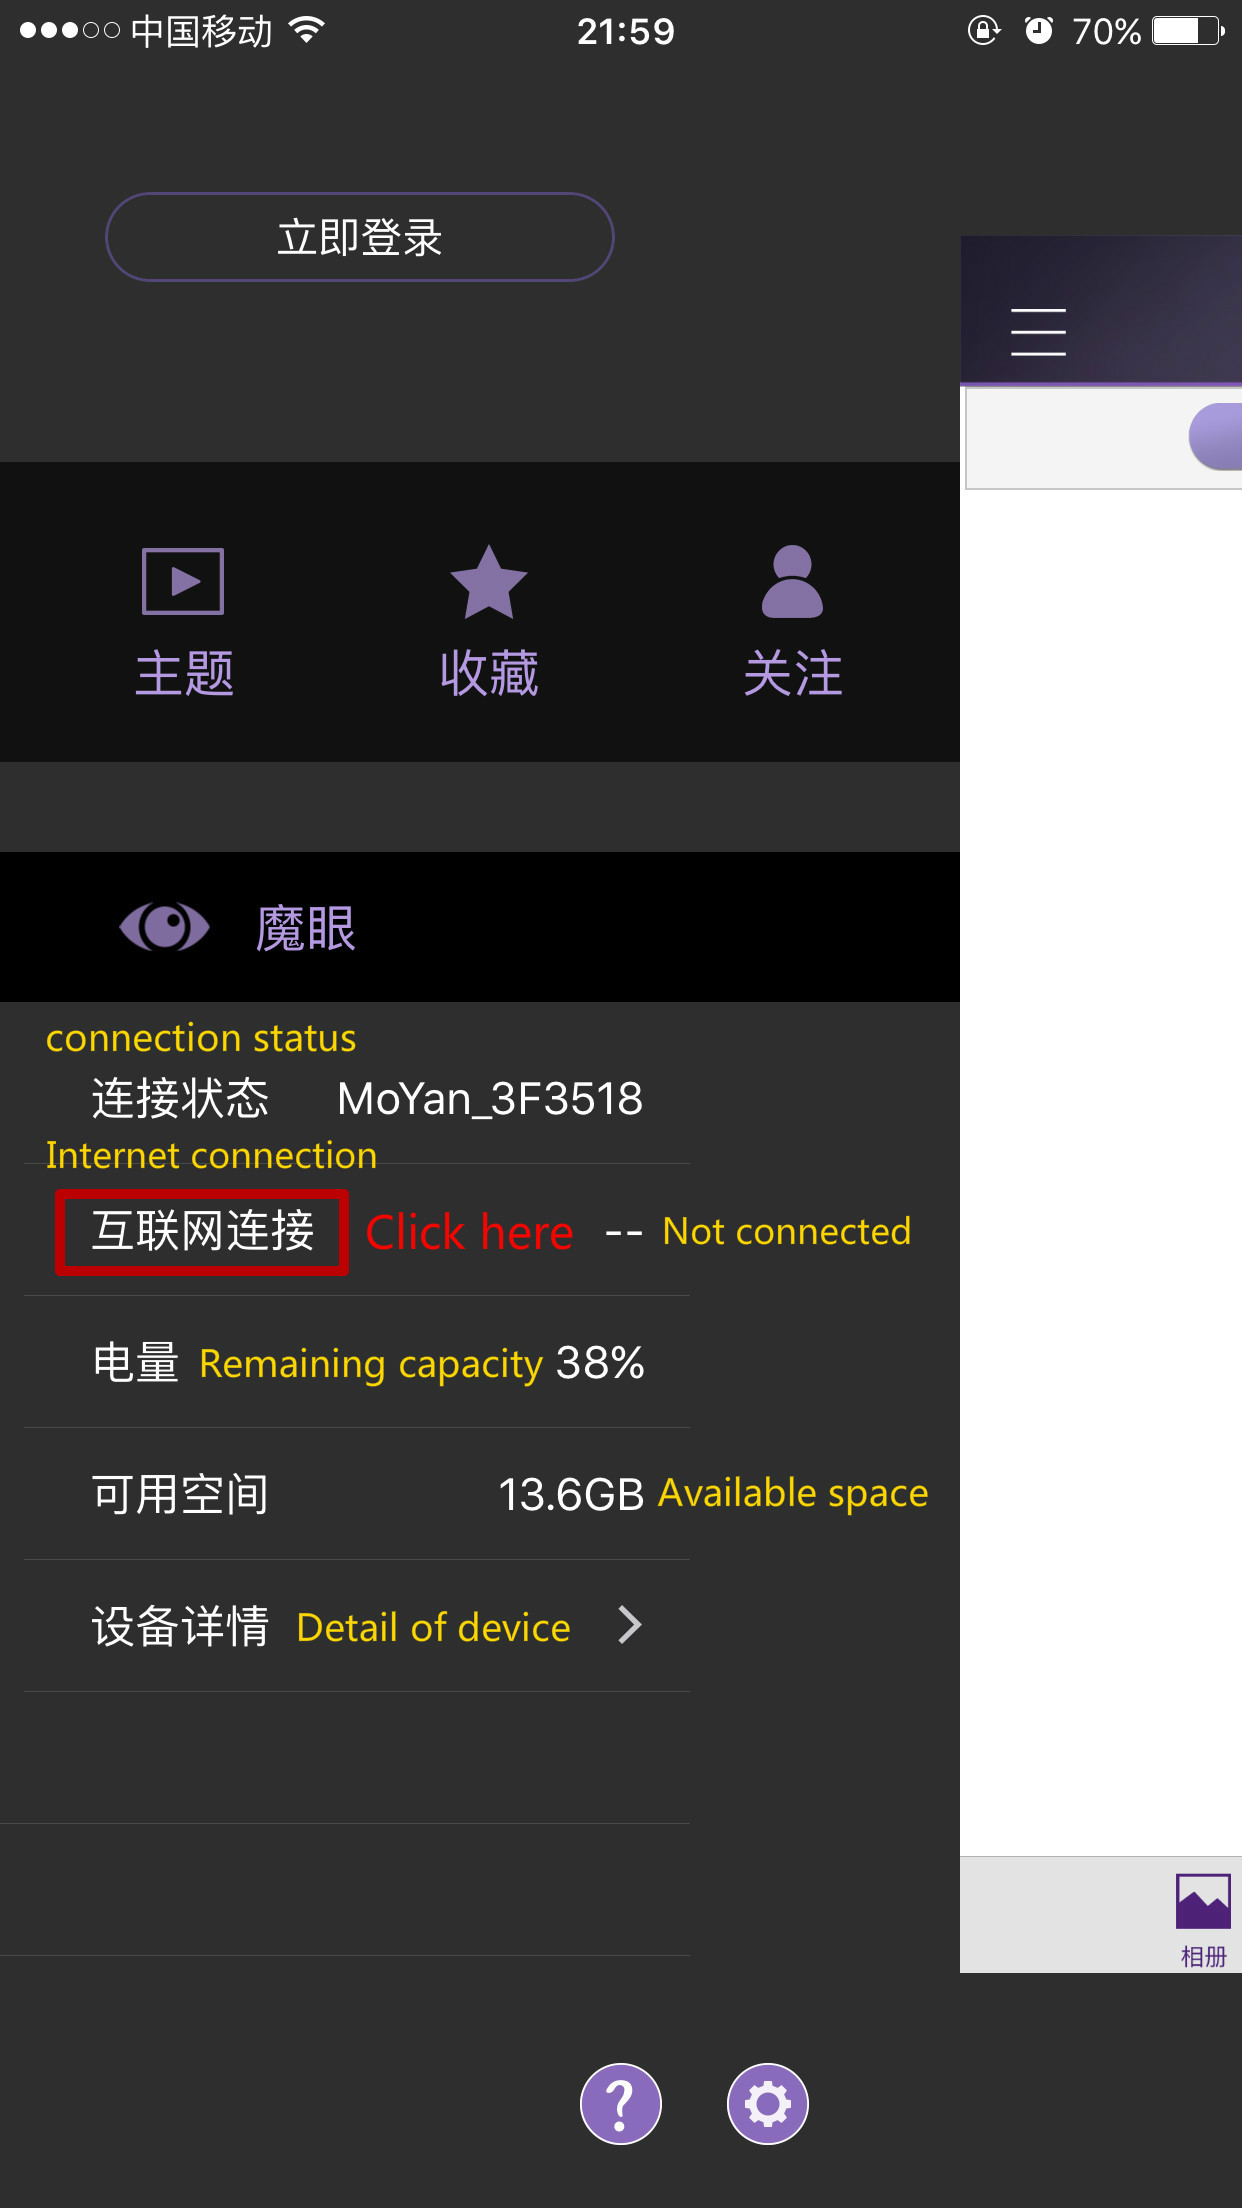
Connect Moyan camera to Baofeng Moyan APP → open Baofeng Moyan APP and click on the top left corner of the menu button → open sidebar
2.
Click “Internet connection”
3.
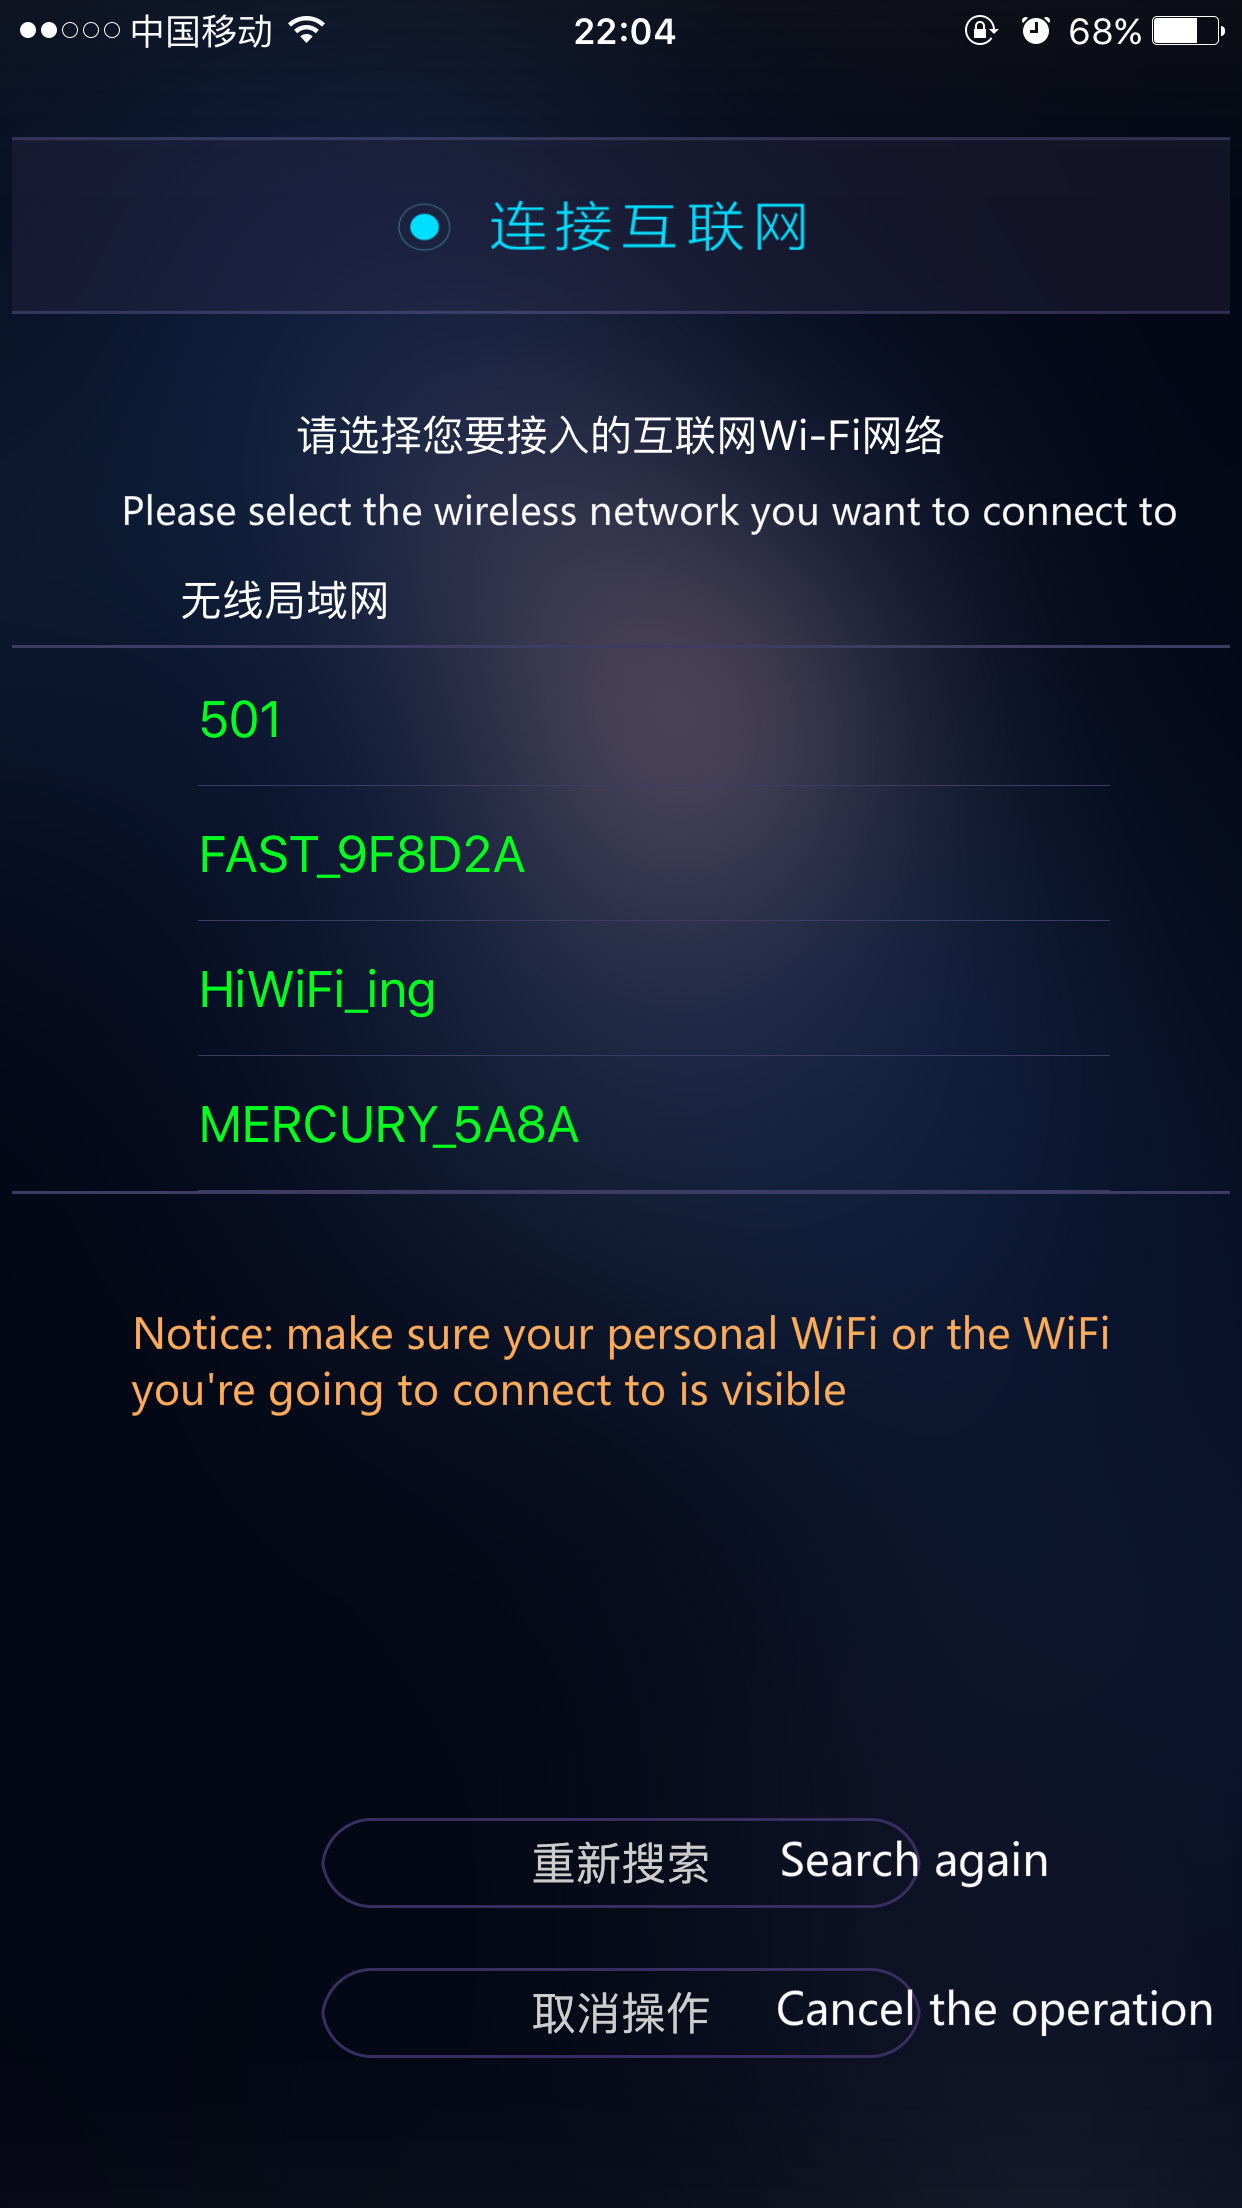
Enter your WiFi hotspot name and password when prompted→ your phone and Moyan camera will both connect to WiFi.
Restore the factory settings
When your Moyan camera breaks down, please try to restore your camera to the original factory settings.
Please ensure your Moyan camera is not in low battery status. We suggest you charge you Moyan camera a while and then restore your camera to factory settings.
When Moyan is in the state of power on, stab the reset hole with a needle or other sharp objects and press it around 3 minutes. As soon as the status light starts blink, you can release reset button. Until the status light turn off press power button, Moyan camera will reset automatically.
Restore the factory settings will only erase your Moyan camera settings. Your pictures and videos saved on your camera will not be erased.
FAQ
Q: How to charge Moyan Camera?
A: Moyan camera has a standard Micro USB port. You can use Moyan charger or Android smartphone charger to charge your Moyan camera.
Q: How to check current battery level of Moyan camera?
A: Turn on the camera and then connect it to Baofeng Moyan APP, you can view the current battery level of your camera,
Q: How long does Moyan camera’s battery last after fully charged?
A: It’s supposed to last for around 40 minutes of continuous shooting panoramic video.
Q: How to connect Moyan camera to smartphones?
A: Turn on your Moyan camera → when the red status light change to blue, turn on your phone’s WLAN switch →open Baofeng Moyan APP → click on the lower right corner of the Moyan icon.
Q: Which phone operating systems are supported with the Baofeng Moyan APP?
A: ≥Android 4.1 system or ≥ iOS 8.0 system
Q: Where can I download Baofeng Moyan APP?
A: You can scan the QR code on the manual or go to Moyan official site (www.mojing.cn) to download Baofeng Moyan APP. Besides, you can download the APP in Android app market or Apples store.
Q: What can I do with Baofeng Moyan APP?
A: After connecting Moyan APP to Moyan camera, you can preview real time image captured by Moyan camera and control Moyan camera to shooting pictures or videos. You can also share the pictures and videos you’ve taken to social network.


