The Anycubic Kobra 3 Combo is designed to provide an exhilarating and seamlessly integrated trio of 3D printing technologies to elevate your artistic pursuits. Bid farewell to sluggish, monotonous, and laborious 3D printing processes!
1. FAQ
How long does the installation process take?
The Anycubic Kobra 3 installation generally takes about 15 minutes to assemble, but there may be differences depending on individual manual skills.
How much time does each of the machine’s functions take?
Vibration detection takes about 4 minutes, PID calibration takes about 6 minutes, and automatic leveling takes about 10 minutes.
What is the automatic filament replenishment function like?
1. Anycubic Kobra 3 automatically detects materials with RFID recognition, identifying the same material and color without any operation (default automatic replenishment).
2. It can be manually set to the same material and color without any operation (default automatic replenishment).
3. It can be manually set to require automatic replenishment.
What is the purpose of the filament entanglement and blockage detection?
During printing, if the filament becomes entangled or blocked, the machine can detect it and automatically pause printing until the issue is resolved.
How to load filament into the multi-color filament box?
1. Place the Anycubic Kobra 3 / K3 on the left side of the printer with a spacing of 10-15cm.
2. Insert one end of the signal line 4-pin into the hole on the left side of the external interface of the printer base, with the buckle facing down.
3. Insert one end of the PTFE tube into the hole at the top of the printer, with the four PTFE tubes inserted one by one.
4. Pass the other end of the PTFE tube through the wire clamp, with the four PTFE tubes inserted one by one.
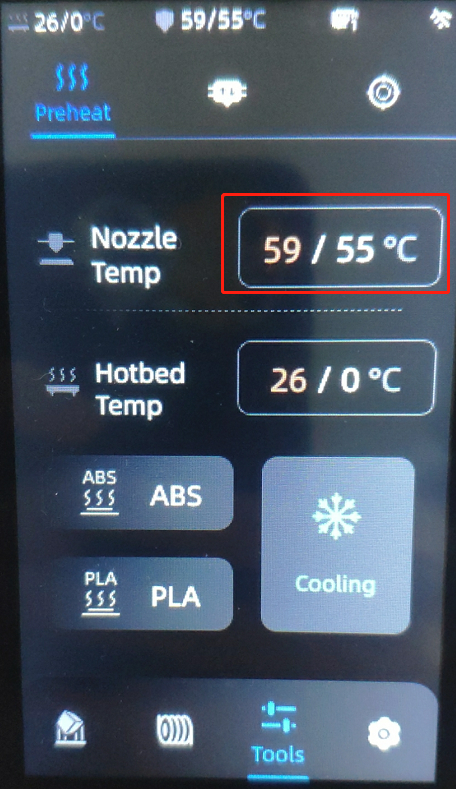
What are the maximum nozzle temperature/hotbed temperature, and recommended print speed?
The maximum nozzle temperature is 300 degrees; the maximum hotbed temperature is 110 degrees; the recommended printing speed is 350mm/s, with an acceleration of 20000mm/s.
What materials can the machine print, and can it print 3mm consumables?
The machine can print PLA, TPU, ABS, PETG, and other linear consumables, but it only supports consumables with a diameter of 1.75mm.
How long can the machine work continuously if printing large models?
The machine can print continuously for up to 200 hours, allowing for large-model printing.
Does the machine have any environmental requirements for use?
The machine can be used at normal room temperature. If the ambient temperature is below 10 degrees, the hotbed temperature needs to be raised to around 70 degrees for printing. The recommended ambient temperature is 8°C to 40°C.
How to maintain the machine ?
Regularly clean the fan blades, regularly lubricate the lead screw and guide rail, regularly clean the throat (once a month), and regularly clean the extruder gears.
How to deal with extruder abnormal noise or slippage?
1. Check if the filament tray is tangled or if the filament has come out of the filament rack.
2. Adjust the knob clockwise appropriately.
3. Open the extruder and tighten the locking screws of the driven gear, then use a brush to clean the residue in the gear grooves.
4. Click the “Feed” button on the touch screen to check if the nozzle of the print head is evenly extruding material. If there is no blockage, but there is still abnormal noise or slippage, it is recommended to directly replace the extruder with a new one.
How to deal with the machine empty printing?
1. Check if the extruder gear is slipping and tighten the adjustment knob as needed.
2. Check if the filament is tangled or stuck and straighten it out.
3. If the print head is clogged, heat the nozzle to 240 degrees, use a steel needle to clear the nozzle of the print head, and replace it with a spare nozzle if necessary.
How to deal with the nozzle not heating up?
1. First, re-plug the print head connection cable and check if the terminal of the print head connection cable is loose or worn.
2. Without heating the nozzle, check if the temperature on the display screen is normal room temperature. If not, it is likely that the thermistor is damaged, and it is recommended to replace the new thermistor.
3. Disassemble the print head shell of the Anycubic Kobra 3, then measure whether the voltage output of the print head adapter board port is 24V under heating. If there is no voltage, it means that the motherboard is damaged and needs to be replaced. If the voltage is normal, it means that the heating rod is the problem and needs to be replaced with a new one.
How to deal with the hotbed not heating up?
1. Please unplug and reconnect the hotbed connection cable, and check whether the terminal and solder joint position of the hotbed connection cable are loose.
2. Without heating the hotbed, check if the temperature on the display screen is normal room temperature. If not, it is likely that the thermistor is damaged, and it is recommended to replace the new thermistor.
3. Disassemble the bottom cover of the printer, then under the condition of heating the hotbed, you can see a red light on the motherboard is always on, and a deep blue light is flashing. If one of them is not on or both are not on, you need to measure whether the output voltage of the motherboard hotbed port is 24V. If there is no voltage, it means that the motherboard is the problem and needs to be replaced.
How to deal with the fan not rotating or making noise?
1. Clean the fan and check if there is any debris interfering with it. Check if the screws and fan cover are loose, and re-fix the fan.
2. Check if the fan blades are damaged or broken, and replace them with new ones.
How to deal with the machine not reading the USB flash drive?
1. Check if the file naming is correct. The file can only be named with letters and numbers, and the suffix is “.gcode”.
2. Format the USB flash drive in FAT32. If it still cannot be read, try replacing it with a new USB flash drive.
3. Check if the card slot is loose, and replace the new motherboard if necessary.
How to deal with the screen being black?
1. Check if the anycubic kobra 3 3D printer is powered on, and whether the red LED on the power switch panel is on. If the light is not on, you need to disassemble the power cover plate to confirm whether the power indicator light is on. If the power indicator light is on, it means that the motherboard is damaged and needs to be replaced. If the power indicator light is also not on, then the power is damaged and needs to be replaced with a new one.
2. Replug the screen connection cable. If there is sound from the screen but it is black, it is recommended to replace the screen.
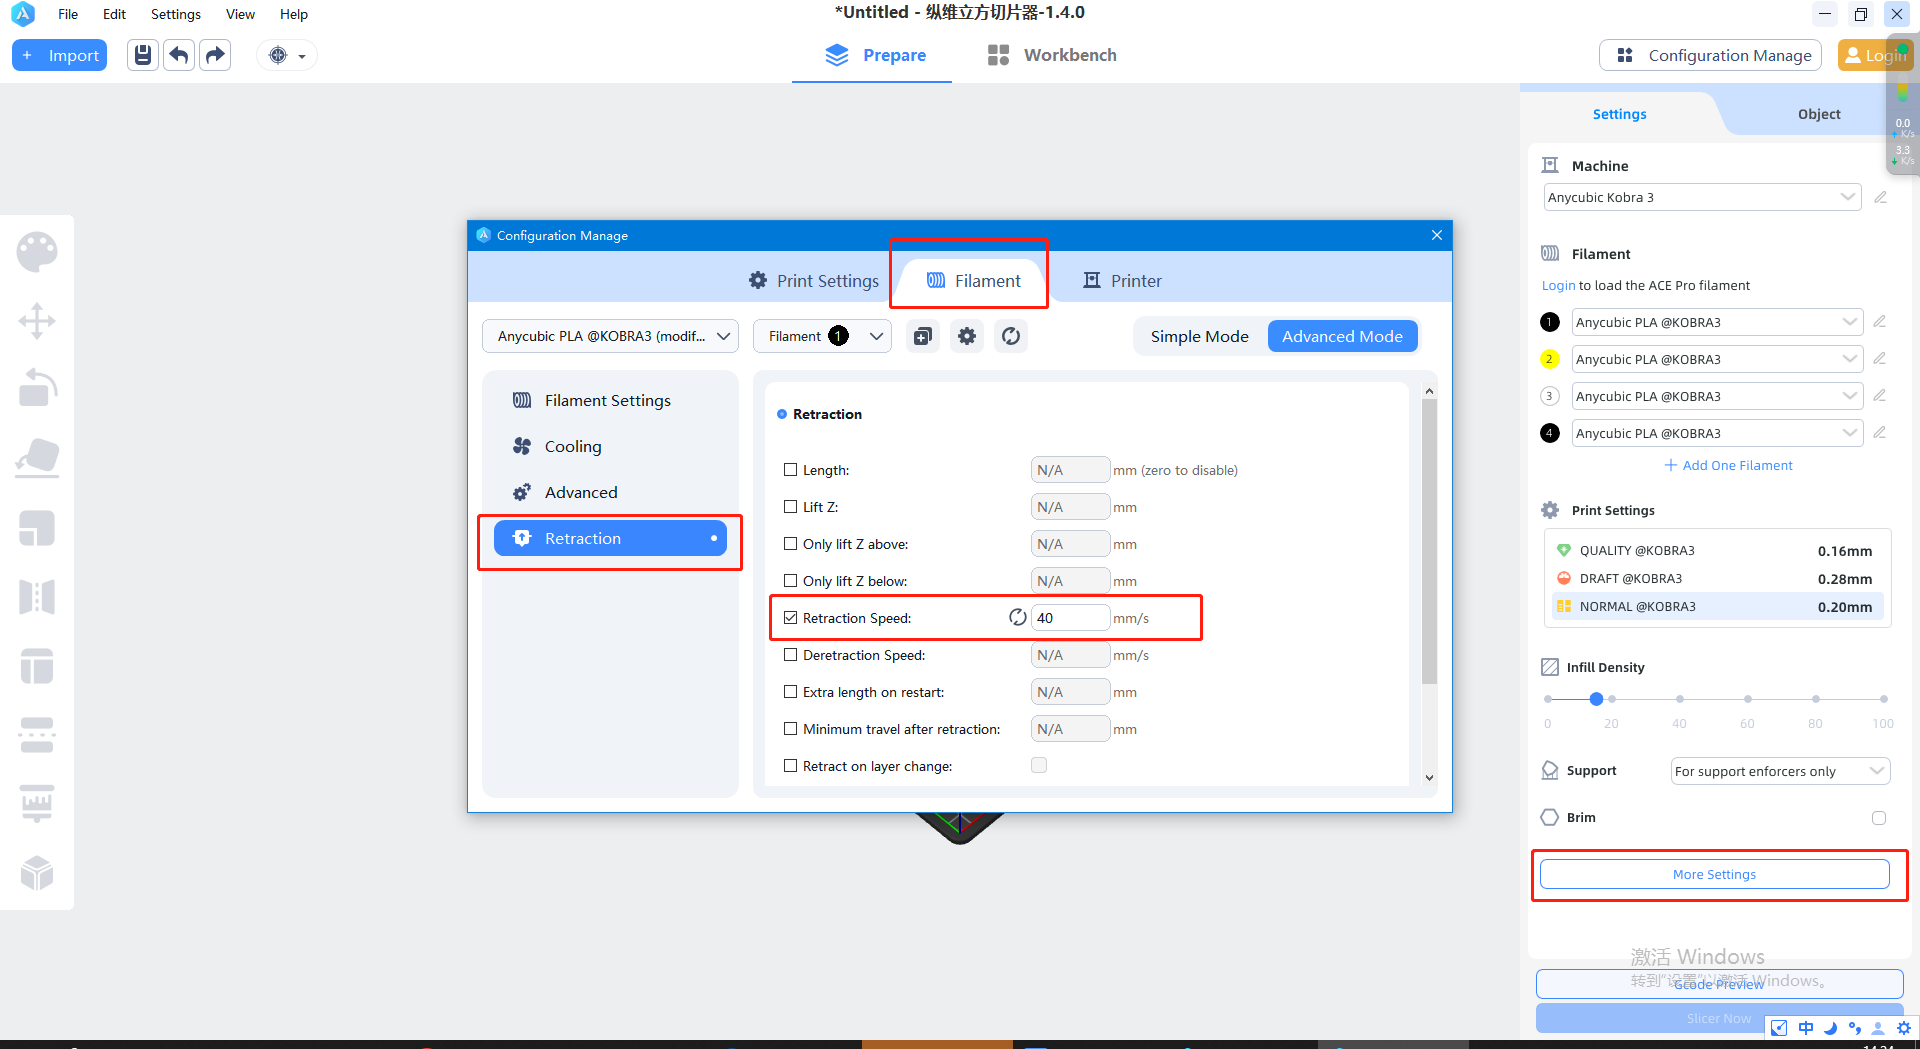
How do you deal with model stringing during printing?
1. Reduce the nozzle temperature by 5-10 degrees, increase the retraction distance and retraction speed, and reduce the printing speed.
2. Use the test models of the machine’s complimentary consumables for printing.
3. If the print head of the anycubic kobra 3 is clogged, heat the nozzle to 240 degrees, use a steel needle to clear the nozzle of the print head, and replace it with a spare nozzle if necessary.
2. Poor Printing Quality
1. Stringing
Stringing refers to the phenomenon of uneven and rough texture on the surface of 3D printed parts, resembling “strings”. This may be caused by the printing speed being too fast, improper temperature, or unstable extrusion speed of the extruder.
Solution:
1) Lower the printing speed, especially for complex geometries or high-precision parts.
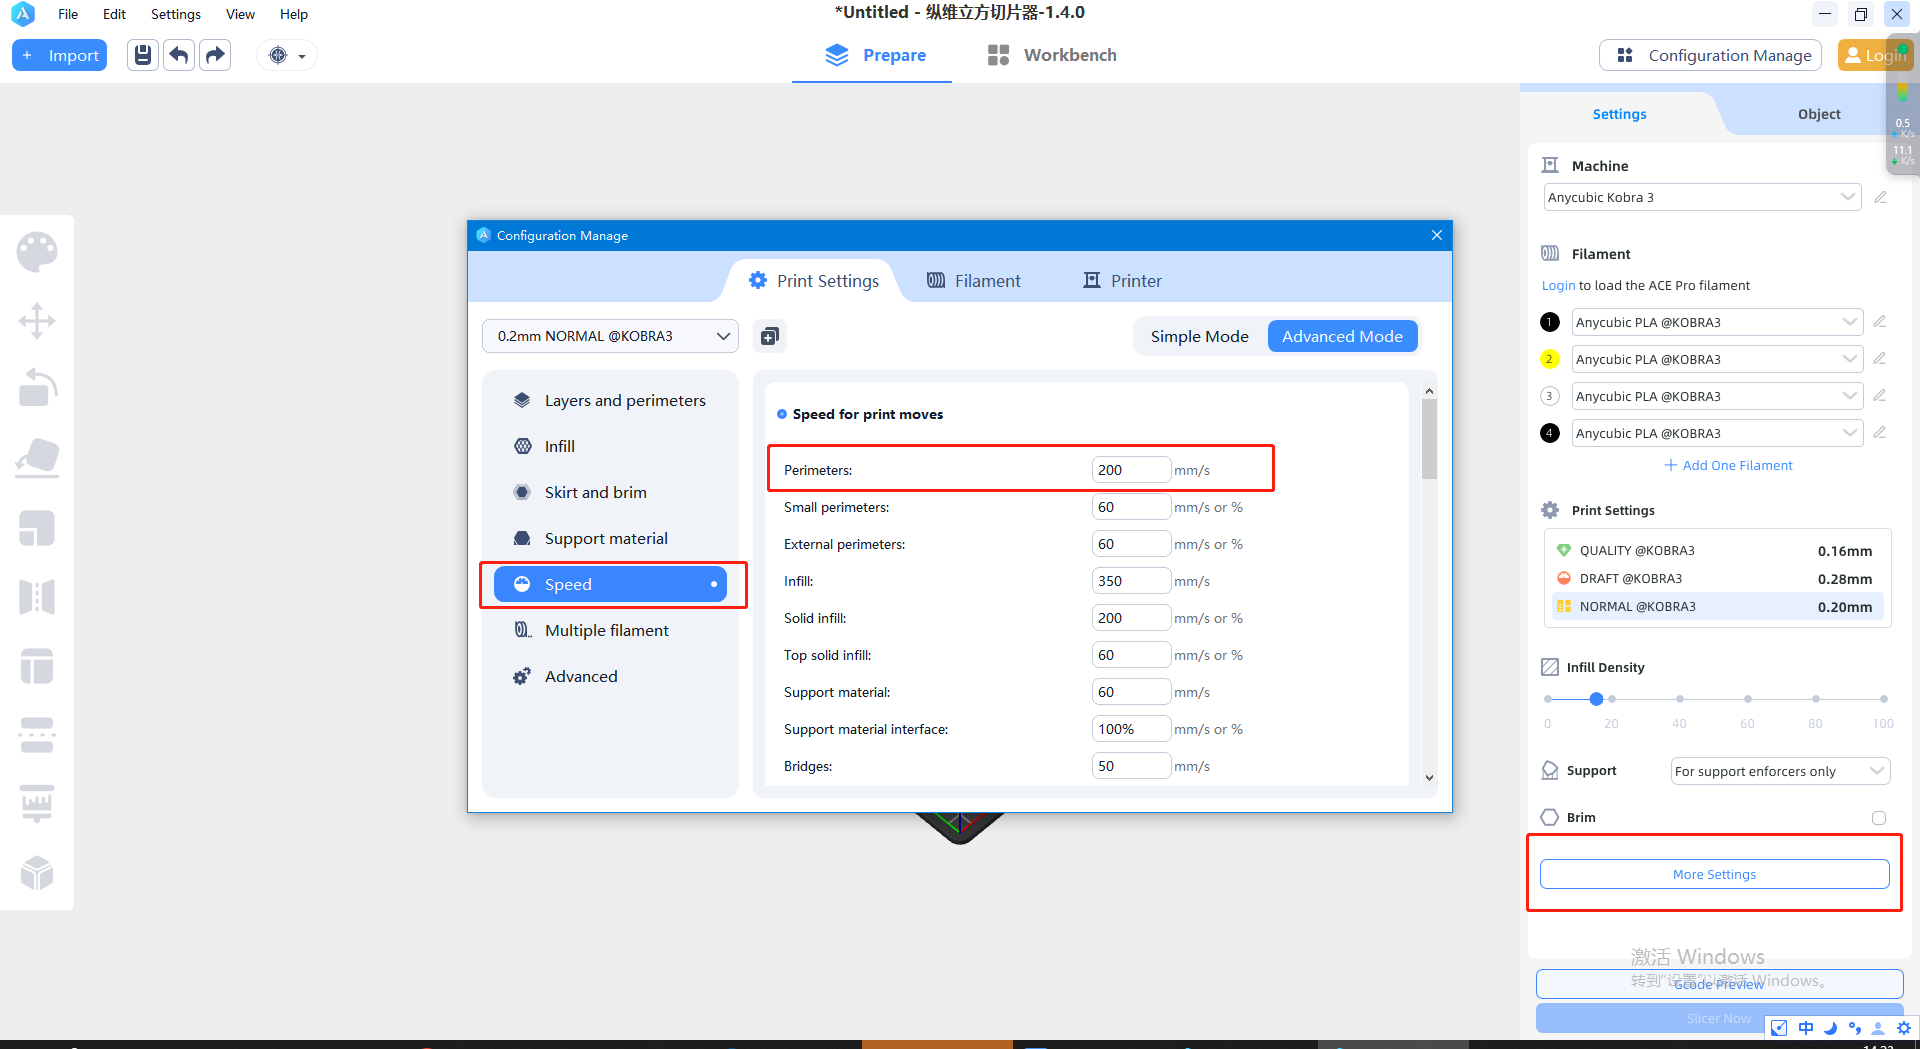
2)Ensure that the printing temperature and material type match the requirements of the part and material. It is recommended to set the temperature based on the recommendations of the material supplier.
3)Check if the extrusion speed of the extruder is stable, and avoid extruding too fast or too slow.
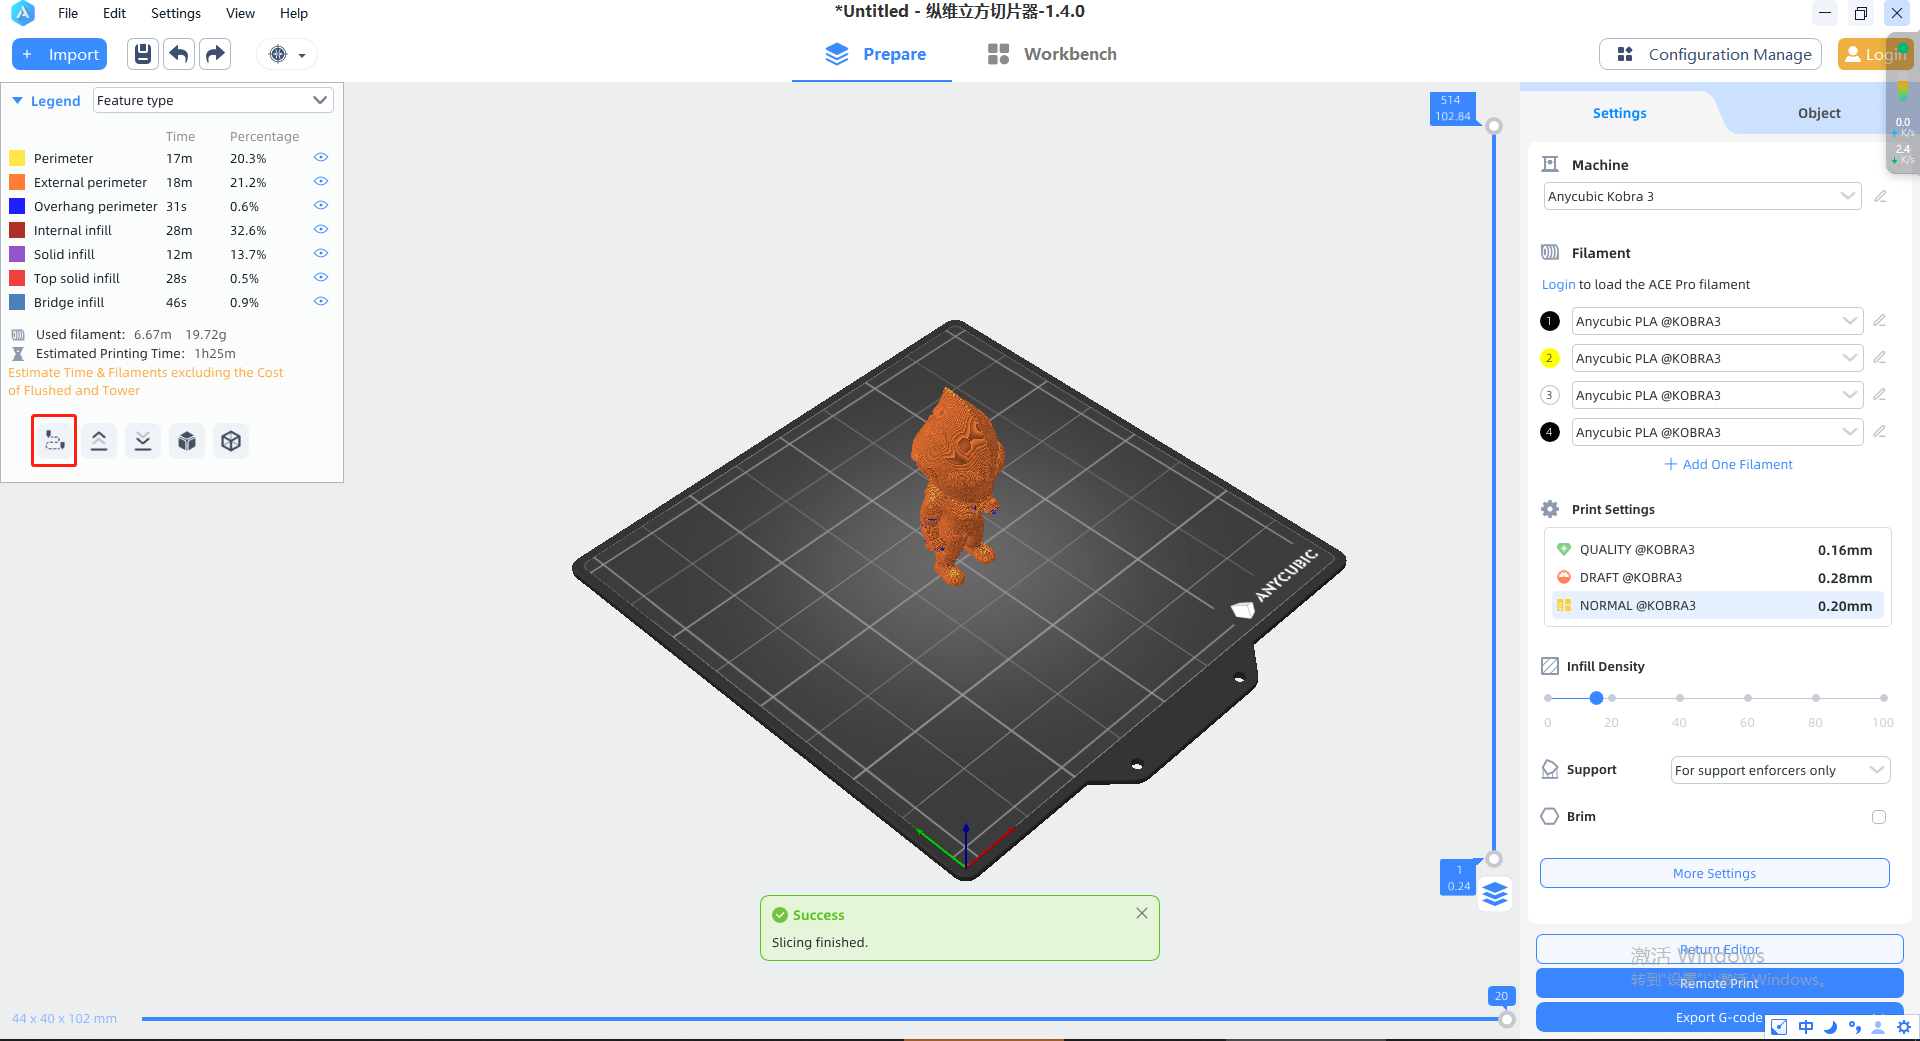
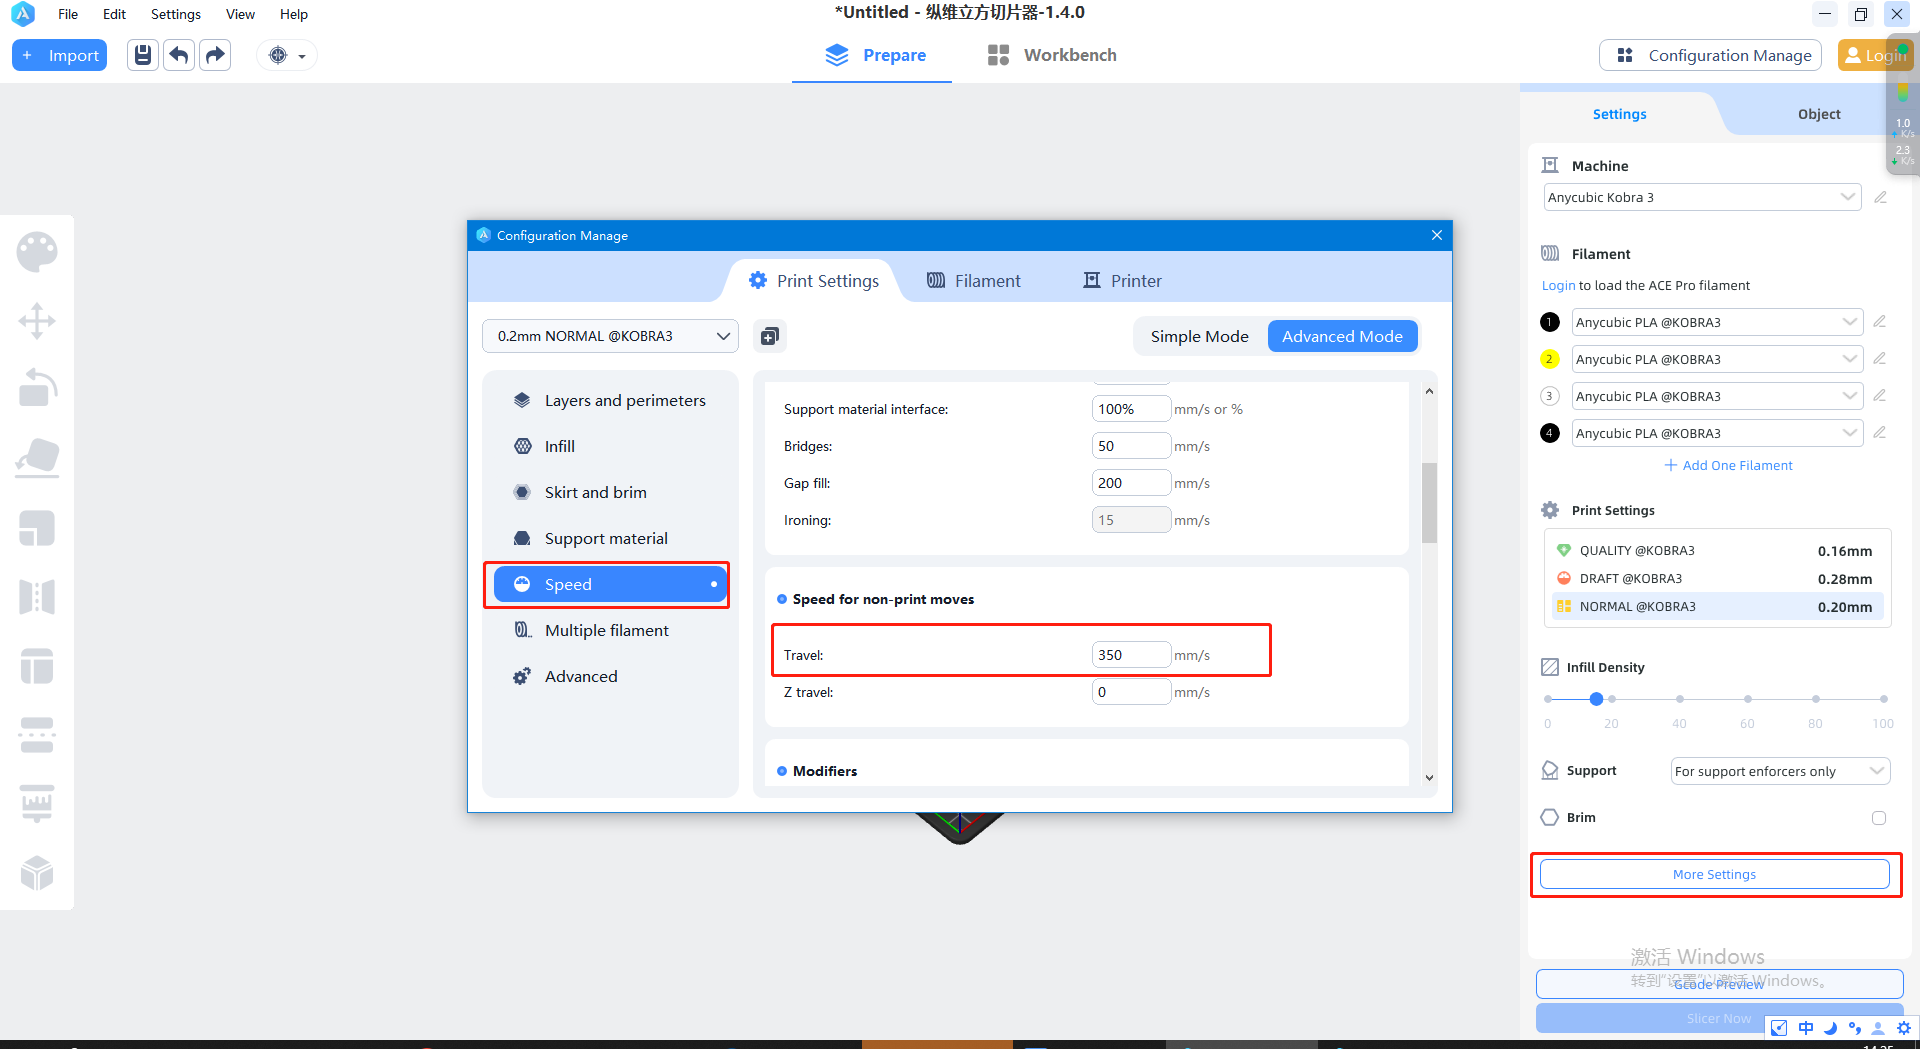
4)Increase the Retraction Speed or Travel Speed, especially for large flat parts or models with long travel distances. (After slicing the model, click on Preview -> Check “Travel” in the Show column)

2.Poor Printing Quality
Poor printing quality usually refers to rough surface, unclear details, and inaccurate shape of the printed parts, which may be caused by inappropriate printing parameters, improper equipment adjustments, or poor material quality.
Solution:
1)Check the printing parameters, including layer height, infill density, printing speed, filament diameter, etc., to ensure that they match the requirements of the printed part and material.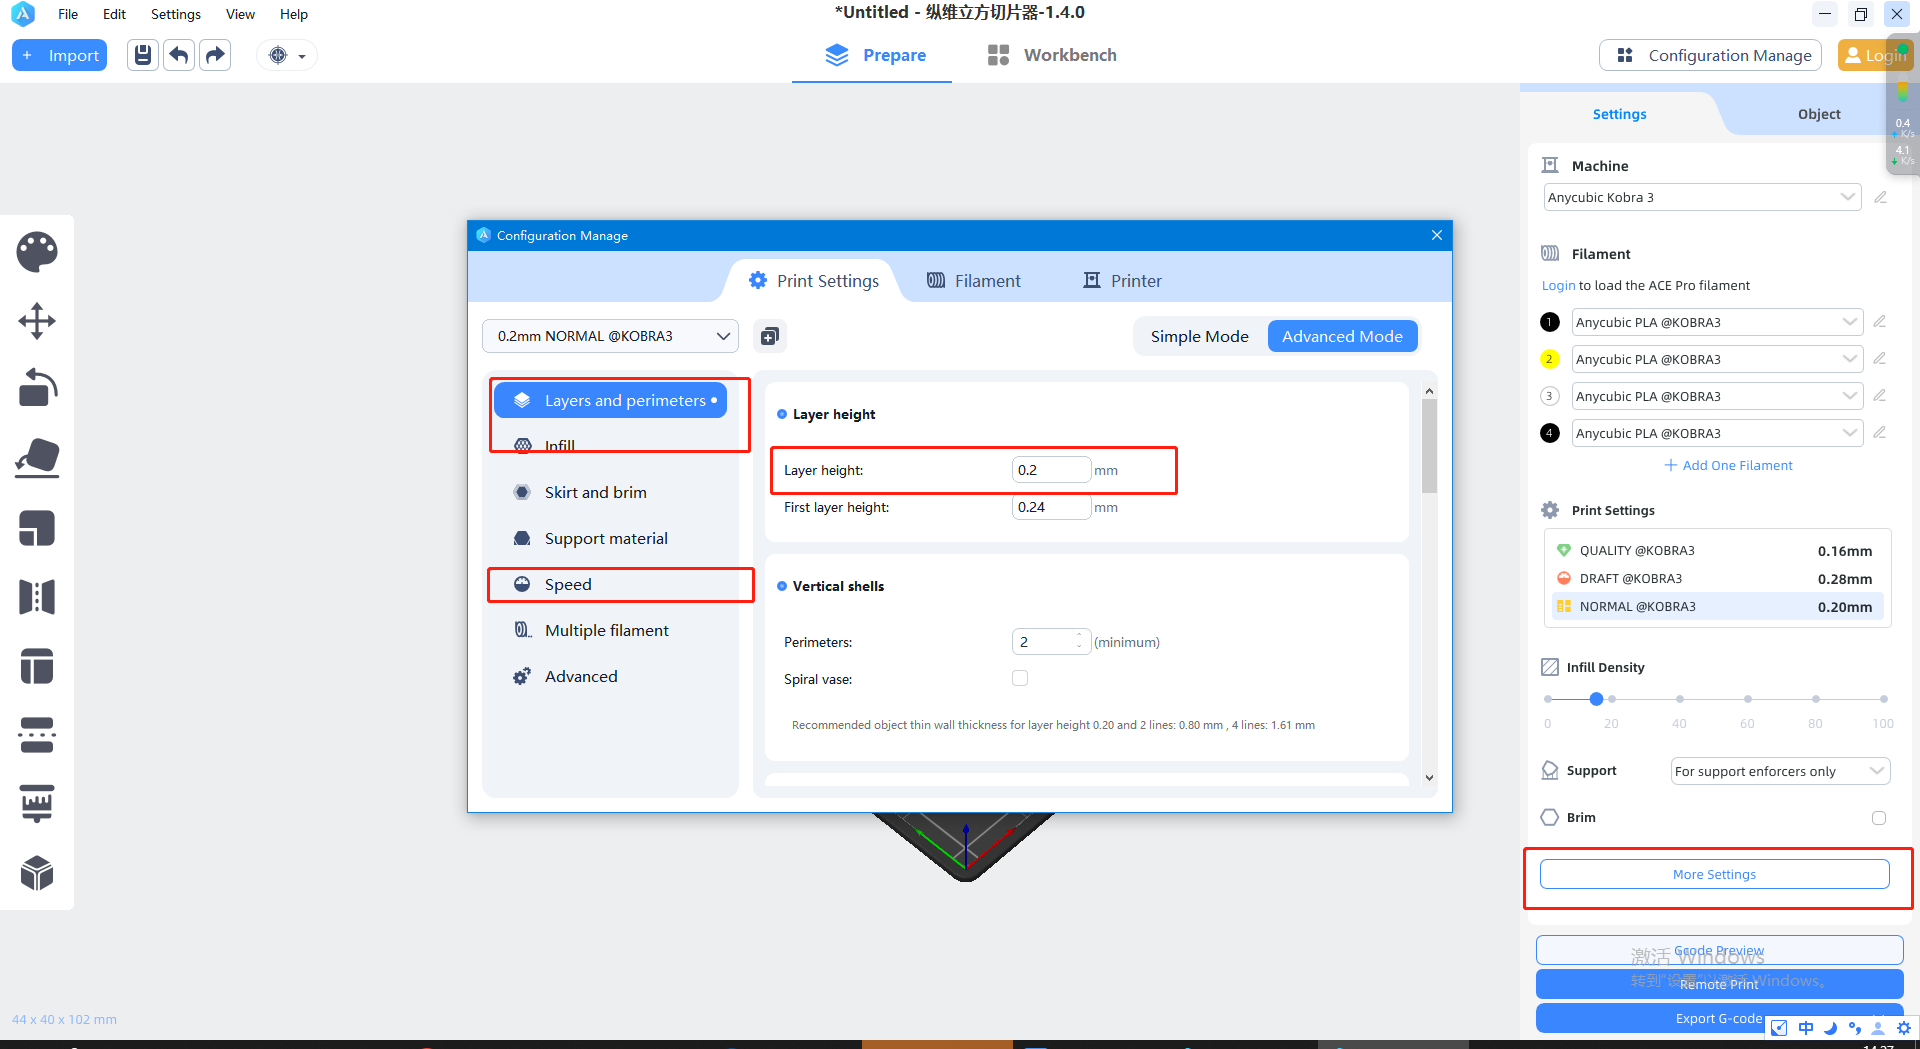
2)Ensure that the printing bed is leveled and adjust it in a timely manner to avoid quality issues caused by uneven bottom surface of the part.
3)Use high-quality printing materials and avoid using expired, leaky, or moisture-absorbed materials.
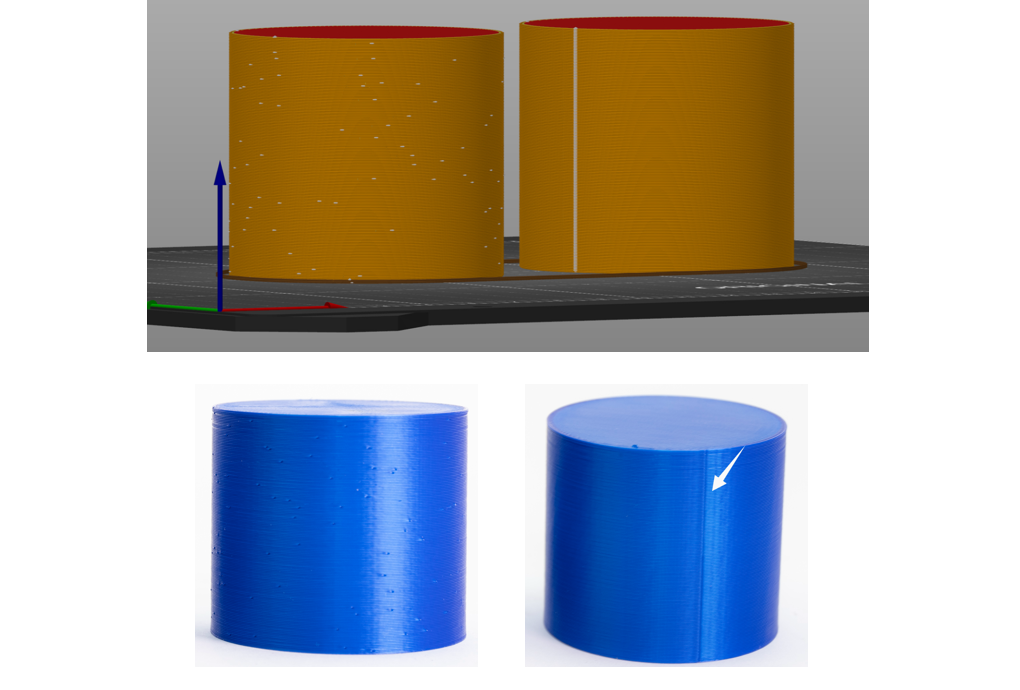
3. Z-Seam position
Due to the structure limitation of FDM-type printers, it is almost impossible to completely eliminate the Z-seam. It will always be somewhat visible. However, with carefully adjusted settings, it should not be too noticeable.
Steps to view Z-seam in slicing software: After slicing the model, click on Preview -> Check “Seams” in the Display column.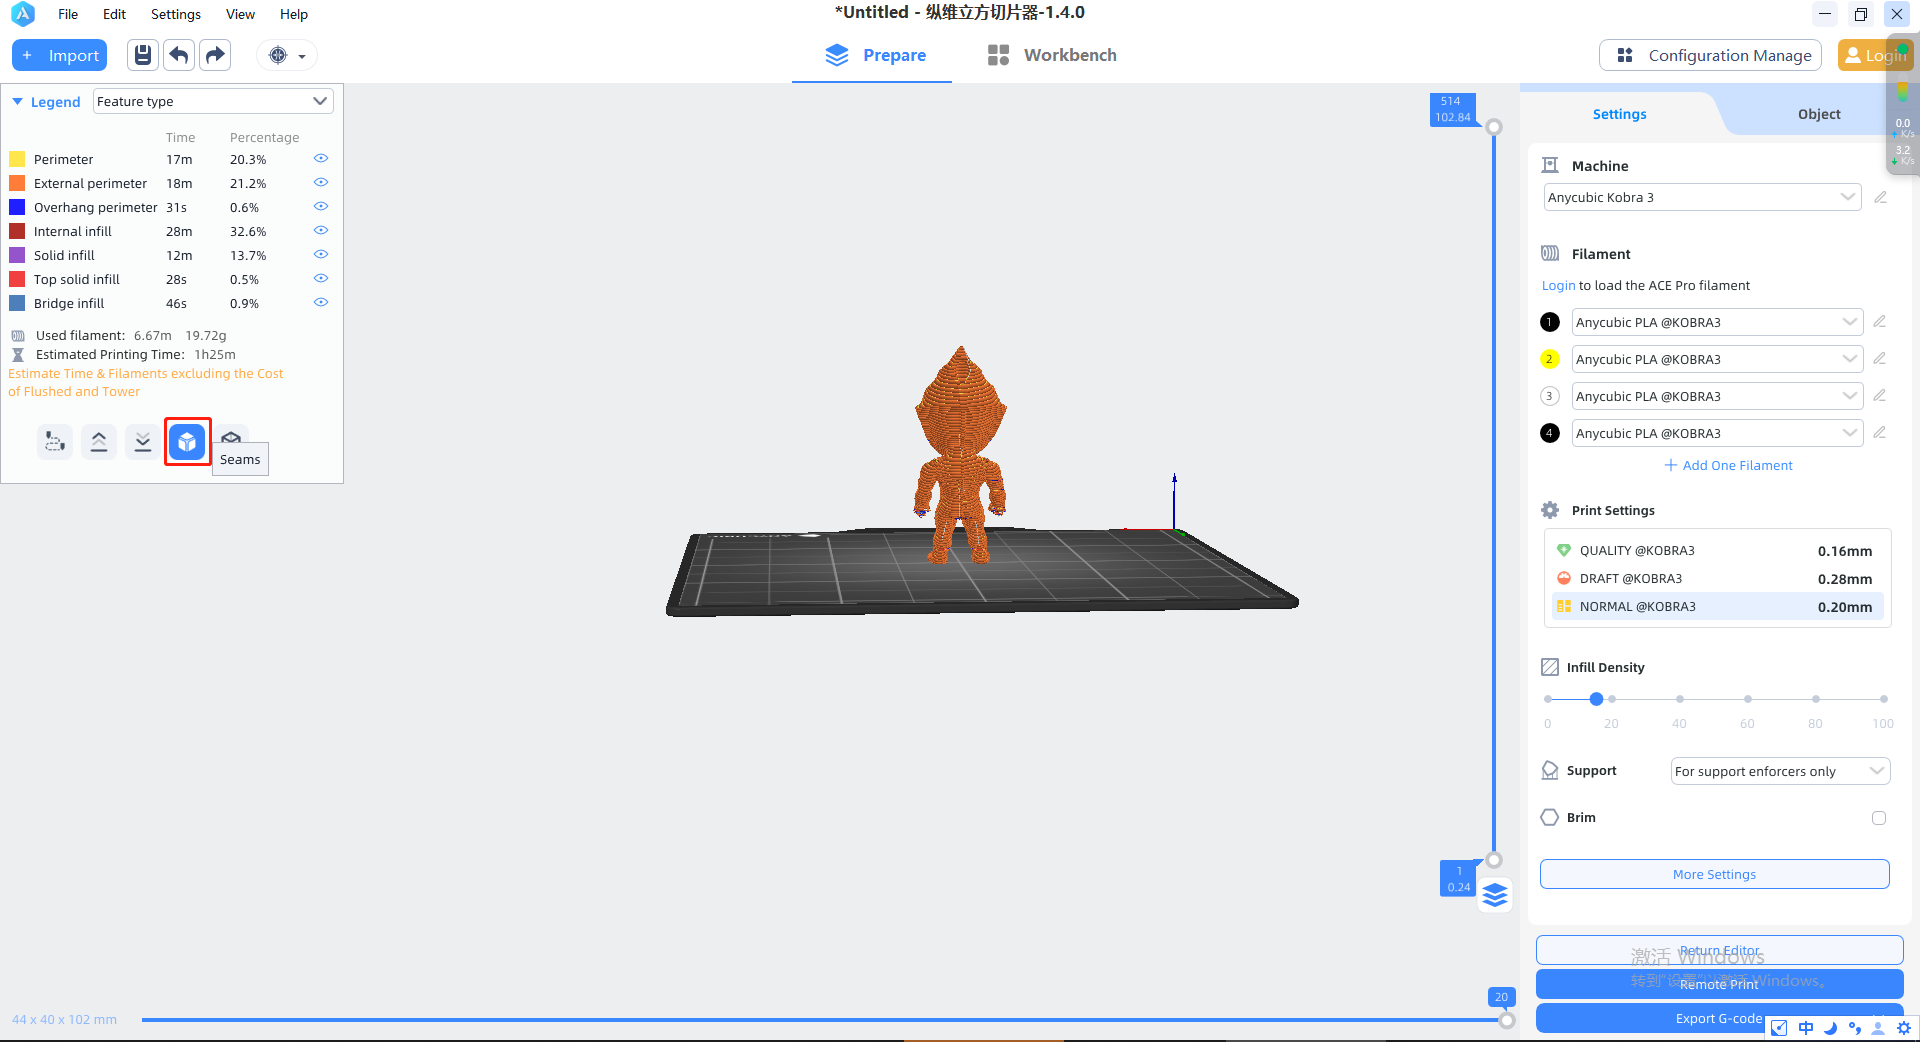
Solution:
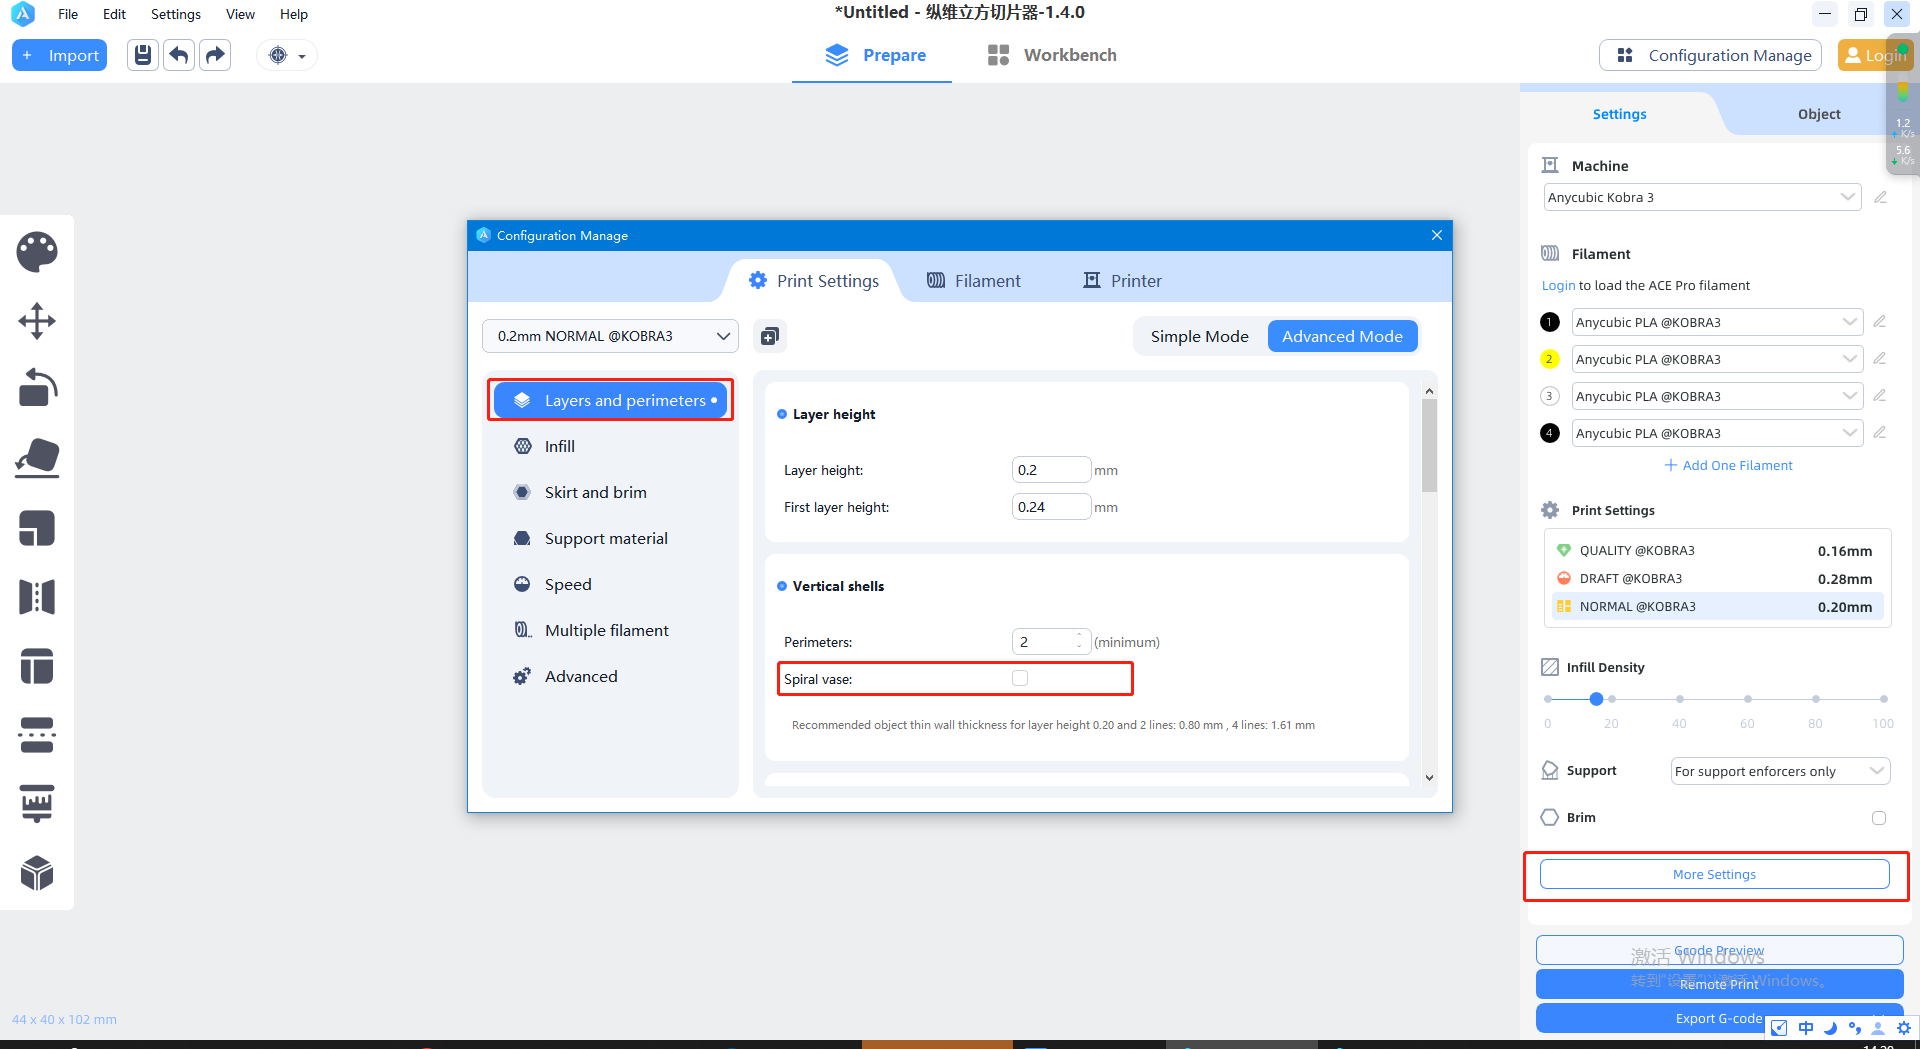
1)Use the Spiral vase mode: In the slicing software, you can use the Spiral vase mode to wrap the outer surface of the model with a shell, thereby hiding the internal Z-seam. A larger shell thickness can usually better hide the Z-seam. You can try increasing the shell thickness to reduce the visibility of the Z-seam.
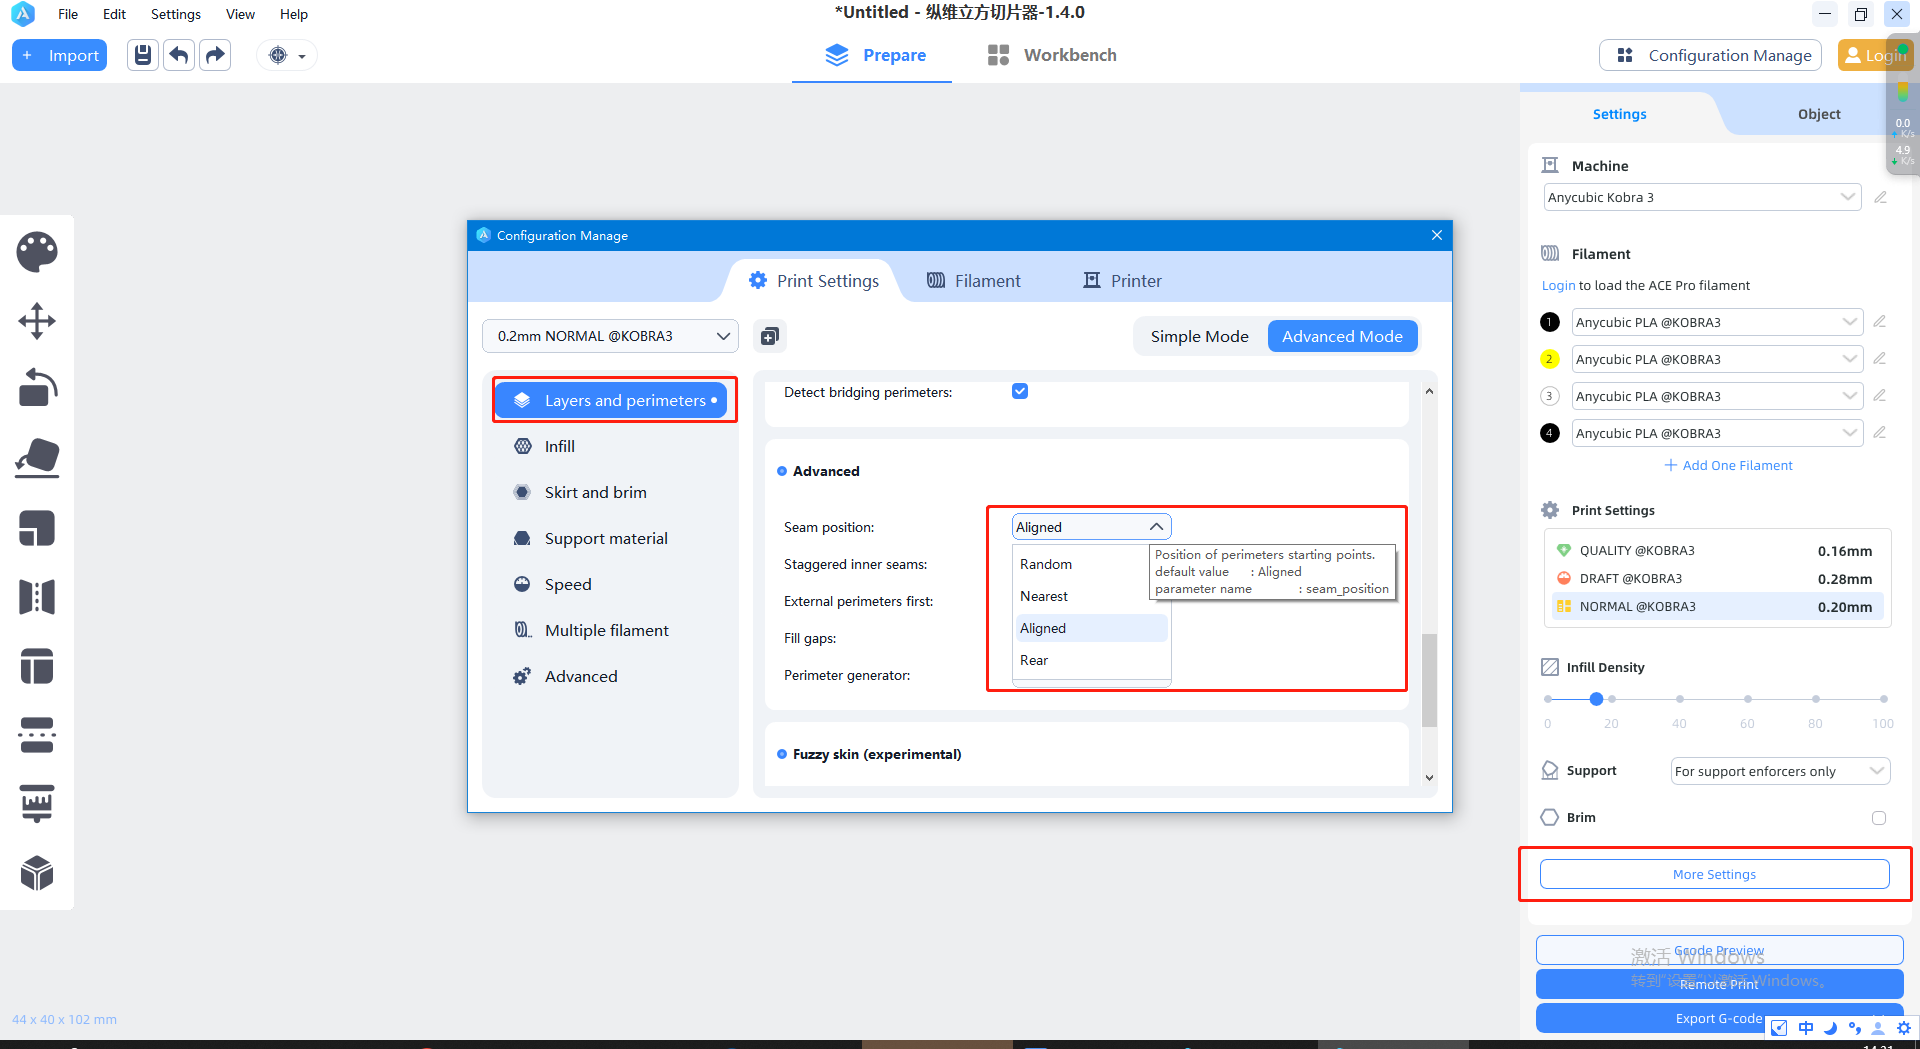
 2)Adjust the position of the Z-seam: In the slicing software, you can try adjusting the position of the Z-seam to hide them as much as possible. You can choose to place the Z-seam at the edge, corner, or less prominent position of the model to reduce its impact on the appearance of the model.
 The above are some methods to try to hide the Z-seam in the model, and the specific effects may vary depending on the printer, material, and settings. It is recommended to adjust and optimize based on the specific situation to achieve the best printing quality.
3. U-disk abnormal
1.File Format or Naming Issue
Troubleshooting Steps::
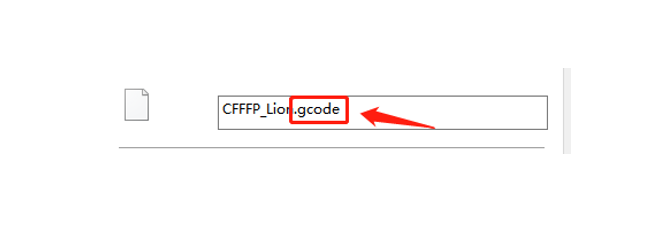
(1) Please note that the anycubic kobbra 3 can only recognize file formats with “.gcode” as the file suffix. Please check if your file meets this formatting requirement. It may be that you copied the unsliced file directly to the USB flash drive so that the file cannot be recognized.
(2) Cannot recognize too special characters, so it is recommended to use English or numerical names. At the same time, please ensure that the file path level is not too high, and the file exists in at most two folders, otherwise the file may not be correctly recognized.
(3)If only one slice file cannot be recognized, you can first try to restart the device or re-slice it.
2.USB Port Issue
Troubleshooting Steps::
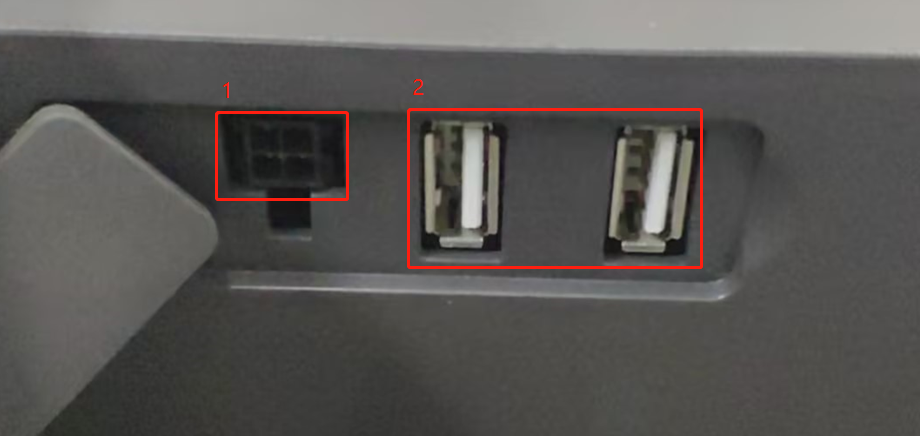
There are two USB ports on the front of the device base. The leftmost one is the USB port of the multi-color box, and the other two are used for file USB drives. And try plugging the USB drive into another USB port. (Please note that if you try to insert two USB drives at the same time, but only the files of one USB drive are recognized, please do not worry, this is normal. This is because one of the two USB ports is reserved as a backup)
3.USB Drive Issue
Troubleshooting Steps:
(1)Ensure your USB drive’s storage capacity is not over 8GB. If it exceeds 8GB, try using a USB drive with a capacity below 8GB for the operation. Larger-capacity USB drives might have compatibility issues with the printer, so it’s advised to use a USB drive within 8GB for optimal compatibility and stability.
(2)Try formatting the USB drive as “FAT32 with 4096 bytes,” ensuring the correct formatting method.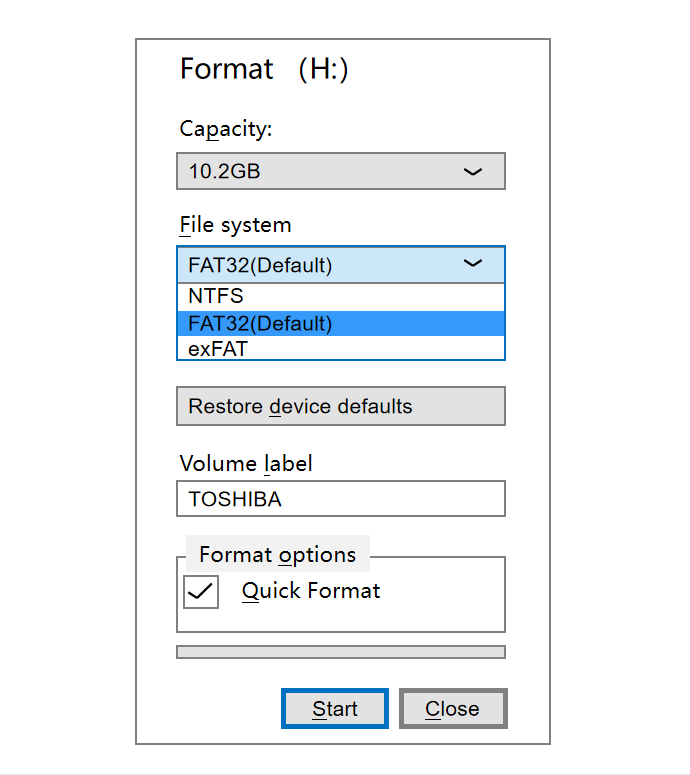
(3)If the problem persists, try testing with a different USB drive that has a capacity of 8GB or less. The issue might be with the previous USB drive if the new USB drive is recognized.
4. Troubleshooting abnormal print head clogging
1.Tools:
Diagonal pliers*
2.Troubleshooting steps:
(1) Remove the consumables from the top of the hub.
If you encounter filaments that cannot be rewound, you need to press the black pneumatic interface, pull out the Teflon tube, and forcibly pull out the filament.
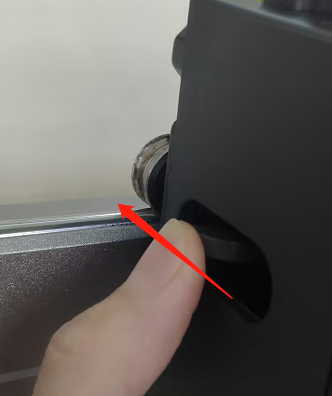
Step 1: Pull out the Teflon tube
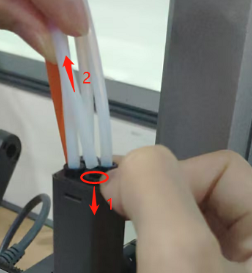
Press the buckle (1) and pull the Teflon tube upwards (2).
Step 2: Pull out the consumables by force
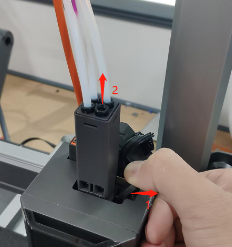
Pull the handle to the right (1) to forcefully remove the filament (2).
Step 3: Put the Teflon tube
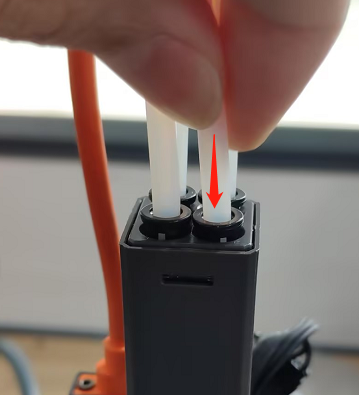
Please clean the excess consumables from the Teflon tube and reinsert the Teflon tube into the hub.
(2) Unable to forcibly remove the consumables from the hub
Step 1: Cut the filament
Push the cutter handle inward to cut the consumables
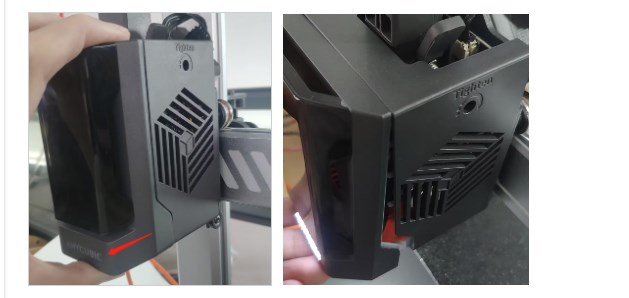
Step 2: Disassemble the printed shell
Pull the print head housing outwards
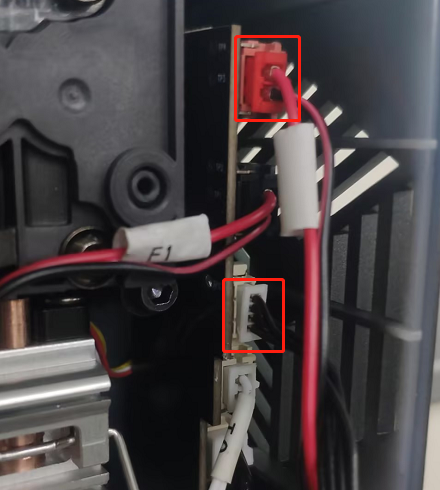
Step 3: Unplug the wiring harness
Please unplug the outer shell fan F0 and LED harness
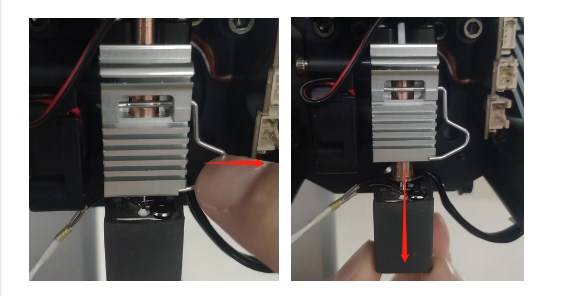
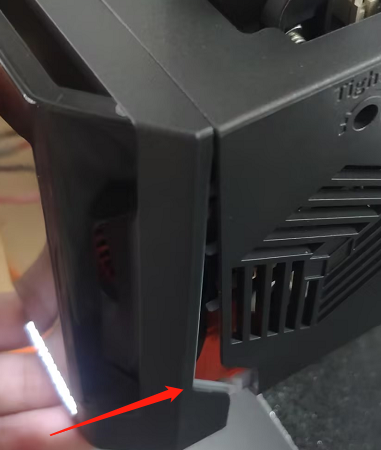
Step 4: Remove the quick-release print head
Please pull the buckle to the right to remove the quick-release print head.
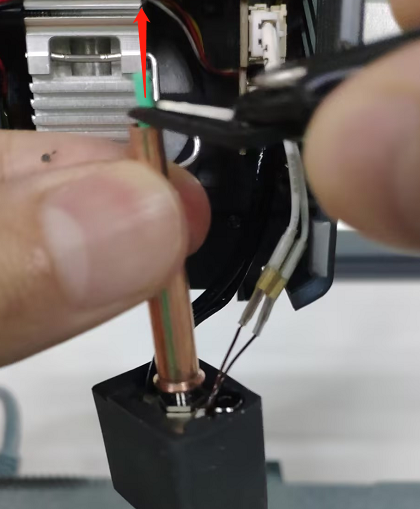
Step 5: Remove the consumables
(1) Heat the head to 55-60 degrees, and do not exceed 60 degrees.

(2) Use diagonal pliers to forcibly remove the filament.
(3) Install the print head
Wait until the print head cools down to below 30 degrees.
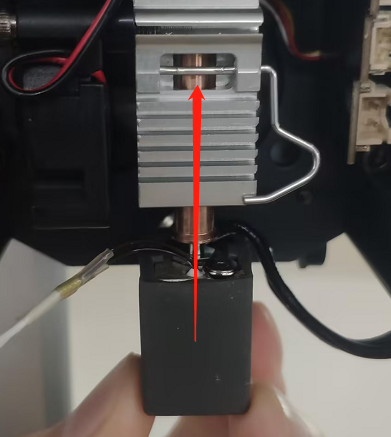
Step 1: Push the print head upwards
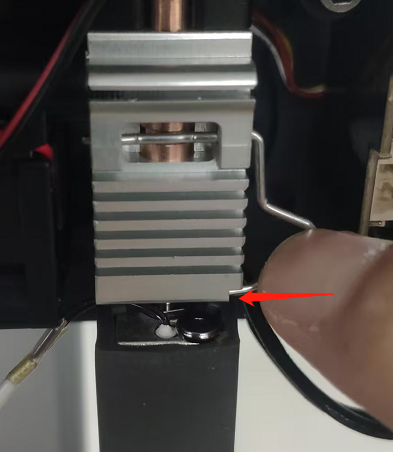
Step 2: Lock the print head with the buckle
Step 3: Plug in the fan and LED harness

Step 4: Install the print head housing
Step 5: Auto-Leveling
Reinstall the print head and Auto-Leveling it.
Click “Tools” – “Control” – “Auto-Leveling”.
5. Infeed and Outfeed Blockage Detection Operation Video
6. The device cannot connect to the network
Please click “Settings” – “Cloud” to check whether CN code exists on the cloud platform interface.
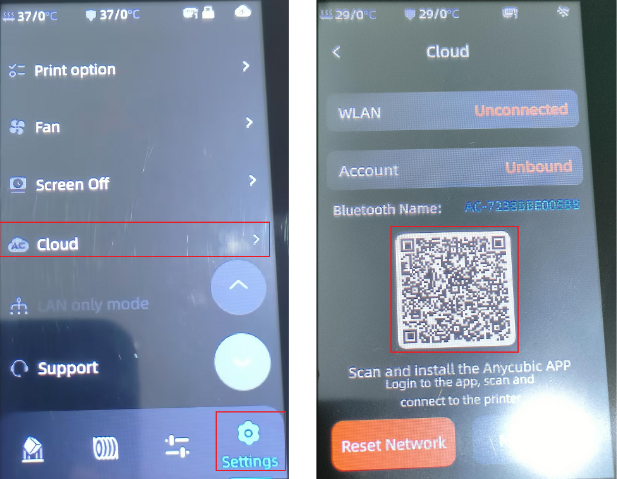
If the CN code is not displayed on the page, contact the store where you purchased the device. Please explain the situation in detail and provide a picture of the cloud platform interface, and professional technicians will help solve the problem.
2. Check whether the cloud platform identifier in the upper right corner is connected
If the anycubic kobra 3 has been bound to the APP or slicing software, but the device is displayed offline, it is generally a device network problem and the device is not connected to the AC cloud server. Turn on your mobile phone to connect to the device, and check whether the cloud platform identifier in the upper right corner is connected.
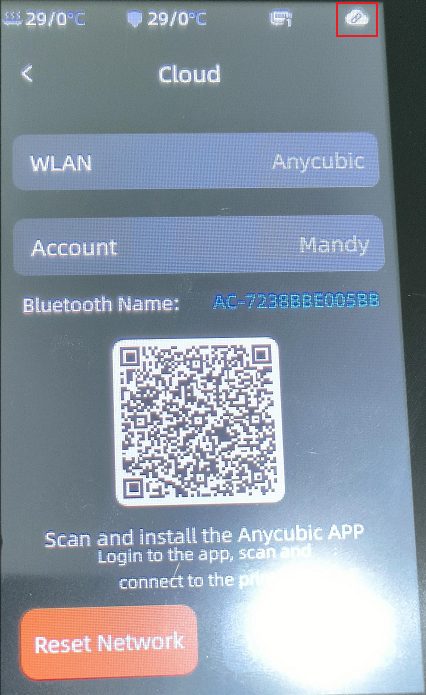
2-1. When Connected:
If the cloud platform indicates that the network is connected, the network access in the home is restricted by the carrier. You need to contact the carrier to remove the restriction.

2-2. When Not Connected:
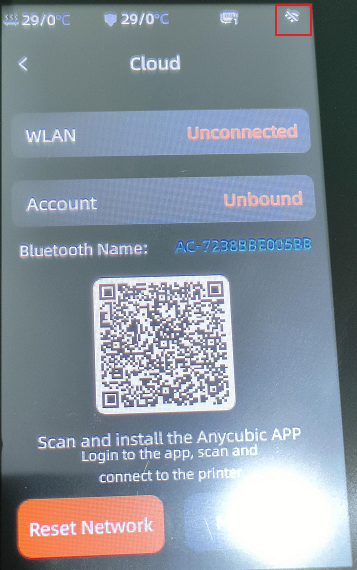
If the cloud platform identifier is not connected, the printer is not connected to the cloud platform. Please use the telnet tool on the PC to check whether the network connection to the AC server is normal. The telnet tool command is telnet mqtt-universe.anycubic.com 8883
(1) If the telnet test fails, check whether the local firewall has restrictions. If the firewall has restrictions, release the firewall rules. If the firewall does not restrict network access, check whether the local carrier restricts network access and contact the local carrier.
(2) If the telnet test is normal but the device cannot connect to the cloud platform, perform the following steps to rectify the fault.
Step 1: Check WiFi Signal Strength
Use a device like a phone to check the nearby WiFi network list, ensuring that you can find and connect to your desired WiFi. If not, try the following possibilities:
① Manual WiFi hiding: If you manually hide your WiFi network, this could be one of the reasons for not being able to find it.
② Device too far: Make sure your device is close enough to the WiFi signal source to find and connect.
Step 2: Confirm WiFi Frequency and Channel
The anycubic kobra 3 only supports the 2.4GHz WiFi frequency. If the router only opens the 5GHz channel WiFi, it will result in a connection failure.
Confirm in the router settings whether the 2.4GHz frequency is also enabled.
Step 3: Verify WiFi Account and Password
Ensure that the entered WiFi account (SSID) and password are correct. Possible issues include case sensitivity errors, special character errors, etc.
Step 4: Check for Router Anomalies
If other products can connect to the same router normally, it might be an anomaly in the router causing the current device not to join.
You can try restarting the router or contacting the router manufacturer for further support.
2-3. When Already Connected, but unstable or disconnected, unable to connect to the network again:
Step 1: Check WiFi Antenna Contact
Ensure that the device’s WiFi antenna is well-connected. Check if the antenna is loose or broken and ensure proper antenna contact. Poor antenna contact may sometimes be related to unstable connections.
Step 2: Check the Stability of the Home Network
It could be an issue with the home network itself causing instability. Please check if other devices also experience similar issues. If so, try optimizing the home network, which may involve restarting the router or contacting the internet service provider for a resolution.
